Moving from External Load Balancer to Cloud-Native Architecture
The Challenge
In on-premise Kubernetes deployments, achieving high availability for ingress traffic often relies on external load balancers running on dedicated VMs. While functional, this approach creates single points of failure, adds operational complexity, and wastes valuable infrastructure resources.
In this guide, I’ll walk you through migrating from an external Envoy load balancer to a fully integrated, Kubernetes-native solution using DaemonSet deployments, Keepalived for VIP management, and host networking for optimal performance.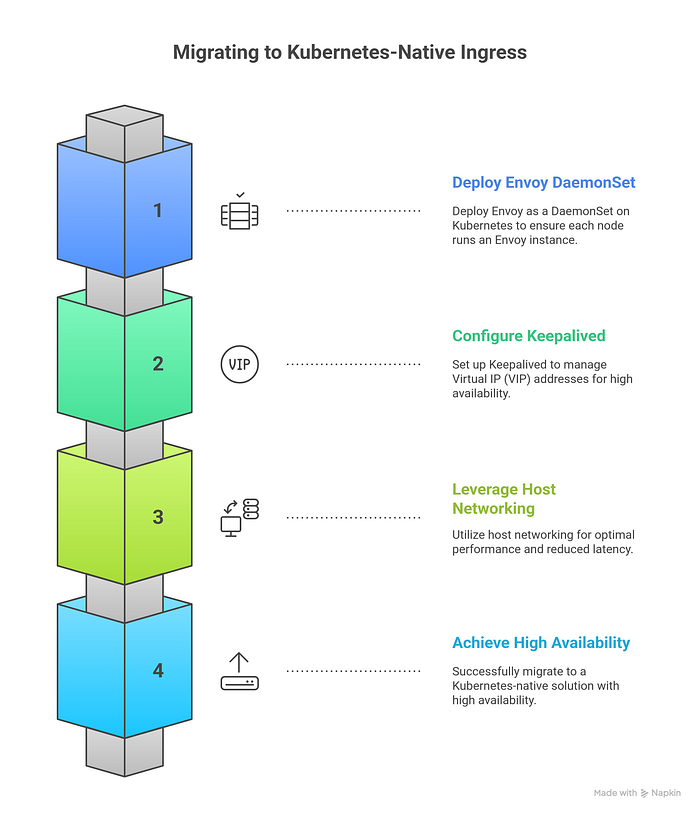
Architecture Overview
Before: External VM Architecture
Internet → External VM (Envoy) → Kong Gateway → Applications
(192.168.10.100)
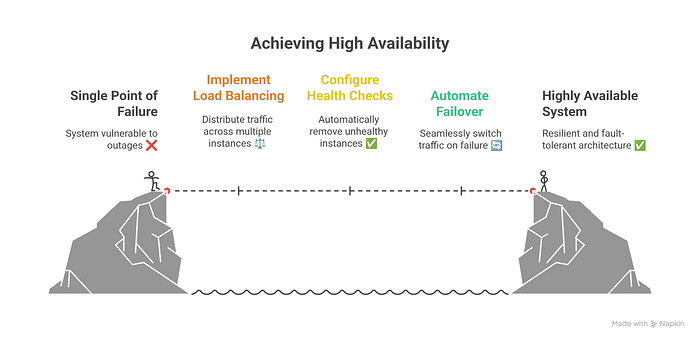
Single Point of Failure ❌
After: Cloud-Native Architecture
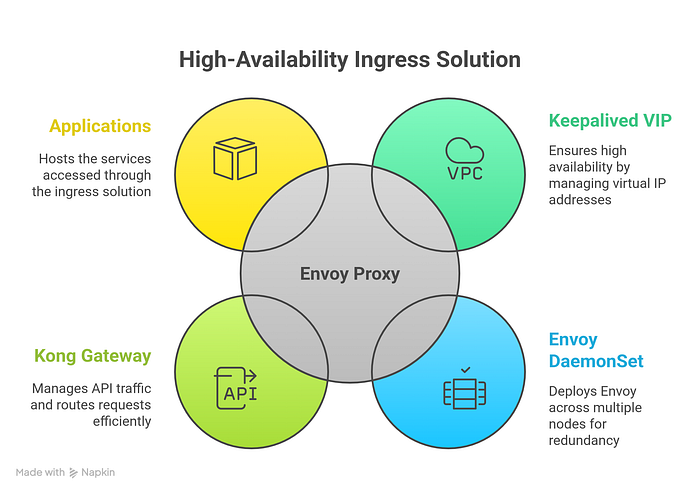
Internet → Keepalived VIP → Envoy DaemonSet → Kong Gateway → Applications
         (192.168.10.200)      (5+ nodes)
         Highly Available ✅
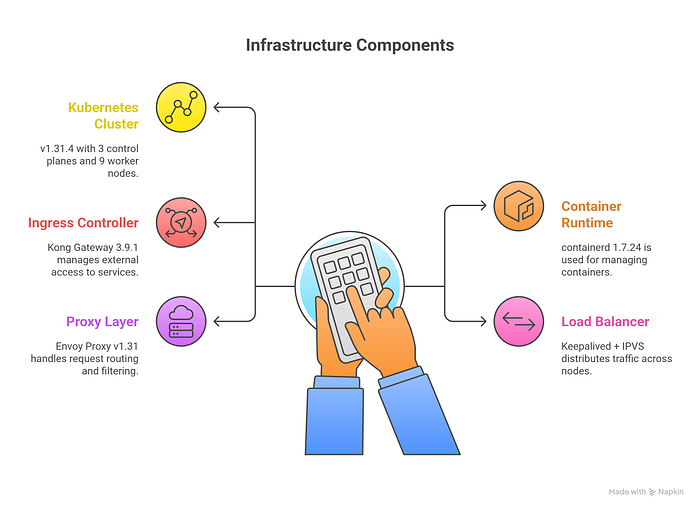
Our Infrastructure
- Kubernetes Cluster: v1.31.4 with 3 control planes and 9 worker nodes
- Container Runtime: containerd 1.7.24
- Ingress Controller: Kong Gateway 3.9.1
- Load Balancer: Keepalived + IPVS
- Proxy Layer: Envoy Proxy v1.31
Step 1: Deploy Envoy as DaemonSet
The first step is deploying Envoy on all worker nodes using a DaemonSet with host networking enabled. This ensures every worker node can receive traffic directly.
ConfigMap for Envoy Configuration
apiVersion: v1
kind: ConfigMap
metadata:
  name: envoy-config
  namespace: envoy-system
data:
  envoy.yaml: |
    static_resources:
      listeners:
      - name: listener_http
        address:
          socket_address:
            address: 0.0.0.0
            port_value: 80
        filter_chains:
        - filters:
          - name: envoy.filters.network.tcp_proxy
            typed_config:
              "@type": type.googleapis.com/envoy.extensions.filters.network.tcp_proxy.v3.TcpProxy
              stat_prefix: tcp_http
              cluster: cluster_http
      - name: listener_https
        address:
          socket_address:
            address: 0.0.0.0
            port_value: 443
        filter_chains:
        - filters:
          - name: envoy.filters.network.tcp_proxy
            typed_config:
              "@type": type.googleapis.com/envoy.extensions.filters.network.tcp_proxy.v3.TcpProxy
              stat_prefix: tcp_https
              cluster: cluster_https      clusters:
      - name: cluster_http
        connect_timeout: 1s
        type: strict_dns
        lb_policy: round_robin
        load_assignment:
          cluster_name: cluster_http
          endpoints:
          - lb_endpoints:
            - endpoint:
                address:
                  socket_address:
                    address: kong-gateway-proxy.kong.svc.cluster.local
                    port_value: 80      - name: cluster_https
        connect_timeout: 1s
        type: strict_dns
        lb_policy: round_robin
        load_assignment:
          cluster_name: cluster_https
          endpoints:
          - lb_endpoints:
            - endpoint:
                address:
                  socket_address:
                    address: kong-gateway-proxy.kong.svc.cluster.local
                    port_value: 443    admin:
      access_log_path: /dev/null
      address:
        socket_address:
          address: 0.0.0.0
          port_value: 9901
DaemonSet Configuration
apiVersion: apps/v1
kind: DaemonSet
metadata:
  name: envoy-proxy
  namespace: envoy-system
  labels:
    app: envoy-proxy
spec:
  selector:
    matchLabels:
      app: envoy-proxy
  updateStrategy:
    type: RollingUpdate
    rollingUpdate:
      maxUnavailable: 1
  template:
    metadata:
      labels:
        app: envoy-proxy
      annotations:
        prometheus.io/scrape: "true"
        prometheus.io/port: "9901"
        prometheus.io/path: "/stats/prometheus"
    spec:
      hostNetwork: true
      dnsPolicy: ClusterFirstWithHostNet
      nodeSelector:
        node-role.kubernetes.io/worker: ""
      tolerations:
      - key: node-role.kubernetes.io/control-plane
        operator: Exists
        effect: NoSchedule
      containers:
      - name: envoy
        image: envoyproxy/envoy:v1.31-latest
        securityContext:
          capabilities:
            add:
            - NET_BIND_SERVICE
          runAsUser: 0
        ports:
        - containerPort: 80
          hostPort: 80
          name: http
        - containerPort: 443
          hostPort: 443
          name: https
        - containerPort: 9901
          hostPort: 9901
          name: admin
        volumeMounts:
        - name: envoy-config
          mountPath: /etc/envoy
          readOnly: true
        resources:
          requests:
            cpu: 100m
            memory: 128Mi
          limits:
            cpu: 500m
            memory: 256Mi
        livenessProbe:
          httpGet:
            path: /ready
            port: 9901
          initialDelaySeconds: 15
          periodSeconds: 10
        readinessProbe:
          httpGet:
            path: /ready
            port: 9901
          initialDelaySeconds: 5
          periodSeconds: 5
      volumes:
      - name: envoy-config
        configMap:
          name: envoy-config
Deploy the configuration:
kubectl create namespace envoy-system
kubectl apply -f envoy-config.yaml
kubectl apply -f envoy-daemonset.yaml
Verify deployment:
kubectl get pods -n envoy-system -o wide
You should see one Envoy pod running on each worker node.
Step 2: Configure Keepalived for High Availability
Keepalived provides a Virtual IP (VIP) that floats between nodes, ensuring traffic always reaches a healthy endpoint.
Install Keepalived on Worker Nodes
On the primary node (worker2):
sudo apt update
sudo apt install keepalived ipvsadm -y
Configure Keepalived (Primary Node)
Create /etc/keepalived/keepalived.conf:
global_defs {
    router_id LVS_WORKER2
}
vrrp_instance VI_1 {
    state MASTER
    interface ens18
    virtual_router_id 51
    priority 100
    advert_int 1

    authentication {
        auth_type PASS
        auth_pass secret_pass
    }

    virtual_ipaddress {
        192.168.10.200/24
    }
}virtual_server 192.168.10.200 80 {
    delay_loop 6
    lb_algo rr
    lb_kind NAT
    protocol TCP

    real_server 192.168.0.0 80 {
        weight 1
        HTTP_GET {
            url {
                path /
                status_code 200 302 404
            }
            connect_timeout 3
        }
    }

    real_server 192.168.0.1 80 {
        weight 1
        HTTP_GET {
            url {
                path /
                status_code 200 302 404
            }
            connect_timeout 3
        }
    }

    # Add more worker nodes as needed
}virtual_server 192.168.10.200 443 {
    delay_loop 6
    lb_algo rr
    lb_kind NAT
    protocol TCP

    real_server 192.168.0.0 443 {
        weight 1
        TCP_CHECK {
            connect_timeout 3
        }
    }

    real_server 192.168.0.1 443 {
        weight 1
        TCP_CHECK {
            connect_timeout 3
        }
    }

    # Add more worker nodes as needed
}
Configure Backup Nodes
On backup nodes (worker3, worker4, etc.), use the same configuration but change:
vrrp_instance VI_1 {
    state BACKUP      # Changed from MASTER
    priority 90       # Lower than master (80, 70, 60 for others)
    # ... rest same
}
Enable IP Forwarding
On all Keepalived nodes:
sudo sysctl -w net.ipv4.ip_forward=1
sudo sysctl -w net.ipv4.vs.conntrack=1
echo "net.ipv4.ip_forward = 1" | sudo tee -a /etc/sysctl.conf
echo "net.ipv4.vs.conntrack = 1" | sudo tee -a /etc/sysctl.conf
sudo sysctl -p
Start Keepalived
sudo systemctl enable keepalived
sudo systemctl start keepalived
sudo systemctl status keepalived
Verify VIP and Load Balancing
# Check VIP is active
ip addr show | grep 192.168.10.200
# Verify IPVS configuration
sudo ipvsadm -L -n# Test load balancing
for i in {1..10}; do
  curl -s http://192.168.10.200 | head -1
done
Step 3: DNS Configuration
Update your DNS to point to the VIP:
For Cloudflare:
Type: A
Name: *.opstree.dev
Content: 192.168.10.200
Proxy status: DNS only (Grey cloud - Important!)
TTL: 300
For internal DNS:
# Add to your DNS server
monitoring.k8s.opstree.dev.  IN  A  192.168.10.200
n8n.opstree.dev.             IN  A  192.168.10.200
Step 4: Testing and Verification
Test HTTP and HTTPS
# Test VIP directly
curl http://192.168.10.200
curl -k https://192.168.10.200
# Test with domain
curl http://monitoring.k8s.opstree.dev
curl -k https://monitoring.k8s.opstree.dev
Monitor Traffic Distribution
# Watch IPVS statistics
watch -n 2 'sudo ipvsadm -L -n --stats'
# Check Envoy metrics
curl http://192.168.0.0:9901/stats# Monitor Envoy logs
kubectl logs -n envoy-system -l app=envoy-proxy -f
Test Failover
# Delete a pod to test failover
kubectl delete pod -n envoy-system envoy-proxy-xxxxx
# Traffic should continue without interruption
while true; do curl -s http://192.168.10.200; sleep 1; done
Step 5: Cleanup External VM
Once everything is verified working:
# SSH to external VM
ssh user@192.168.10.100
# Stop Envoy
sudo systemctl stop envoy
sudo systemctl disable envoy# Backup configuration
sudo tar -czf /root/envoy-backup-$(date +%Y%m%d).tar.gz /etc/envoy/# The VM is now free for other workloads
Are you looking Enterprise Data Engineering Company.
Benefits Achieved
Performance Improvements:
- Eliminated extra network hop through external VM
- Direct connection from worker nodes reduces latency
- DNS-based service discovery simplifies configuration
High Availability:
- No single point of failure
- Automatic VIP failover with Keepalived
- Health checks ensure traffic only reaches healthy endpoints
- Pod auto-healing through Kubernetes
Operational Excellence:
- Simplified management through kubectl
- GitOps-friendly configuration
- Prometheus metrics integration ready
- Scales automatically with worker node additions
Resource Optimization:
- External VM freed for other workloads
- Better resource utilization across cluster
- Reduced infrastructure costs
Monitoring and Observability
Envoy Admin Interface
Access Envoy’s built-in admin interface:
kubectl port-forward -n envoy-system daemonset/envoy-proxy 9901:9901
Visit http://localhost:9901 for:
- Real-time stats
- Configuration dump
- Health checks
- Cluster status
Prometheus Integration
The DaemonSet is already configured with Prometheus annotations. Create a ServiceMonitor:
apiVersion: monitoring.coreos.com/v1
kind: ServiceMonitor
metadata:
  name: envoy-proxy
  namespace: envoy-system
spec:
  selector:
    matchLabels:
      app: envoy-proxy
  endpoints:
  - port: admin
    path: /stats/prometheus
Key Metrics to Monitor
envoy_cluster_upstream_rq_total: Total requests to upstreamenvoy_cluster_upstream_rq_time: Request latencyenvoy_cluster_upstream_cx_active: Active connectionsenvoy_cluster_health_check_success: Health check status
Troubleshooting Common Issues
Pods Not Starting
# Check for port conflicts
ssh worker-node
sudo netstat -tulpn | grep -E ':80|:443'
# Stop conflicting services
sudo systemctl stop nginx apache2
HTTPS Not Working
# Verify Kong service name
kubectl get svc -n kong kong-gateway-proxy
# Test Kong HTTPS directly
curl -k https://kong-gateway-proxy.kong.svc.cluster.local# Check Envoy cluster health
curl http://worker-ip:9901/clusters | grep cluster_https
VIP Not Accessible
# Check Keepalived status
sudo systemctl status keepalived
# Verify IPVS rules
sudo ipvsadm -L -n# Check authentication matches on all nodes
sudo journalctl -u keepalived | grep authentication
Best Practices
Security:
- Use network policies to restrict access to Envoy admin interface
- Implement proper TLS certificates (Let’s Encrypt or internal CA)
- Regular security updates for Envoy image
Performance:
- Tune Envoy buffer sizes for your workload
- Monitor connection pool settings
- Adjust worker threads based on CPU cores
High Availability:
- Deploy Keepalived on at least 3 nodes
- Use different priority values for proper failover order
- Monitor VIP location and failover events
Scaling:
- DaemonSet automatically scales with new worker nodes
- Update Keepalived config when adding nodes
- Test failover scenarios regularly
Conclusion
Migrating from an external load balancer to a Kubernetes-native Envoy solution provides significant benefits in reliability, performance, and operational simplicity. By leveraging DaemonSets for deployment and Keepalived for VIP management, we achieved a highly available ingress architecture without external dependencies.
The solution is production-ready, scales horizontally, and integrates seamlessly with existing Kubernetes tooling. Most importantly, it frees up infrastructure resources while improving overall system reliability.