
Kubernetes is powerful, scalable, and production-ready – but troubleshooting Kubernetes issues is often painful and time-consuming.
A Pod suddenly enters CrashLoopBackOff, an image fails to pull, or a Deployment silently refuses to become ready. Engineers typically spend hours checking logs, events, YAML manifests, and running multiple kubectl commands just to understand what went wrong.
Now imagine asking AI:
“Why is my Kubernetes Pod failing?”
And within seconds, you get:
- The reason behind the failure
- The possible root cause
- Recommended solutions to fix it
That’s exactly what K8sGPT does.
K8sGPT is an AI-powered Kubernetes troubleshooting tool that analyzes your cluster and explains issues in simple, human-readable language. Instead of manually interpreting cryptic Kubernetes errors, K8sGPT acts as an AI assistant for your cluster.
In this blog, we will set up K8sGPT as a CLI tool to manually analyze and troubleshoot Kubernetes issues directly from the terminal. This approach is lightweight, simple, and perfect for learning and experimentation.
In the next part, we will explore K8sGPT as a Kubernetes Operator, where it runs continuously inside the cluster and automatically monitors resources for issues. Unlike the CLI approach, the Operator model is better suited for production environments because it enables automated, cluster-wide analysis without manually running commands every time.
Table of Contents
What is K8sGPT?
K8sGPT is an open-source project that uses Large Language Models (LLMs) to analyze Kubernetes clusters and explain issues and possible solutions in simple English.
It helps answer questions such as:
- Why is my Pod in CrashLoopBackOff?
- Why is my Service not reachable?
- Why is my Deployment not scaling?
- Why is my Ingress not routing traffic?
Instead of manually debugging low-level Kubernetes errors, K8sGPT converts them into understandable explanations with suggested fixes.
Benefits of Using K8sGPT
- Reduced troubleshooting time
- Better understanding of Kubernetes issues
- Lower operational overhead
- Improved privacy with local AI models
- Faster onboarding for junior engineers
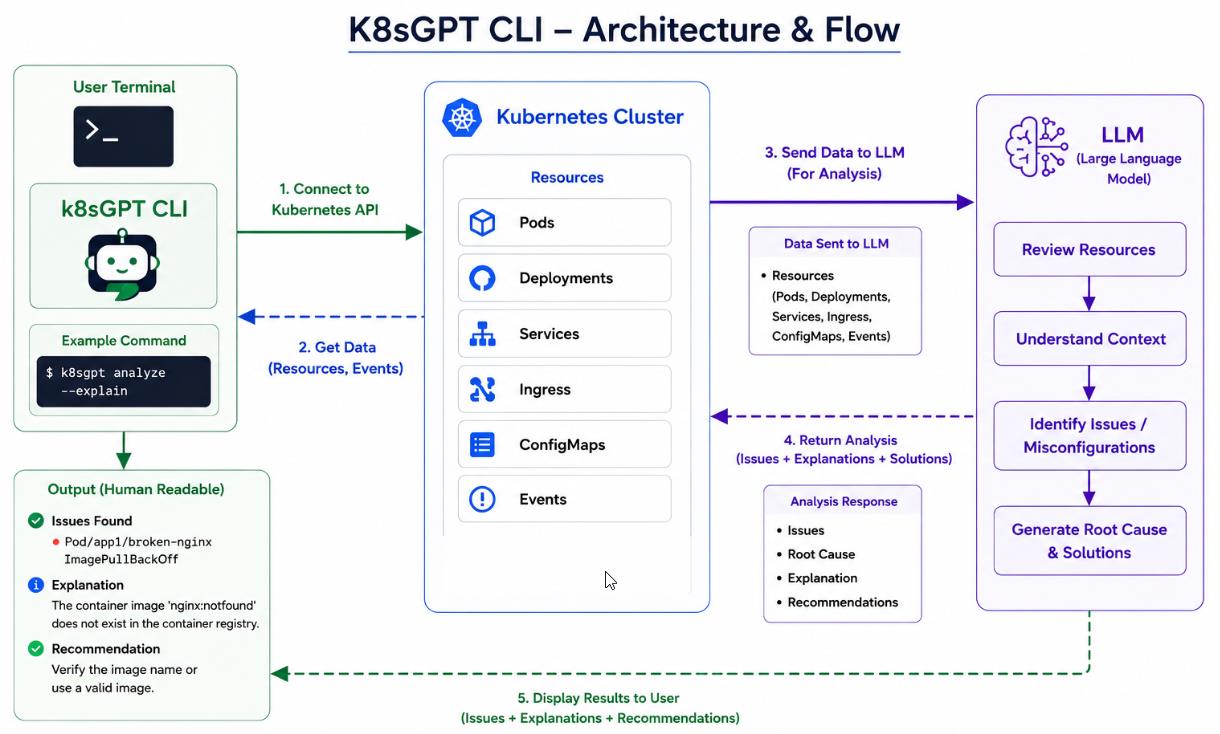
How K8sGPT Works
At a high level, K8sGPT works in three simple steps.
1. Scan the Cluster
K8sGPT inspects Kubernetes resources such as:
- Pods
- Deployments
- Services
- Events
- ConfigMaps
- Ingress resources
2. Analyze with AI
The collected cluster information is sent to an AI backend for analysis.
In this blog, the AI backend is:
- Ollama :- is a free, open-source tool that allows you to easily download, set up, and run large language models (LLMs) entirely on your own computer
- TinyLlama:- This is an LLM.
3. Generate Insights
K8sGPT returns:
- Human-readable explanations
- Possible root causes
- Recommended fixes
This significantly reduces troubleshooting time and helps engineers understand Kubernetes’ issues much faster.
Architecture Flow
The overall architecture looks like this:
- Deploy Ollama inside the Kubernetes cluster
- Run the TinyLlama model inside the Ollama Pod
- Install K8sGPT on your local machine or EC2 instance
- Connect K8sGPT to the local Ollama AI backend
- Analyze Kubernetes issues using AI
What K8sGPT CAN Do
- Scan your cluster for common problems
- Detect configuration mistakes
- Inspect events, crashes, and resource issues
- Explain Kubernetes errors in simple English
- Suggest possible solutions
- Reduce debugging time drastically
What K8sGPT CANNOT Do (By Default)
- It does not automatically fix problems
- It should not make production changes on its own
- It cannot understand your business logic completely
- It cannot repair bugs inside application code
- It cannot replace human review and approval processes
NOTE: K8sGPT should be treated as an intelligent troubleshooting assistant, not a replacement for engineering decisions.
What We Are Building
We’ll build a complete local AI-powered Kubernetes troubleshooting environment using:
- Minikube
- Docker
- Ollama
- K8sGPT
- TinyLlama
NOTE: You can use your Kubernetes cluster instead of Minikube. I am using Minikube here simply to demonstrate how everything works in a local environment.
I am also using TinyLlama because my system has limited resources. If your machine has better CPU/RAM/GPU capacity, you can use larger models such as llama3 for better response quality and accuracy.
Why Use Local AI Instead of Cloud AI?
In this setup, the AI model runs completely locally instead of using cloud providers such as OpenAI.
The Best Part?
- Everything runs locally
- No OpenAI API key required
- No external cloud dependency
- Completely free and privacy-friendly
This is especially useful for organizations that do not want to expose Kubernetes metadata, infrastructure details, or operational logs to third-party AI services.
NOTE: If you are setting this up in your pre-production or existing Kubernetes infrastructure and not for local testing using Minikube, then you can skip Step 1 – Step 4 and directly start from Step 5.
Step 1: Install Minikube
Minikube allows us to run Kubernetes locally.
We can use below official documentation to install and setup minikube
https://minikube.sigs.k8s.io/docs/start/
Step 2 : Install kubectl
kubectl is the Kubernetes command-line tool used to interact with clusters.
We can use the below official documentation to install kubectl.
https://kubernetes.io/docs/tasks/tools/install-kubectl-linux/
Step 3 : Install Docker
Docker is required as the container runtime for Minikube.
We can follow the below official documentation to install Docker Engine.
https://docs.docker.com/engine/install/ubuntu/
Step 4: Start the Kubernetes Cluster
Start Minikube
minikube start --cpus=4 --memory=8192
Verify the Cluster
kubectl get nodes
Expected Output:
NAME       STATUS   ROLES           AGE   VERSION
minikube   Ready    control-plane   2m    v1.xx.x
Your local Kubernetes cluster is now ready.
Step 5 : Deploy Ollama in Kubernetes
Now we’ll deploy Ollama inside Kubernetes.
Create a file called: ollama.yaml
And add the below manifest to the file:
apiVersion: v1
kind: Namespace
metadata:
  name: ollama

---
apiVersion: v1
kind: PersistentVolumeClaim
metadata:
  name: ollama-storage
  namespace: ollama

spec:
  accessModes:
    - ReadWriteOnce
  resources:
    requests:
      storage: 8Gi

---
apiVersion: apps/v1
kind: Deployment
metadata:
  name: ollama
  namespace: ollama

spec:
  replicas: 1

  selector:
    matchLabels:
      app: ollama

  template:
    metadata:
      labels:
        app: ollama

    spec:
      containers:
        - name: ollama
          image: ollama/ollama:latest

          imagePullPolicy: IfNotPresent

          ports:
            - containerPort: 11434

          env:
            - name: OLLAMA_KEEP_ALIVE
              value: "30m"

          resources:
            requests:
              memory: "1Gi"
              cpu: "500m"

            limits:
              memory: "2Gi"
              cpu: "1"

          volumeMounts:
            - name: ollama-storage
              mountPath: /root/.ollama

          startupProbe:
            tcpSocket:
              port: 11434
            failureThreshold: 30
            periodSeconds: 10

          readinessProbe:
            tcpSocket:
              port: 11434
            initialDelaySeconds: 5
            periodSeconds: 10

          livenessProbe:
            tcpSocket:
              port: 11434
            initialDelaySeconds: 30
            periodSeconds: 20

      volumes:
        - name: ollama-storage
          persistentVolumeClaim:
            claimName: ollama-storage

---
apiVersion: v1
kind: Service
metadata:
  name: ollama
  namespace: ollama

spec:
  type: ClusterIP

  selector:
    app: ollama

  ports:
    - port: 11434
      targetPort: 11434
Deploy the Resources
kubectl apply -f ollama.yaml
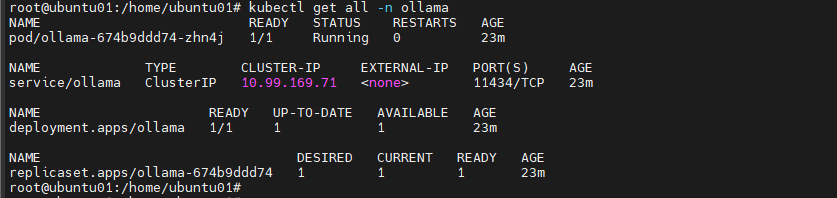
Verify Deployment:
kubectl get all -n ollama
Step 6 : Download the TinyLlama Model
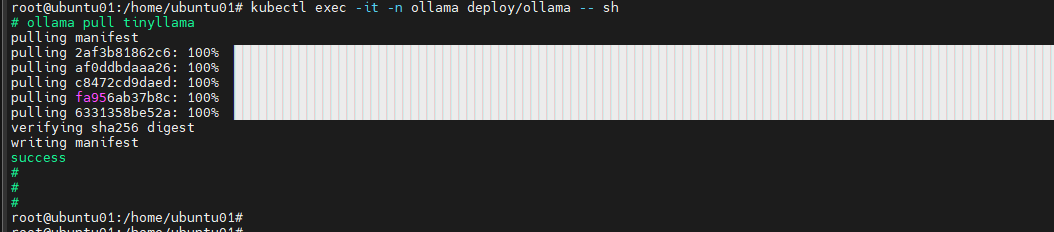
Access the Ollama container:
kubectl exec -it -n ollama deploy/ollama -- sh
Pull the TinyLlama model:
ollama pull tinyllama
Exit the container:
exit
Step 7 — Expose Ollama Locally
Run port forwarding:
kubectl port-forward -n ollama svc/ollama 11434:11434
11434:11434 → This is Ollama’s default port.
Ollama is now accessible at:
http://localhost:11434
Keep this terminal running.
NOTE: Before moving to Step 8, install K8sGPT on the machine from where you run kubectl commands and access your Kubernetes cluster.
Step 8 : Install K8sGPT
K8sGPT uses your local kubeconfig context to analyze Kubernetes resources,
events, Pods, Deployments, Services, and other cluster components.
Download K8sGPT:
curl -LO https://github.com/k8sgpt-ai/k8sgpt/releases/download/v0.4.32/k8sgpt_amd64.deb
Install it:
sudo dpkg -i k8sgpt_amd64.deb
Verify installation:
k8sgpt version
Step 9 : Connect K8sGPT with Ollama
Configure K8sGPT to use the local AI model.
k8sgpt auth add \
  --backend ollama \
  --baseurl http://localhost:11434 \
  --model tinyllama

Step 10 — Set Ollama as the Default Backend
k8sgpt auth default -p ollama
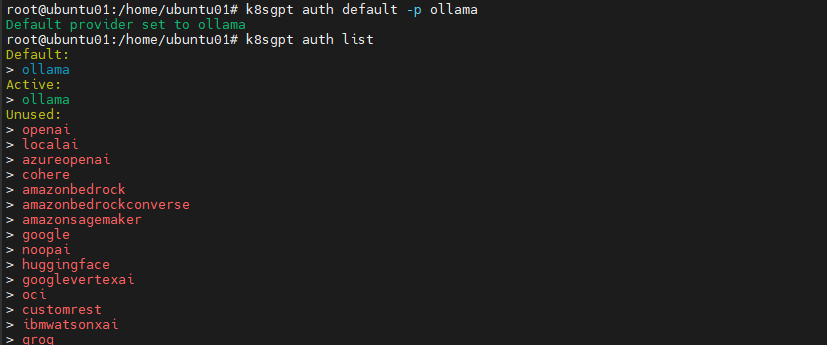
Check configured providers:
k8sgpt auth list
Step 11 : Analyze Kubernetes Issues
Now let AI analyze your Kubernetes cluster.
Analyze the Entire Cluster:
k8sgpt analyze
Get AI-Generated Explanations:
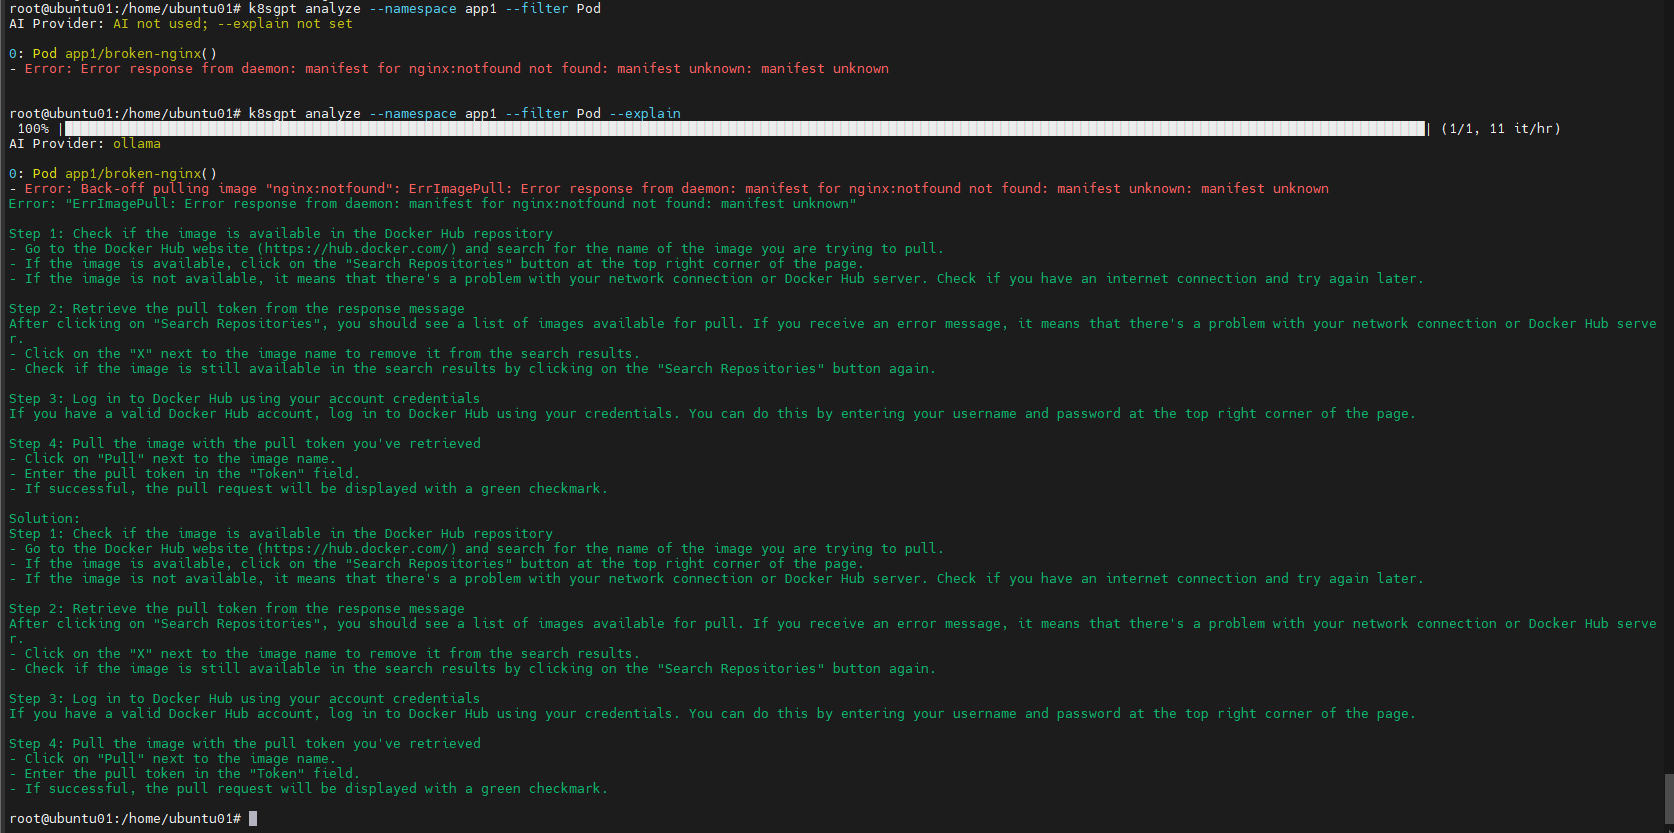
k8sgpt analyze --explain
Analyze Only Pods:
k8sgpt analyze --filter Pod
Analyze a Specific Namespace:
k8sgpt analyze --namespace app1 --explain
Export Results as JSON:
k8sgpt analyze -o json > report.json
Analyze Pods with AI Explanations:
k8sgpt analyze \
  --namespace app1 \
  --filter Pod \
  --explain
Analyze with Anonymization:
k8sgpt analyze --explain -b ollama --anonymize
Step 12 : Create a Broken Pod for Testing
Now let’s intentionally deploy a broken Pod and allow K8sGPT to diagnose the issue.
Create a Namespace:
kubectl create namespace app1
Create broken.yaml:
apiVersion: v1

kind: Pod

metadata:
  name: broken-nginx
  namespace: app1

spec:
  containers:
    - name: nginx
      image: nginx:notfound
Deploy the Broken Pod:
kubectl apply -f broken.yaml
Check Pod Status:
kubectl get pods -n app1
You’ll notice errors such as:
ErrImagePull

ImagePullBackOff
Ask K8sGPT to Explain the Issue:
k8sgpt analyze --namespace app1 --filter Pod --explain
Instead of showing raw Kubernetes errors, K8sGPT provides a clear explanation in plain English.
This is extremely useful for both beginners and experienced Kubernetes engineers.
Understanding the –anonymize Flag
When using external AI providers such as OpenAI with K8sGPT, many organizations worry about exposing sensitive Kubernetes information like:
- Namespace names
- Service names
- Internal URLs
- Infrastructure details
This is where the --anonymize flag becomes very important.
Run:
k8sgpt analyze --explain --anonymize
K8sGPT masks sensitive cluster information before sending the data to the AI provider.
The AI only receives masked resource details instead of the original values.
After the analysis is completed, K8sGPT maps the response back locally so the user still receives meaningful explanations related to their actual Kubernetes resources.
This allows teams to use AI-powered troubleshooting while significantly reducing privacy and security risks associated with sharing production cluster data with external AI platforms.
Final Thoughts
K8sGPT is one of the most practical AI tools currently available for Kubernetes operations.
By combining:
- Kubernetes
- Ollama
- Local LLMs
- AI-powered analysis
you can dramatically simplify Kubernetes troubleshooting without depending on external cloud AI providers.
In the next part, we’ll explore running K8sGPT as a Kubernetes Operator for continuous cluster monitoring and automated AI-powered diagnostics.
Related Searces
- Flagd on Kubernetes: Complete Production Guide to Architecture, Implementation and Troubleshooting\
- Kubernetes Events Monitoring using Open Telemetry And Loki
- A Complete Traffic Flow Guide to Using Kong Gateway in Kubernetes