

Objective of This SOP
By following this SOP, you will create a basic action-oriented AI workflow using Amazon Nova Act that:
- Reads CPU usage
- Checks a condition (CPU > 80%)
- Executes an action using AWS Lambda
- Returns a result
This is the foundation of Nova Act–style AI.
Prerequisites
Before starting, ensure you have:
- An AWS account
- Access to AWS Console
- Region set to us-east-1
- Create the EC2 instance and use this instance id for lambda
- Basic familiarity with AWS navigation
STEP 1: Log in to AWS Console
- Open browser
- Go to: https://console.aws.amazon.com
- Log in with your AWS credentials
- Set region (top-right) to us-east-1
STEP 2: Enable Amazon Bedrock (AI Intelligence)
Purpose:
This provides the “thinking capability” for the AI.
Steps:
- In AWS search bar, type Bedrock
- Open Amazon Bedrock
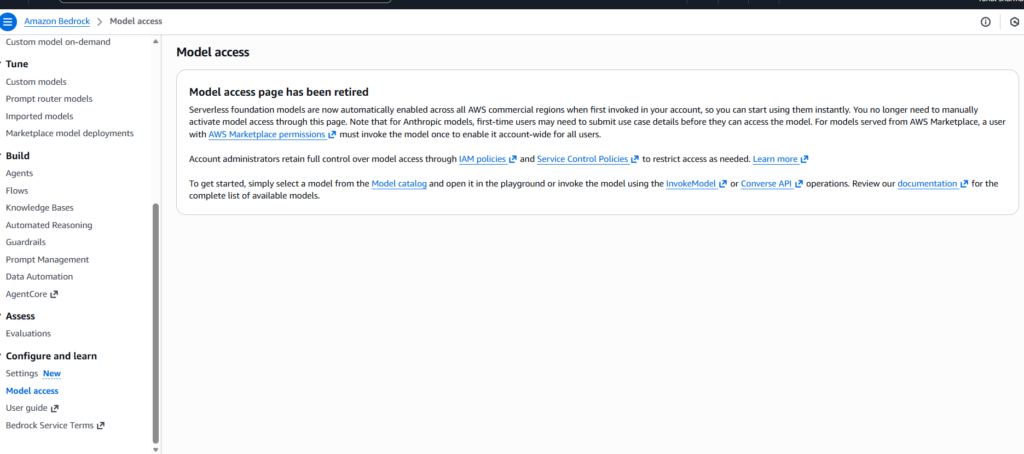
- From left menu, click Model access
- Auto Enable:
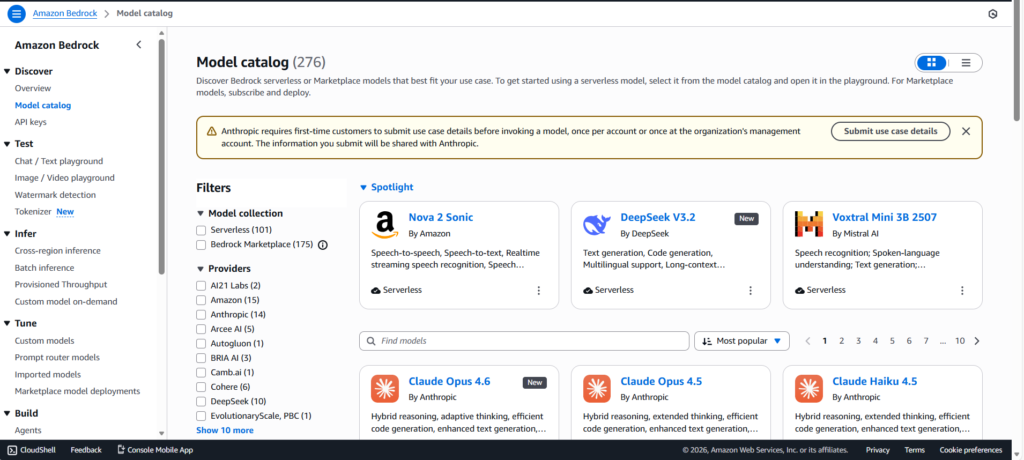
5. Go from left menu, click Model Catalog
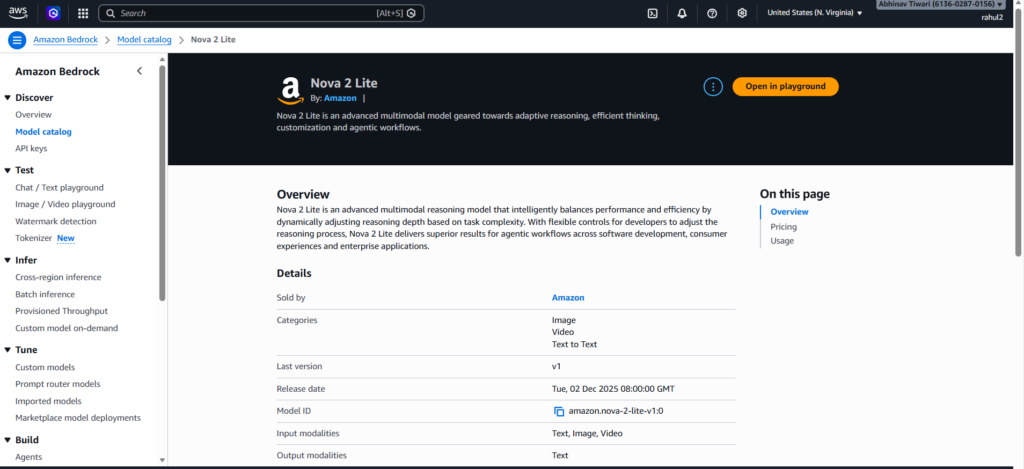
6. Click on Nova 2 Lite
Click on the yellow button: Open in Playground
7. Type the message “hello” to test whether Nova 2 Lite is working or not.
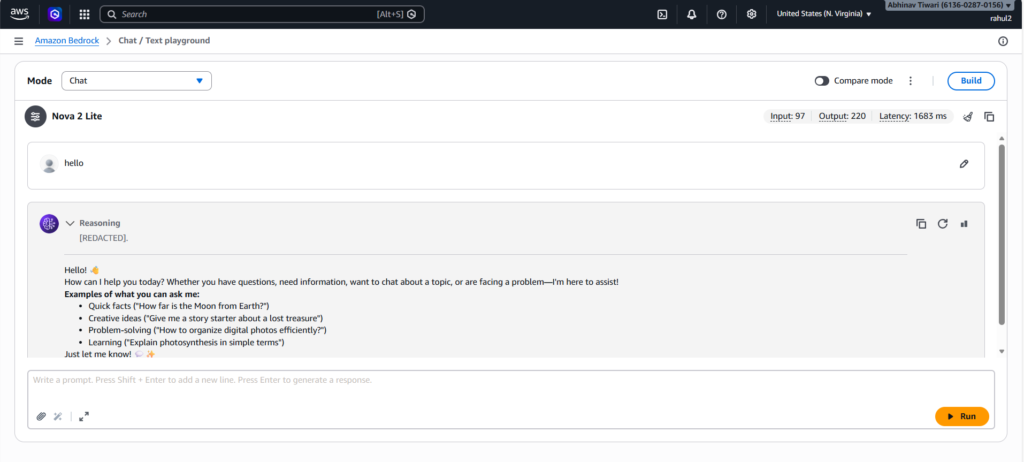
It’s Working.
STEP 3: Create IAM Role (Permissions for Actions)
Purpose:
Nova Act and lambda requires permission to interact with AWS services.
1. Search for IAM
2. Click Roles → Create role
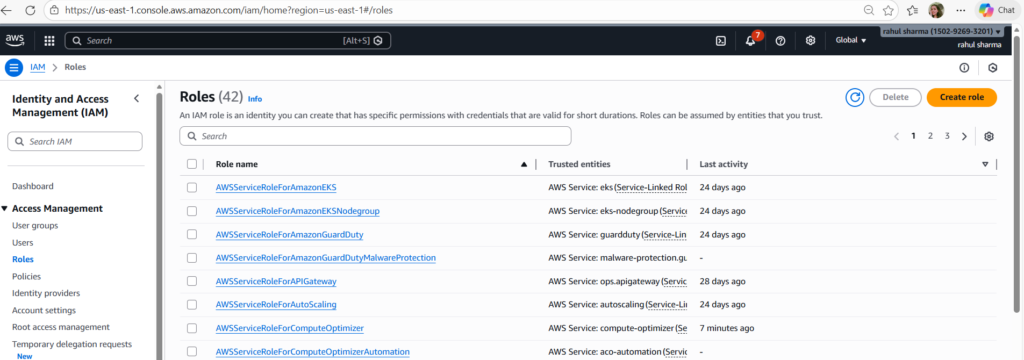
3. Select:
- Trusted entity: AWS service
- Use case: Lambda
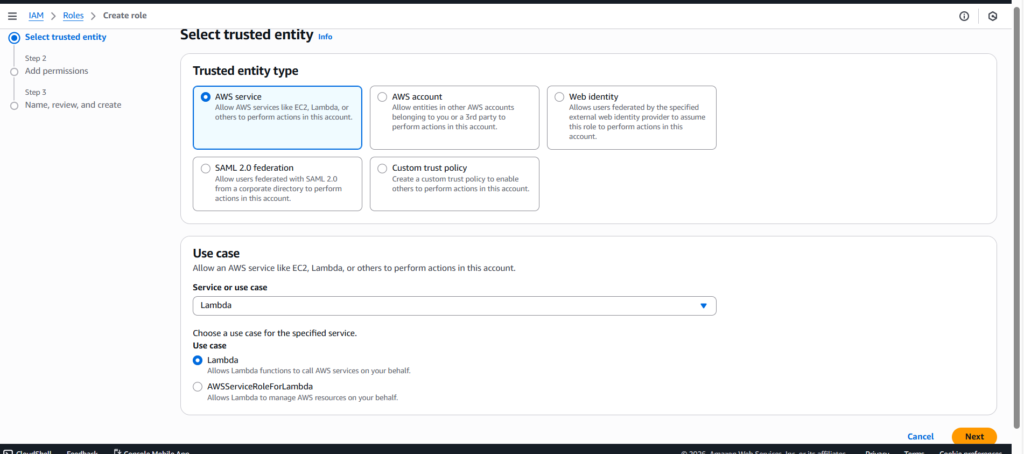
4. Click Next
Add Permissions:
AWSLambdaBasicExecutionRoleCloudWatchReadOnlyAccess- cloudwatch+ec2
{
  "Version": "2012-10-17",
  "Statement": [
    {
      "Effect": "Allow",
      "Action": [
        "cloudwatch:GetMetricData",
        "cloudwatch:GetMetricStatistics",
        "cloudwatch:ListMetrics",
        "ec2:DescribeInstances",
        "ec2:RebootInstances"
      ],
      "Resource": "*"
    }
  ]
}
Role name:
lambda-execution
Click Create role
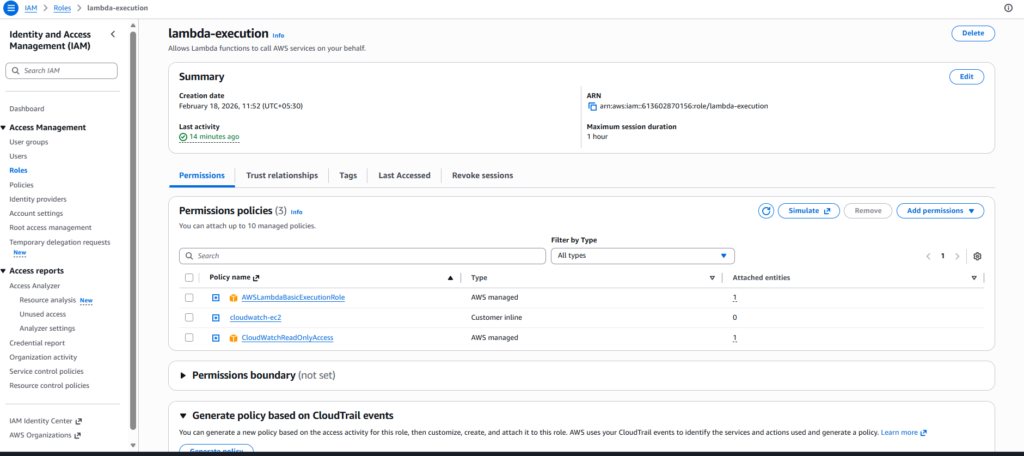
AI now has permission to perform actions.
STEP 4 – Open the Lambda Console
- In the AWS Console search bar, type Lambda
- Click on Lambda
- Click Create function
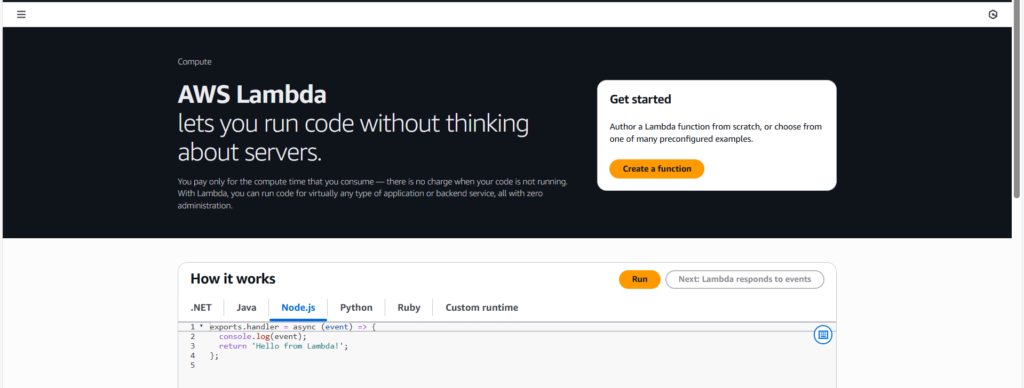
Function Create Settings
Select exactly the following options:
Function name: get_cpu_utilization
Runtime:
Python 3.12
Execution role:
Use an existing role
Role name: lambda-execution
Now click on Create function.
Wait for a few seconds while the function is being created.
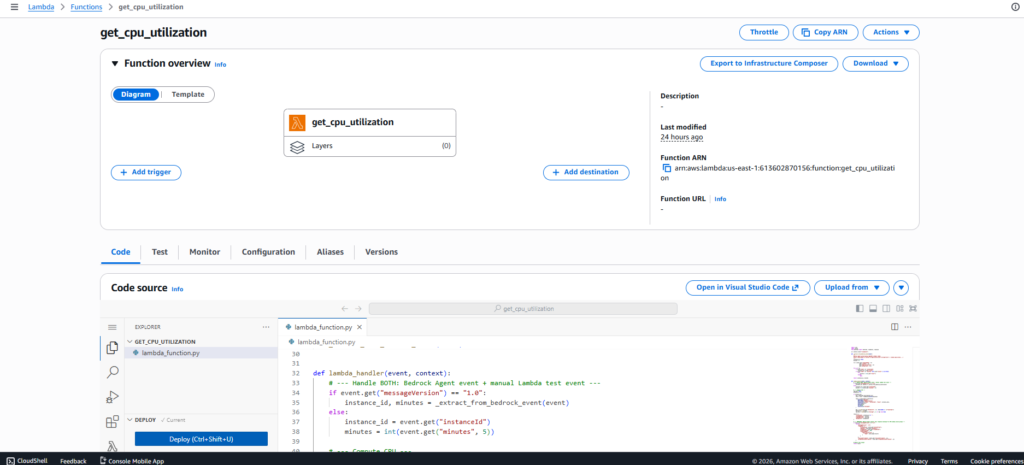
When Lambda Opens – Go to the Code Tab
As soon as the Lambda function opens, you will see the Code tab.
There will be some default code already present.
Delete the default code completely
Copy–paste the full code below:
import json
import boto3
from datetime import datetime, timedelta, timezone

cw = boto3.client("cloudwatch")

def _extract_from_bedrock_event(event):
    """
    Bedrock Agent action-group (OpenAPI schema) sends:
    event["requestBody"]["content"]["application/json"]["properties"] = [{name,type,value},...]
    """

    instance_id = None
    minutes = 5

    rb = (
        event.get("requestBody", {})
             .get("content", {})
             .get("application/json", {})
             .get("properties", [])
    )

    for p in rb:
        if p.get("name") == "instanceId":
            instance_id = p.get("value")

        if p.get("name") == "minutes" and p.get("value") is not None:
            try:
                minutes = int(p.get("value"))
            except:
                pass

    return instance_id, minutes


def lambda_handler(event, context):

    # Handle both Bedrock Agent events and manual Lambda test events

    if event.get("messageVersion") == "1.0":
        instance_id, minutes = _extract_from_bedrock_event(event)
    else:
        instance_id = event.get("instanceId")
        minutes = int(event.get("minutes", 5))

    cpu_avg = None
    datapoints = 0

    if instance_id:

        end = datetime.now(timezone.utc)
        start = end - timedelta(minutes=minutes)

        resp = cw.get_metric_statistics(
            Namespace="AWS/EC2",
            MetricName="CPUUtilization",
            Dimensions=[
                {
                    "Name": "InstanceId",
                    "Value": instance_id
                }
            ],
            StartTime=start,
            EndTime=end,
            Period=60,
            Statistics=["Average"]
        )

        dps = sorted(
            resp.get("Datapoints", []),
            key=lambda x: x["Timestamp"]
        )

        datapoints = len(dps)
        cpu_avg = round(dps[-1]["Average"], 2) if dps else None

    result = {
        "instanceId": instance_id or "",
        "windowMinutes": minutes,
        "cpuAvgPercent": cpu_avg,
        "datapoints": datapoints
    }

    # Return Bedrock Agent response envelope

    if event.get("messageVersion") == "1.0":

        return {
            "messageVersion": "1.0",
            "response": {
                "actionGroup": event.get("actionGroup"),
                "apiPath": event.get("apiPath"),
                "httpMethod": event.get("httpMethod"),
                "httpStatusCode": 200,
                "responseBody": {
                    "application/json": {
                        "body": json.dumps(result)
                    }
                }
            },
            "sessionAttributes": event.get("sessionAttributes", {}),
            "promptSessionAttributes": event.get("promptSessionAttributes", {})
        }

    # Manual Lambda test output

    return result
Do NOT Forget to Click the Deploy Button
After pasting the code:
Click the Deploy button (top right)
If you see “Successfully deployed” → Perfect
Lambda Test
Now we verify whether the Lambda function is working.
- Click the Test tab on the Lambda page
- Click Create new test event
Event name:
cpu-test
Paste this exact JSON into the Event JSON:
{
  "instanceId": "i-05b89d8172f7e0d20",
  "minutes": 5
}
Click Save
Now click the Test button
Expected Output (If You See This → PASS )
Your output should look like this:
{
  "instanceId": "i-05b89d8172f7e0d20",
  "windowMinutes": 5,
  "cpuAvgPercent": 0.11,
  "datapoints": 1
}
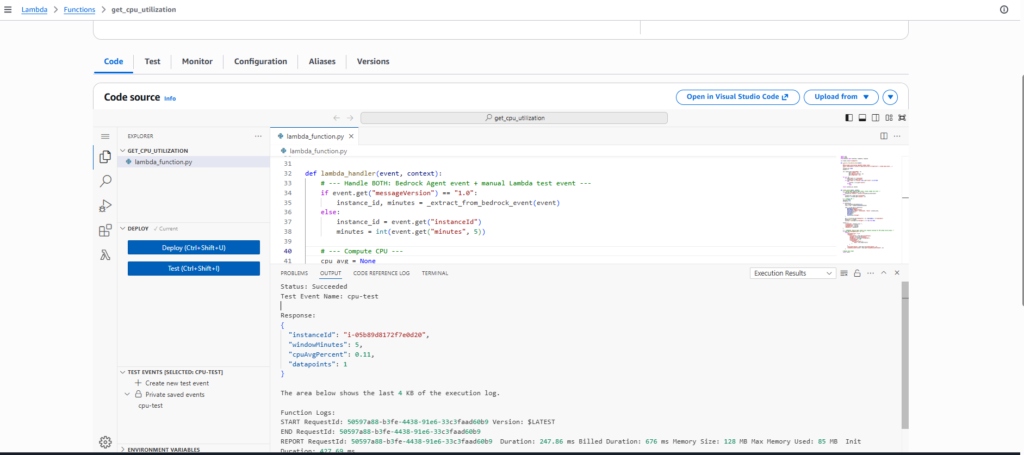
Congratulations! Your Lambda function is working perfectly.
STEP 5– Now go back to Bedrock.
- Look at the left sidebar
- Scroll down a bit
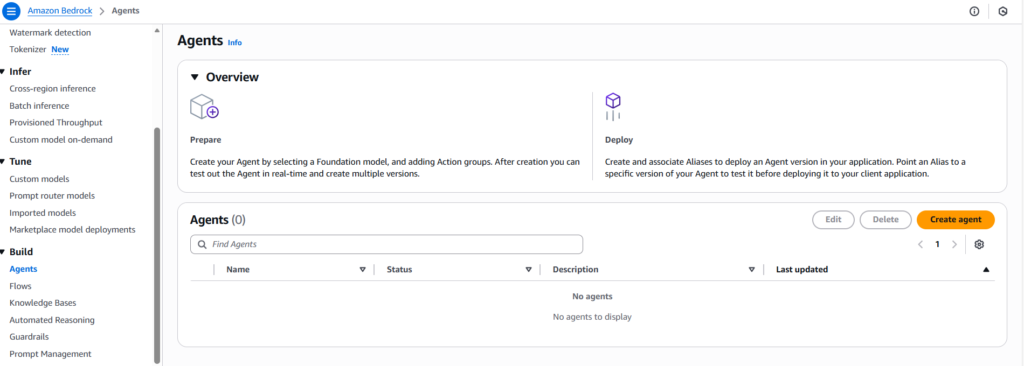
- You’ll find a section called Build
Inside Build, click on Agents.
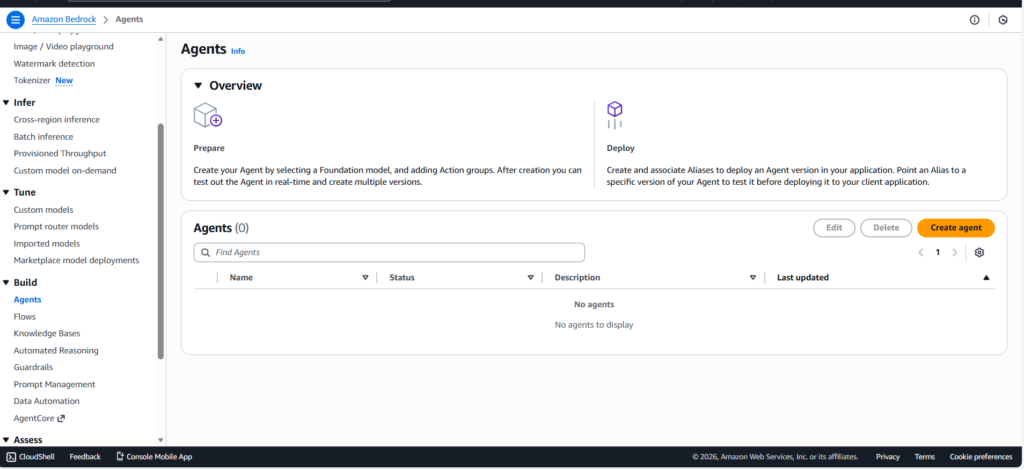
Create Agent
The Agents page will open.
On the top right, you will see the Create agent button.
Click on Create agent
Enter Agent Details
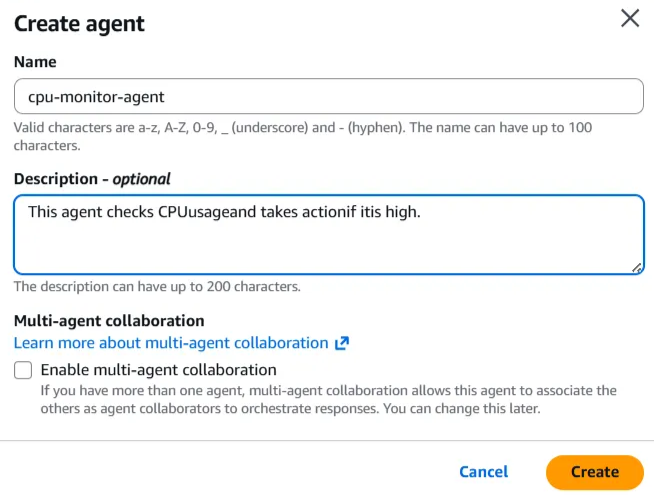
A form will appear.
Fill in exactly the following:
Agent name:
cpu-monitor-agent
Description:
This agent checks CPUusageand takes actionif itis high.
Click Create
The next page will open
You will now be on the Agent Builder page
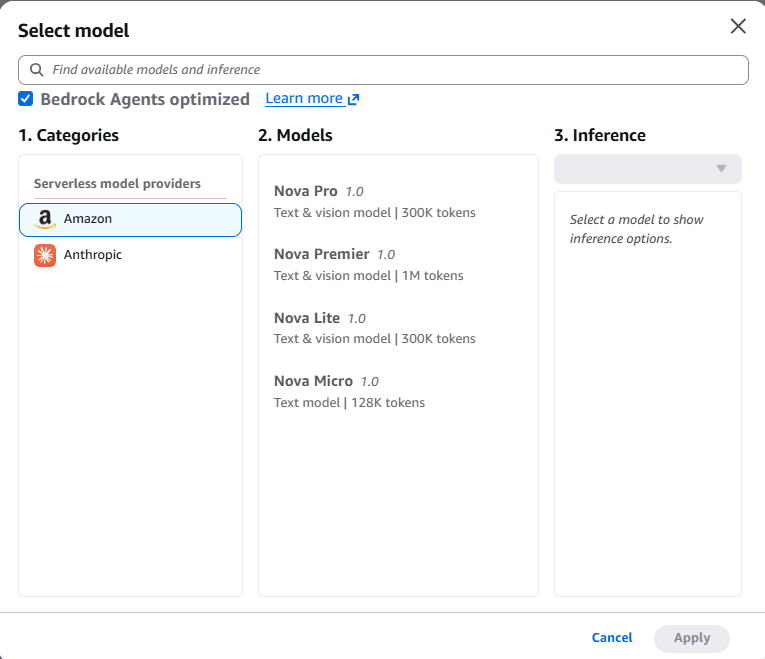
Select the Foundation Model
Now you need to select a model (this will be the AI’s brain).
Remove the checkmark on the option that says ‘optimized for Bedrock Agents’, then search for the Nova 2 Lite model
Choose Nova 2 lite text model from the list
Do NOT select Nova Sonic (voice model)
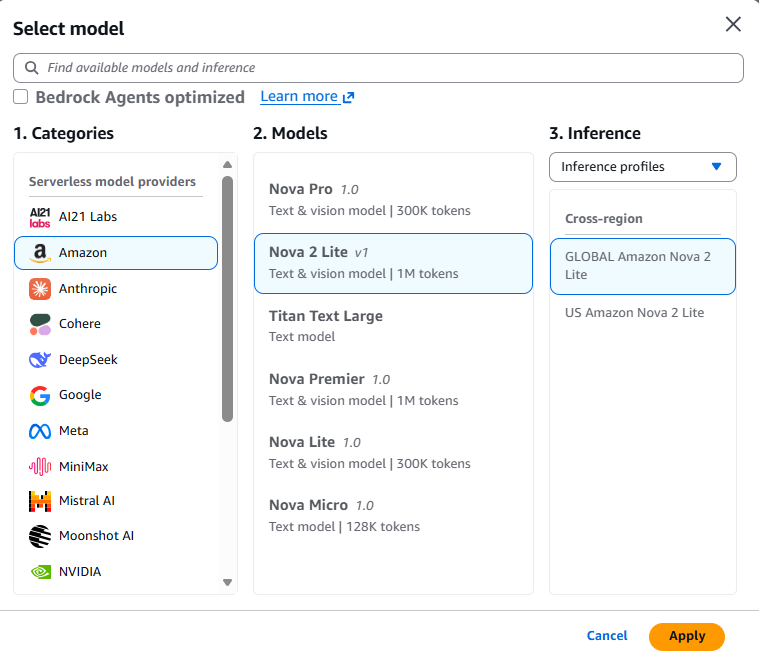
Click Apply
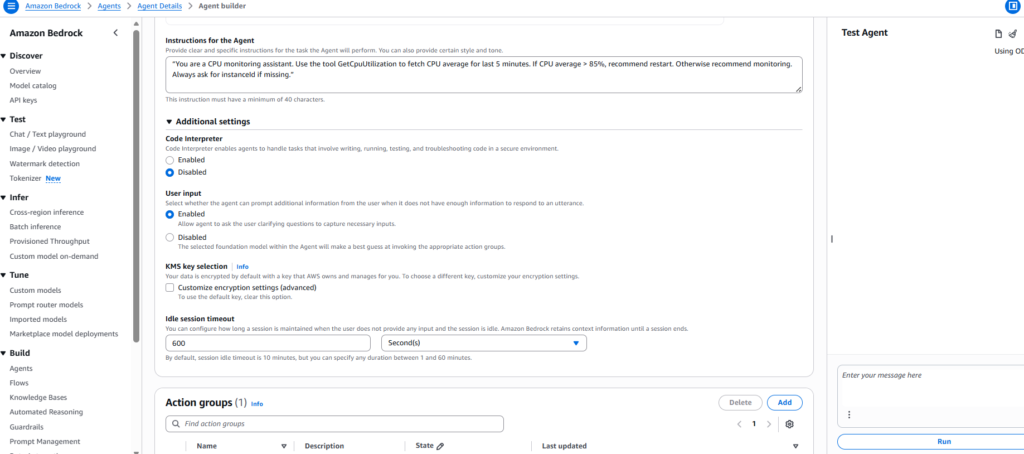
Paste Instructions
Here we define the agent’s behavior.
Paste exactly this into the Instructions box
“You are a CPU monitoring assistant. Use the tool GetCpuUtilization to fetch CPU average for last 5 minutes. If CPU average > 85%, recommend restart. Otherwise recommend monitoring. Always ask for instanceId if missing.”
Additional Setting – User Input
In the Agent Builder, find the section:
User Input
Currently, it will be:
Disabled
Enable User Input
Select:
Enabled
Click Save
Also Read: Enterprise Scale Multi-Cloud Infrastructure Modernization with Zero Downtime for Sprinklr
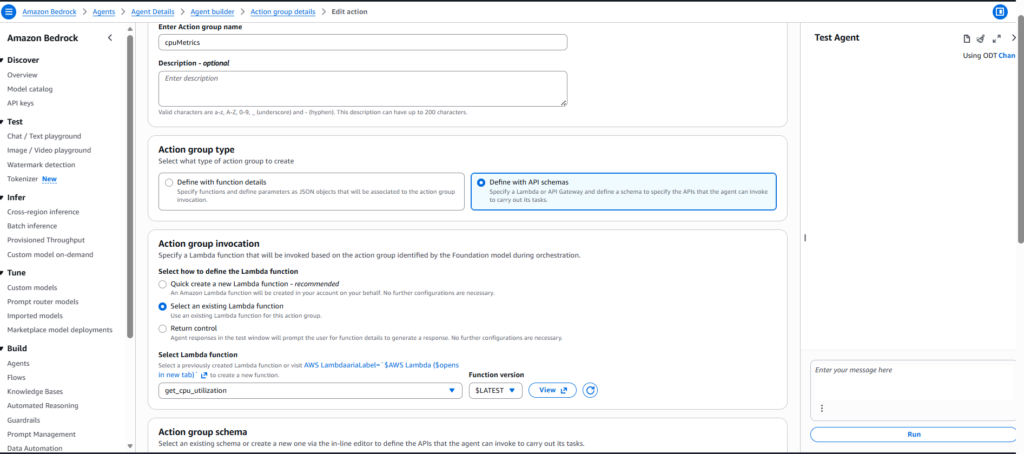
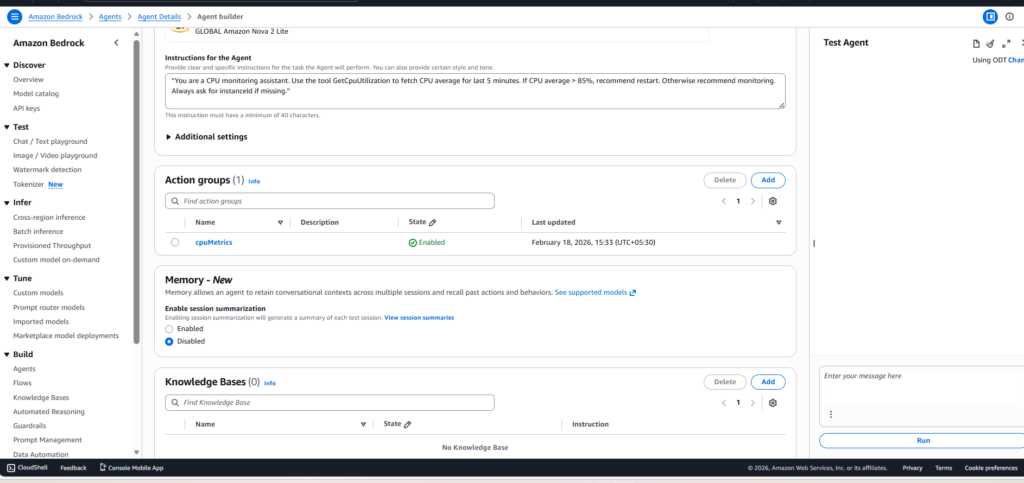
STEP 6 – Add an Action Group
You will now see the Action Groups screen.
Click Add action group
Fill in:
Action group name:
cpuMetrics
Action type:
Select Define with API schemas
Select the Lambda Function
Now choose your Lambda function.
Select the Lambda you created earlier
(example: get_cpu_utilization)
If the Lambda already exists:
Select it
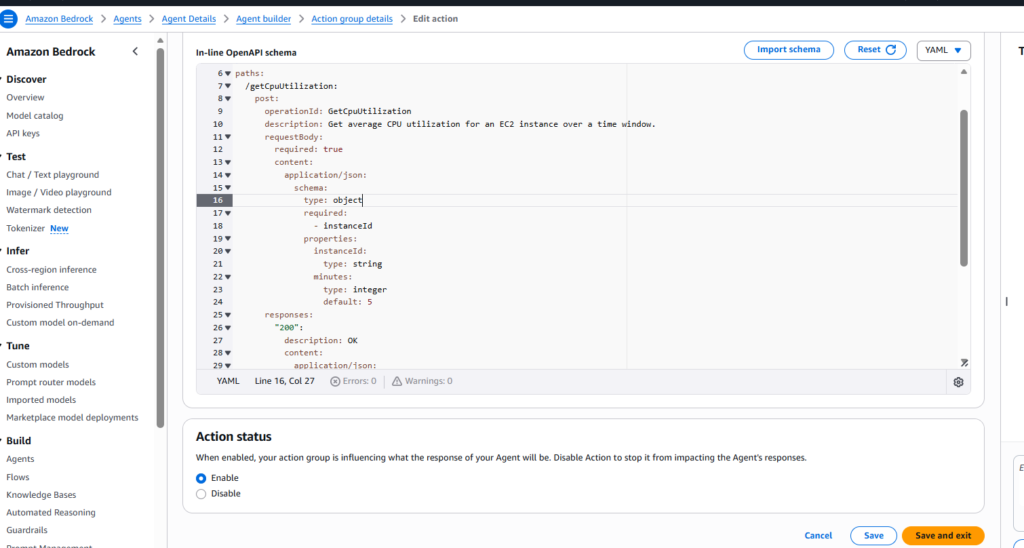
Action group schema
click Define via in-line schema editor
OpenAPI schema
Copy–paste the full code below:
openapi: 3.0.1

info:
  title: cpuMetrics
  version: 1.0.0

paths:
  /getCpuUtilization:
    post:
      operationId: GetCpuUtilization

      description: Get average CPU utilization for an EC2 instance over a time window.

      requestBody:
        required: true

        content:
          application/json:
            schema:
              type: object

              required:
                - instanceId

              properties:
                instanceId:
                  type: string

                minutes:
                  type: integer
                  default: 5

      responses:
        "200":
          description: OK

          content:
            application/json:
              schema:
                type: object

                properties:
                  instanceId:
                    type: string

                  windowMinutes:
                    type: integer

                  cpuAvgPercent:
                    type: number
                    nullable: true

                  datapoints:
                    type: integer
Click Save
After saving:
The Prepare button will become clickable
Then click Prepare
STEP 7 – Open the Lambda Console
In the AWS search bar:
Lambda
Click it.
Select Your Lambda Function
Choose:
get_cpu_utilization
Open it.
Go to the Configuration Tab
On the Lambda screen, you will see these tabs:
Code
Test
Monitor
Configuration
Click Configuration.
Open the Permissions Section
Scroll down
Permissions
Click it.
Resource-based Policy
You will see a button:
Add permissions
Click it.
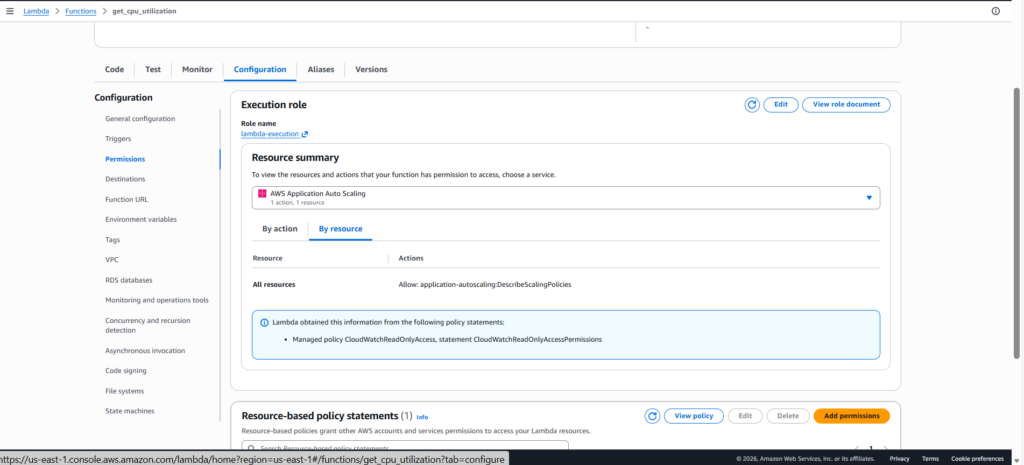
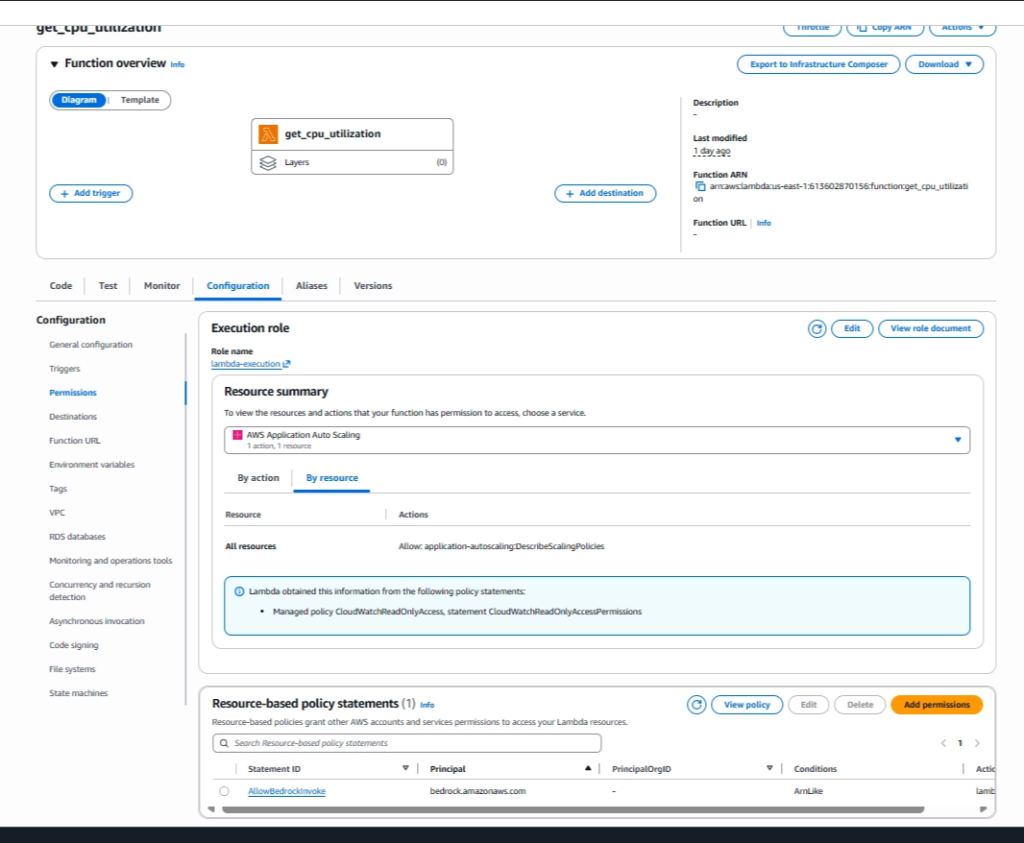
Fill in EXACTLY
Statement ID
AllowBedrockInvoke
Principal
bedrock.amazonaws.com
Action
lambda:InvokeFunction
ARN
"arn:aws:bedrock:us-east-1:613602870156:agent/*"
Click Save
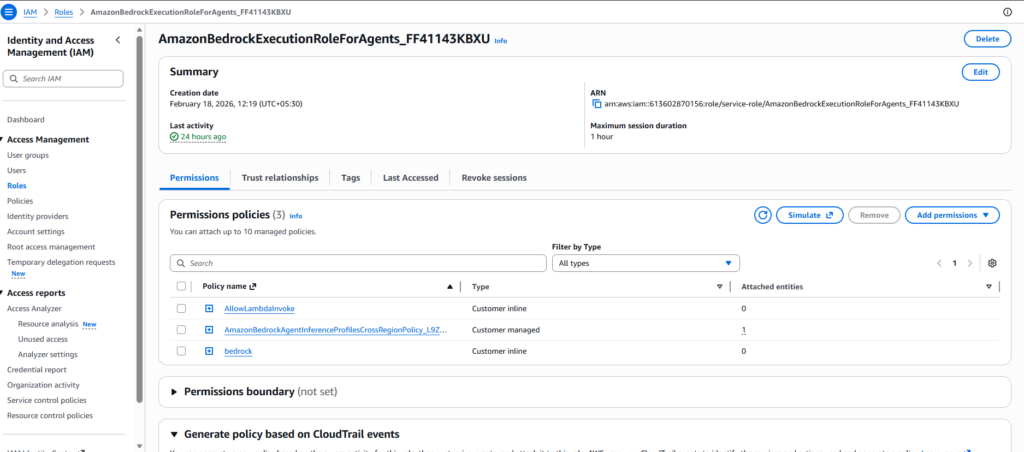
STEP 8 – Then next go to Role
And in Bedrock, in the Agent Builder
Select the Agent resource role that is visible by going to the IAM roles section : choose
AmazonBedrockExecutionRoleForAgents_FF41143KBXU
Add Permissions:
- AmazonBedrockAgentInferenceProfilesCrossRegionPolicy_L9ZHEFYE8FI
{
  "Version": "2012-10-17",
  "Statement": [
    {
      "Sid": "AmazonBedrockAgentInferenceProfilesCrossRegionPolicyProd",
      "Effect": "Allow",
      "Action": [
        "bedrock:InvokeModel",
        "bedrock:InvokeModelWithResponseStream",
        "bedrock:GetInferenceProfile",
        "bedrock:GetFoundationModel"
      ],
      "Resource": [
        "arn:aws:bedrock:us-east-1:613602870156:inference-profile/global.amazon.nova-2-lite-v1:0",
        "arn:aws:bedrock:*::foundation-model/global.amazon.nova-2-lite-v1:0"
      ]
    }
  ]
}
- AllowLambdaInvoke
{
  "Version": "2012-10-17",
  "Statement": [
    {
      "Effect": "Allow",
      "Action": "lambda:InvokeFunction",
      "Resource": "arn:aws:lambda:us-east-1:613602870156:function:get_cpu_utilization"
    }
  ]
}
- BedRock
{
  "Version": "2012-10-17",
  "Statement": [
    {
      "Sid": "AllowInvokeNova",
      "Effect": "Allow",
      "Action": [
        "bedrock:InvokeModel",
        "bedrock:InvokeModelWithResponseStream"
      ],
      "Resource": "*"
    }
  ]
}
STEP 9 – Test the Agent
Open the agent
Go to the Test tab
In the input box, type:
check cpu for instance i-05b89d8172f7e0d20 for last 60 minutes
Click Run
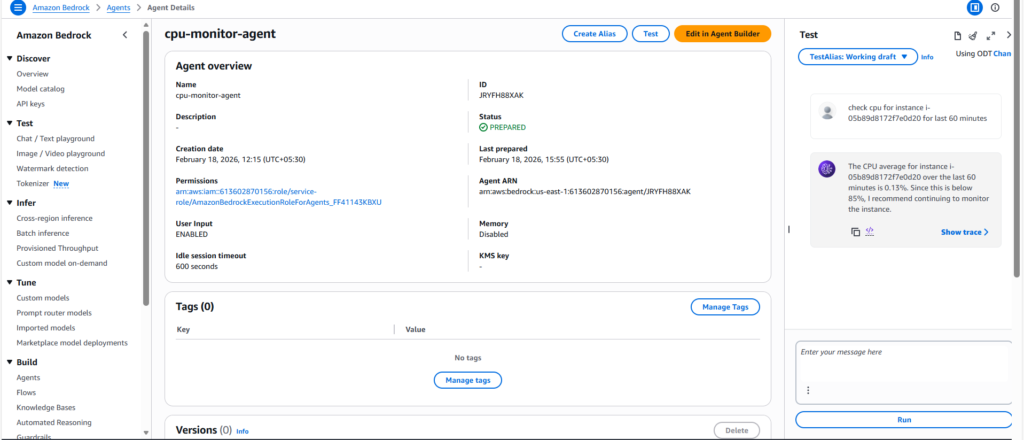
EXPECTED OUTPUT (If You See This → SUCCESS )
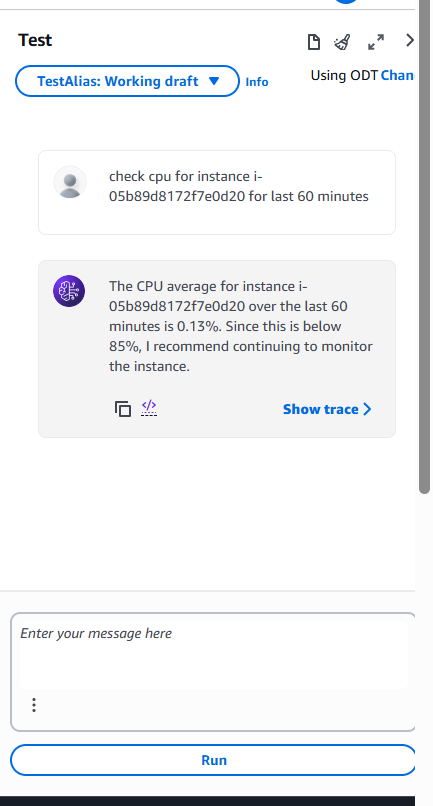
Congratulations!
You are now:
Taking decisions using AI
Triggering Lambda using AI
Successfully implementing a real Nova Act pattern
Related Searches
- A Leading Logistics Platform Achieved 30% Faster Incident Resolution with AI-Driven Observability
- What is Amazon Web Service (AWS)?
- 3× Faster Issue Resolution Through Smarter Operational Intelligence
- Top AWS Consulting Partner in India 2026