Bonjour! So we’ve had our minikube cluster up and running and tried setting up MySQL application onto our cluster using publicly available Helm Charts in our previous blog. In case, you haven’t, I suggest you go through the link before reading this blog.
This guide walks us through the process of creating our first-ever chart, explaining what goes inside these packages and the tools we use to develop them. By the end of it we should have an understanding of the advantages of using and creating our Helm Charts to deliver our own applications to the K8s cluster.

Case: Deploying a Golang Application using our own Helm Charts
The best way to get started with a new chart is to use the helm create command, which helps to understand the directory structure of a Chart in Helm. It is nothing but a packaged version of your application that follows some specifications for describing the resources to be installed into K8s.
$ helm create gowebapp
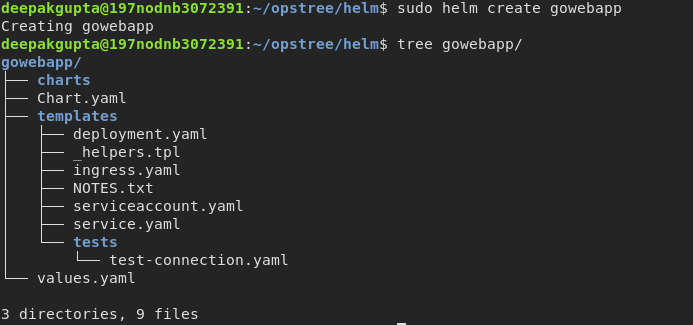
Chart.yaml : It provides the information about the chart version, name, description, etc. or, in another words, the metadata of our chart.
Templates : The most important piece in the puzzle of Helm is the templates/ directory. This is where Helm finds the YAML definitions for our Services, Deployments, and other K8s objects.
values.yaml : This file can’t be shrugged off as it contains the default values for the chart. These values may be overridden by us to manage our K8s objects.
Building a Helm Chart
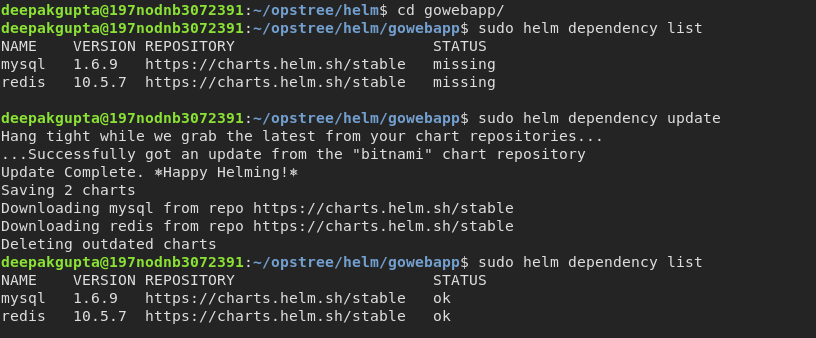
As we have already created the default structure for our application as shown above, we’ll proceed with building our resource files under gowebapp/ directory. We have some database dependencies for our application which helps to bring up the UI. To resolve those dependencies, we mention it under Chart.yaml as shown below
apiVersion: v2
name: gowebapp
description: A Helm chart for GoWebApp
type: application
version: 0.1.0
appVersion: 1.16.0
dependencies:
- name: mysql
  version: "1.6.9"
  repository: "https://charts.helm.sh/stable"
- name: redis
  version: "10.5.7"
  repository: "https://charts.helm.sh/stable"
Before, updating the dependencies we can list out to check do we have any or not, as shown :

Now, to update the application dependencies we have to follow some steps keeping ourselves under the gowebapp directory :
$ helm dependency list
$ helm dependency update
As the dependencies are downloaded, it’s time for adding resource files. For our Golang Application all we need is deployment, service, and ingress resources. The other resources created by default like, service account, _helpers.tpl, etc. can be deleted.
Here, we passed some default values of database, labels, matchlabels, and containers specs to the Chart with the help of values.yaml file as below :
mysql:
  mysqlDatabase: employeedb
  mysqlRootPassword: password
  persistence:
    enabled: false

redis:
  usePassword: false
  cluster:
    enabled: false
  master:
    persistence:
      enabled: false

labels:
  app.kubernetes.io/name: app
  app.kubernetes.io/instance: goweb-app
  app.kubernetes.io/version: "1.16.0"

matchLabels:
  app.kubernetes.io/name: app
  app.kubernetes.io/instance: goweb-app

containers:
  name: goweb-app
  image: opstreedevops/ot-go-webapp
  tag: "v1"
Now, we can start adding the resource file values under the template/ directory in the deployment, service, and ingress resource files as below :
apiVersion: apps/v1
kind: Deployment
metadata:
  name: goweb-app
  {{- if .Values.labels }}
  labels:
    {{- toYaml .Values.labels | nindent 4 }}
  {{- end }}
spec:
  replicas: 1
  selector:
    matchLabels:
      {{- toYaml .Values.matchLabels | nindent 6 }}
  template:
    metadata:
      {{- if .Values.matchLabels }}
      labels:
        {{- toYaml .Values.matchLabels| nindent 8 }}
      {{- end }}
    spec:
      containers:
        - name: {{ .Values.containers.name }}
          image: "{{ .Values.containers.image }}:{{ .Values.containers.tag }}"
          imagePullPolicy: IfNotPresent
          ports:
          - name: http
            containerPort: 8080
            protocol: TCP
          env:
          - name: DB_URL
            value: goweb-app-mysql
          - name: DB_PORT
            value: "3306"
          - name: DB_USER
            value: "root"
          - name: DB_PASSWORD
            value: password
          - name: REDIS_HOST
            value: "goweb-app-redis-headless"
          - name: REDIS_PORT
            value: "6379"
apiVersion: v1
kind: Service
metadata:
  name: goweb-app
  {{- if .Values.labels }}
  labels:
    {{- toYaml .Values.labels | nindent 4 }}
  {{- end }}
spec:
  type: ClusterIP
  ports:
    - port: 8080
      targetPort: http
      protocol: TCP
      name: http
{{- if .Values.matchLabels }}
  selector:
        {{- toYaml .Values.matchLabels| nindent 4 }}
      {{- end }}
apiVersion: networking.k8s.io/v1beta1
kind: Ingress
metadata:
  name: goweb-app
  {{- if .Values.labels }}
  labels:
    {{- toYaml .Values.labels | nindent 4 }}
  {{- end }}
spec:
  rules:
    - host: "ethanhunt.com"
      http:
        paths:
          - path: /
            backend:
              serviceName: goweb-app
              servicePort: 8080
Let’s validate the manifest content by running helm template command, which will list out all the resource files with the configured values which will be needed to install our application using Helm Chart onto our K8s cluster.
$ helm template gowebapp/
To make it more clear let’s understand the flow when Helm Chart is installed into Kubernetes :
- Helm reads the chart.
- It reads the configuration values from the values.yml and generates the manifest files with these values.
- Helm sends these generated manifests to the Kubernetes API server.
- K8 takes these manifest files and creates desired resources in the cluster.

Installing a Local Helm Chart of our Application
We can deploy and verify the locally created helm chart of our application using
$ helm install go-web-app gowebapp/
$ helm ls
$ kubectl get pods

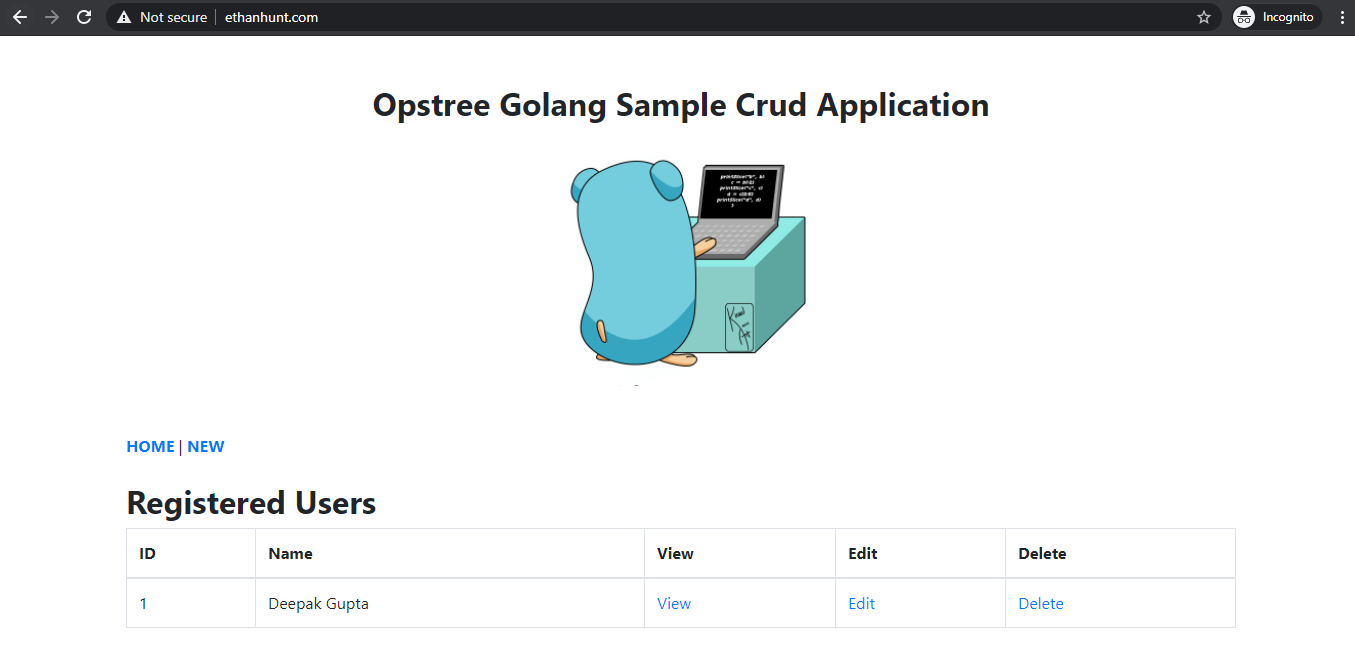
And finally, we can check our application up and running with the help of hostname given in our Ingress resource file.
With the above steps, it should not be difficult to get a pod up and running with our own chart. The journey so far brought us from understanding the basics of Helm to creating our, very own, first chart. Until now, we went with somewhat hardcoded approach to understand the functioning of Helm Charts. In the next blog, we’ll go further in automating by templating the chart and populating the variables as per requirement.
Till then, Happy Helming!
Blog Pundit: Adeel Ahmad
Opstree is an End to End DevOps solution provider