Have you ever gone through the situation when your Jenkins goes down without any backup of your jobs and then you have to waste a lot of time and effort to re-create all your resources from scratch? We had also faced the same problem, but now We are free from it We have found a solution.
You might really want to know, how. What if, I say you can create a Jenkins server with the same configuration without any efforts and most importantly without wasting months, days, or even hours. Yes, you can set up your Jenkins in just 30 mins as we did.
There can be two approaches, either to spin up a new Jenkins server from scratch or migrate an existing one. We achieved both of these. The secret is Configuration as a code plugin provided by Jenkins. This can be helpful in case of Jenkins fail-over as well, within 30 minutes we will get back our Jenkins in working condition.
Configuration as a code plugin aims to replace any user interface based configuration with the code-based configuration. Using configuration as code, one can manage Jenkins master’s configuration with simple, declarative YAML files.
Once we have prepared our configuration file, Jenkins can be configured automatically when it starts. We can restore our Jenkins easily – within seconds. We can also reuse the same file to configure multiple Jenkins instances, or we can spin up a local instance to test our changes before we make them part of the production environment.
Scratch setup or migrate an existing one or Failover
If the setup is from scratch then we should be aware of what configuration and jobs we will be needing for the setup. And if we want to migrate our existing one then we need to write code accordingly for the Jenkins.yaml file.
While setting up a Jenkins server from scratch, we generally perform the below tasks:
- Install Jenkins
- Install some basic packages (like Python, Docker, etc as needed)
- Install plugins
- Setup multiple credentials
- Setup tools such as java, maven, nodejs, etc
- Configure shared libraries
- Configure notifier such as slackNotifier
- Update executors
- And the most important Jenkins jobs
- User-management in Jenkins server to SSH
- GAuth to access Jenkins using our Gmail credentials
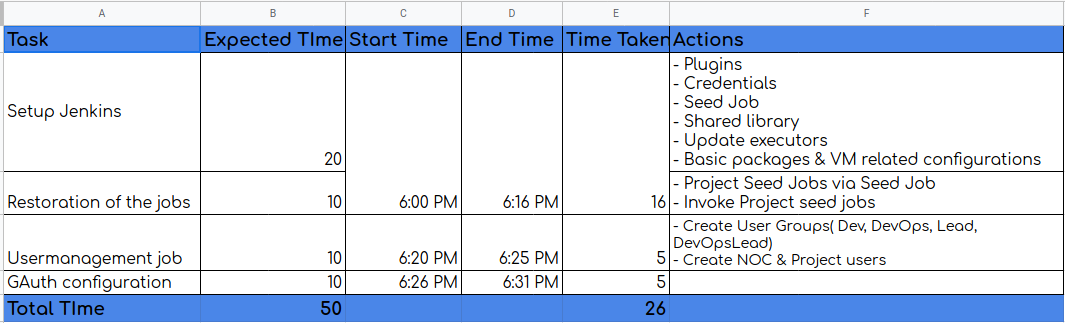
We have achieved all of the above-mentioned tasks in 30 minutes using Jenkins Ansible role, seed jobs, and user management role. GAuth is a manual part so it could take extra time depending on you.
Jenkins Installation is done by using a normal Ansible role which will install Jenkins, plugins, and some basic packages. And by using declarative YAML file we achieved:
- Credentials
- Seed Job
- Shared library
- Update executors
- Basic packages & VM related configurations
- Restoration of the jobs
- Project Seed Jobs via Seed Job
If you want to setup Jenkins on VMs or bare metal, you can use the ansible role developed by us:
https://galaxy.ansible.com/opstree_devops/jenkins
Below declarative YAML configuration file includes root entries for various components of your primary Jenkins installation. The Jenkins one is for the root Jenkins object, and the other ones are for various global configuration elements :
Update executors:

Credentials:

Shared Library:


Project Seed Jobs via Seed Job:

Restoration of the jobs
Once Jenkins is up and running, we log in and check if a Master project job has already been created. We will trigger it and the other jobs will be spawned with it using DSL. We already have DSL’s scripts for all jobs in Git and they could be retrieved any time in just one click. Below are the snapshots for the same:


Our setup time taken:-
Conclusion
So, now we got to know how Configuration as a code plugin and DSL scripts will be beneficial for us in this situation. DSL scripts are easy to write and understand your job configurations. I hope this will help to solve your problems for backing up & restoration as well.
By using this strategy, we have solved the problem but if you guys have any better solution please feel free to comment on the blog. We would really appreciate it.
Thank You & Have a nice day