The purpose of this blog is not to go deep into coreDNS rather explain how DNS works in kubernetes, what coreDNS contains and how the corefile uses plugins. So let’s get started.
Pods communication
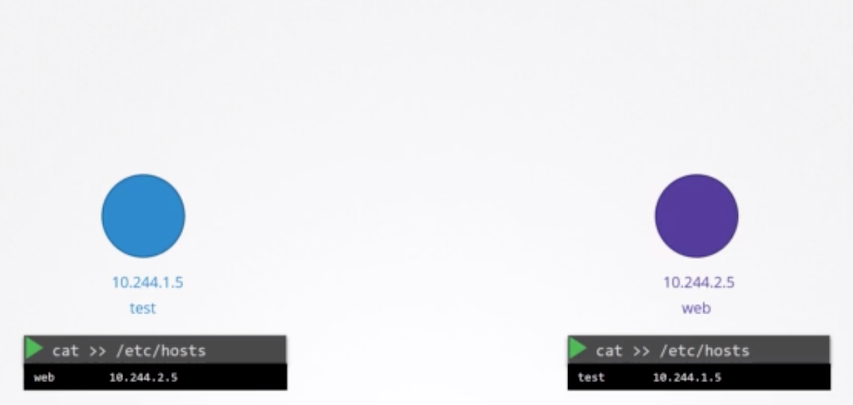
Before talking about coreDNS, I want everyone to know how kubernetes implements DNS in clusters. Let’s say one pod i.e. test wants to communicate with another pod, db. So, we can do that by putting an entry in /etc/hosts file as shown in figure 1a.
fig 1(b)
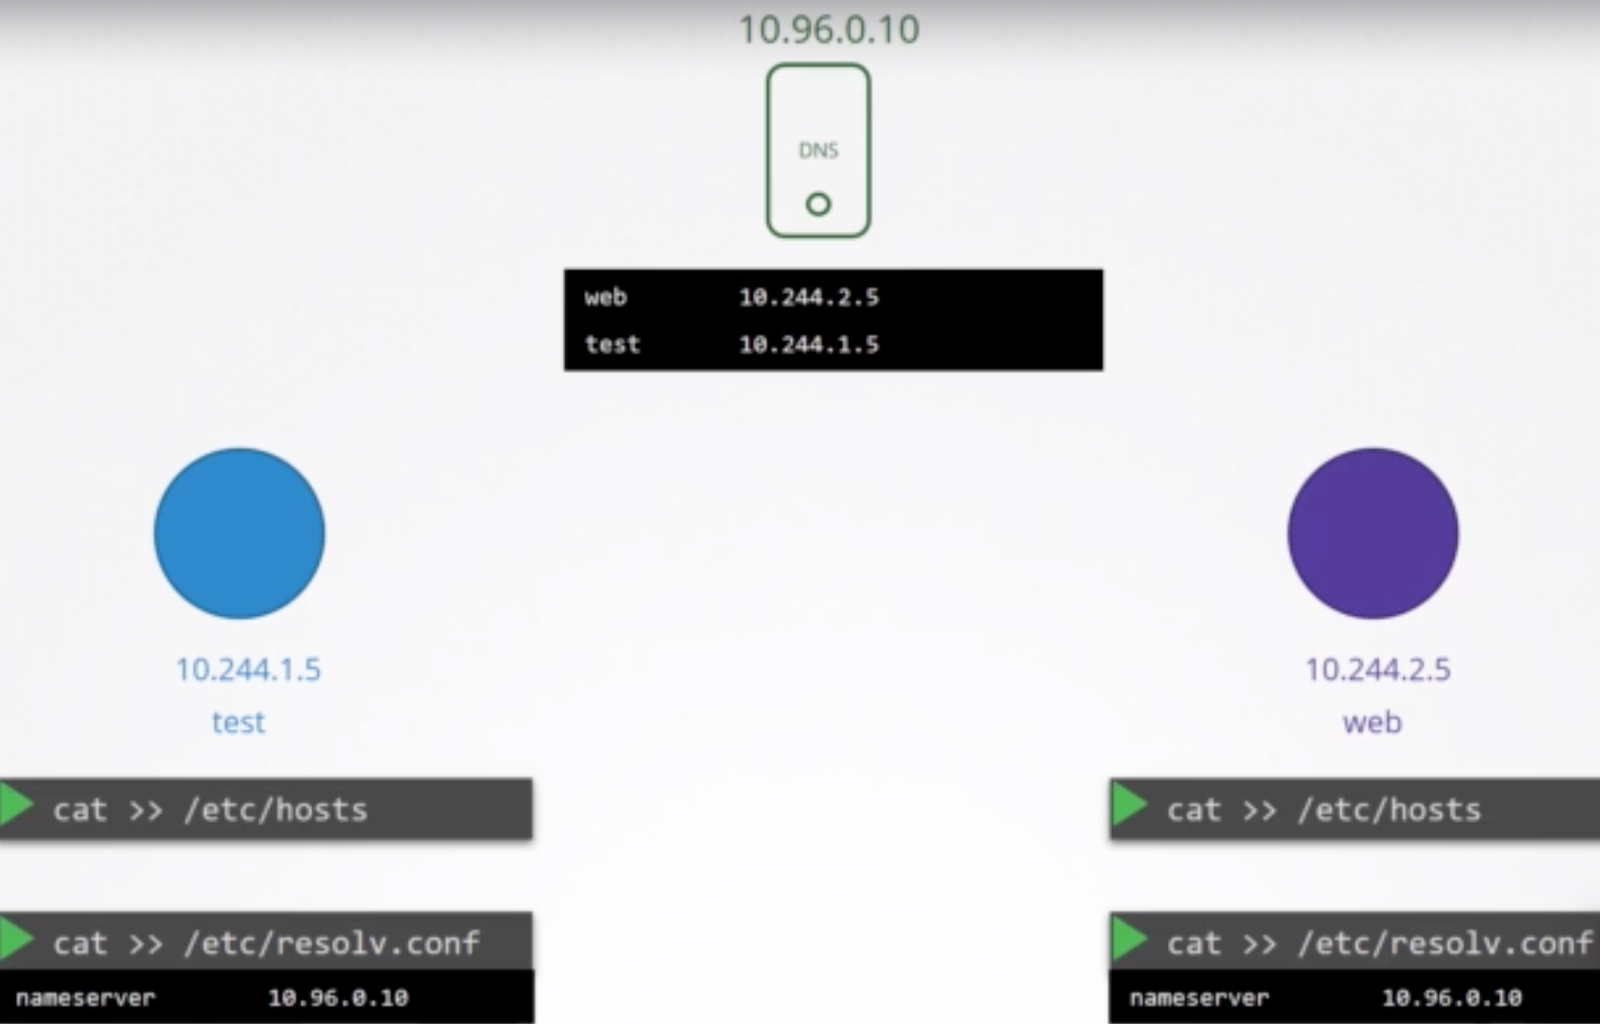
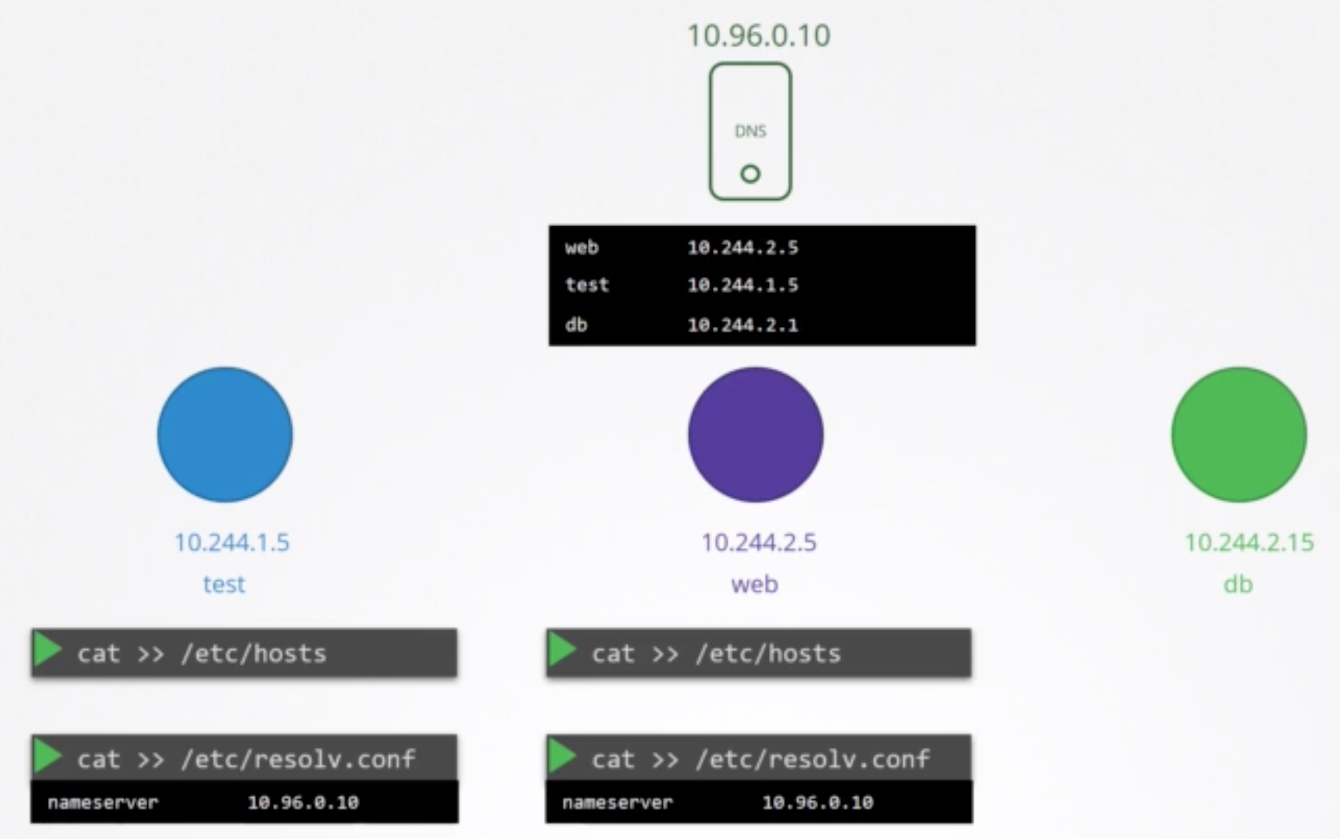
Every time a new pod gets created, k8s do an entry of the new pod in the DNS server and a corresponding entry in /etc/resolv.conf file of the new pod as well, of course, pointing to the IP address of the DNS server as shown in figure 1c.
fig 1(c)
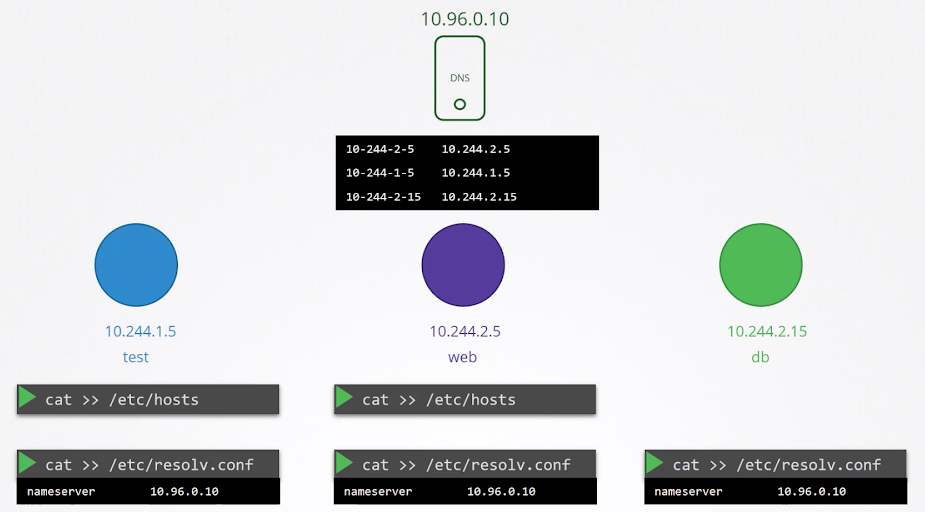
Like I said above that we change the entry of /etc/hosts to centralised DNS server. Well, it is right but partially. DNS does not do the entry of pods as we do by editing /etc/hosts file in pods (Format: <pod_name> <IP>). Instead, it creates a new hostname by replacing dots into dashes in the IP address of pods like hostname 10-244-2-5 (Format: <hostname> <IP>). Refer figure 1d and look at the entry of DNS.
fig 1(d)
Introducing coreDNS
Well, the above discussion was for understanding. Actually, pods communicate via services in a k8s cluster and coreDNS sets record for these services (by default, pods entries are disabled but you can enable them in corefile of coreDNS).
Although CoreDNS and Kube-dns ultimately perform the same task, there are some key differences in implementation that affect resource consumption and performance. You can read about this thoroughly in coreDNS official docs.
CoreDNS has been available in kubernetes since v1.9. It is a fast and flexible DNS server. The keyword flexible here means you are given a lot of freedom with your DNS data which you can exercise using a range of plugins. If some functionality is not provided out of the box you can add it by writing a plugin. It is written in the Go language.
We deploy CoreDNS as a deployment object in the kube-system namespace in a cluster with a service named “kube-dns”. It requires a configuration file that we call corefile located at /etc/coredns/Corefile.
Corefile and plugins:
Corefile consists of a number of plugins, plugins are configured for error handling, reporting health, monitoring metrics, cache etc.
The plugin that makes coreDNS to work with kubernetes is kubernetes plugin. In kubernetes plugin, top level domain of kubernetes cluster is set (cluster.local)
Also, it watches for new services by default. For pods, you have to enable ‘pod mode’ in Corefile under kubernetes plugin by making an entry as ‘pods POD MODE’ in the cluster. If a new object gets created, it adds the record of service or pods in coreDNS server.
The next step for the pods is to point to coreDNS IP address for DNS resolution by specifying nameserver in resolv.conf file. But, what address should it be? Well, you don’t need to care about this because DNS entries have been handled by the kubelet component.
When we install coreDNS in a cluster, we expose it as a service, so the IP address of that service is configured as a nameserver in pods by kubelet.
Again, my question is how does kubelet know this?
You can see the entry of coreDNS server in the kubelet configuration file as shown in figure 2a
You can also configure kubelet and run as service and pass clusterDns IP in that service file.
in minikube:
minikube ssh
cat /var/lib/kubelet/config.yaml
fig 2(a)
Self hosted k8s:
In our project we are not using managed kubernetes service, hence I’ll talk about self-hosted kubernetes cluster. You can check the clusterDns entry in kubelet service by doing ssh to any of the k8s node. Below is the service file we are using in our k8s cluster.
For services: svcname.namespace.type.rootDomain For pods: hostname.namespace.type.rootDomain
Example:
For services: test-service.default.svc.cluster.local
For pods: 10-244-2-5.default.pod.cluster.local
Inside the Corefile:
We pass Corefile as a config map in the cluster so that it remains decoupled from the deployment object of coreDNS. It has the plugins already configured. You can get the list of plugin chains here.
Let’s talk about kubernetes plugin, Using the kubernetes plugin, CoreDNS will read zone data from a Kubernetes cluster. It implements the spec defined for Kubernetes DNS-Based service discovery
Format:
Kubernetes ZONE {
pods POD-MODE
           fallthrough ZONE
           ttl time_in_sec
Inside the kubernetes plugin, there are a lot of options that you can go through here.
Let’s discuss the option we are using in the above Corefile.
pods POD-MODE sets the mode for handling IP-based pod A records, e.g.10-244-2-5.default.pod.cluster.local. in A 10.244.2.5. This option is provided to facilitate the use of SSL certs when connecting directly to pods.
Value for POD-MODE that we have used:
insecure: Always return an A record of pods.
fallthrough [ZONES…] If a query in the zones for which the plugin is authoritative it either returns a result, or it returns NXDOMAIN for the query. NXDOMAIN responses are created when a DNS has no listing for the domain requested. When fallthrough is enabled, instead of returning NXDOMAIN when a record is not found, the plugin will pass the request down the plugin chain which can include another plugin to handle the query.
ttl allows you to set a custom TTL for responses. The default is 5 seconds. The minimum TTL allowed is 0 seconds, and the maximum is capped at 3600 seconds. Setting TTL to 0 will prevent records from being cached.
Conclusion:
In this blog, we got to know how DNS plays an important role in kubernetes. coreDNS works with kubernetes by utilizing kubernetes plugin. It consists of various plugins that you can customize as per your use case. We got to know the format of kubernetes DNS records for services and pods. We explored kubelet configuration through which we learned how the kubelet component configures resolv.conf file. I hope this blog gives you some exposure to coreDNS which might help you to start off with the topic.
Every time a new pod gets created, k8s do an entry of the new pod in the DNS server and a corresponding entry in /etc/resolv.conf file of the new pod as well, of course, pointing to the IP address of the DNS server as shown in figure 1c.
fig 1(c)
Like I said above that we change the entry of /etc/hosts to centralised DNS server. Well, it is right but partially. DNS does not do the entry of pods as we do by editing /etc/hosts file in pods (Format: <pod_name> <IP>). Instead, it creates a new hostname by replacing dots into dashes in the IP address of pods like hostname 10-244-2-5 (Format: <hostname> <IP>). Refer figure 1d and look at the entry of DNS.
fig 1(d)
Introducing coreDNS
Well, the above discussion was for understanding. Actually, pods communicate via services in a k8s cluster and coreDNS sets record for these services (by default, pods entries are disabled but you can enable them in corefile of coreDNS).
Although CoreDNS and Kube-dns ultimately perform the same task, there are some key differences in implementation that affect resource consumption and performance. You can read about this thoroughly in coreDNS official docs.
CoreDNS has been available in kubernetes since v1.9. It is a fast and flexible DNS server. The keyword flexible here means you are given a lot of freedom with your DNS data which you can exercise using a range of plugins. If some functionality is not provided out of the box you can add it by writing a plugin. It is written in the Go language.
We deploy CoreDNS as a deployment object in the kube-system namespace in a cluster with a service named “kube-dns”. It requires a configuration file that we call corefile located at /etc/coredns/Corefile.
Corefile and plugins:
Corefile consists of a number of plugins, plugins are configured for error handling, reporting health, monitoring metrics, cache etc.
The plugin that makes coreDNS to work with kubernetes is kubernetes plugin. In kubernetes plugin, top level domain of kubernetes cluster is set (cluster.local)
Also, it watches for new services by default. For pods, you have to enable ‘pod mode’ in Corefile under kubernetes plugin by making an entry as ‘pods POD MODE’ in the cluster. If a new object gets created, it adds the record of service or pods in coreDNS server.
The next step for the pods is to point to coreDNS IP address for DNS resolution by specifying nameserver in resolv.conf file. But, what address should it be? Well, you don’t need to care about this because DNS entries have been handled by the kubelet component.
When we install coreDNS in a cluster, we expose it as a service, so the IP address of that service is configured as a nameserver in pods by kubelet.
Again, my question is how does kubelet know this?
You can see the entry of coreDNS server in the kubelet configuration file as shown in figure 2a
You can also configure kubelet and run as service and pass clusterDns IP in that service file.
in minikube:
minikube ssh
cat /var/lib/kubelet/config.yaml
fig 2(a)
Self hosted k8s:
In our project we are not using managed kubernetes service, hence I’ll talk about self-hosted kubernetes cluster. You can check the clusterDns entry in kubelet service by doing ssh to any of the k8s node. Below is the service file we are using in our k8s cluster.
For services: svcname.namespace.type.rootDomain For pods: hostname.namespace.type.rootDomain
Example:
For services: test-service.default.svc.cluster.local
For pods: 10-244-2-5.default.pod.cluster.local
Inside the Corefile:
We pass Corefile as a config map in the cluster so that it remains decoupled from the deployment object of coreDNS. It has the plugins already configured. You can get the list of plugin chains here.
Let’s talk about kubernetes plugin, Using the kubernetes plugin, CoreDNS will read zone data from a Kubernetes cluster. It implements the spec defined for Kubernetes DNS-Based service discovery
Format:
Kubernetes ZONE {
pods POD-MODE
           fallthrough ZONE
           ttl time_in_sec
Inside the kubernetes plugin, there are a lot of options that you can go through here.
Let’s discuss the option we are using in the above Corefile.
pods POD-MODE sets the mode for handling IP-based pod A records, e.g.10-244-2-5.default.pod.cluster.local. in A 10.244.2.5. This option is provided to facilitate the use of SSL certs when connecting directly to pods.
Value for POD-MODE that we have used:
insecure: Always return an A record of pods.
fallthrough [ZONES…] If a query in the zones for which the plugin is authoritative it either returns a result, or it returns NXDOMAIN for the query. NXDOMAIN responses are created when a DNS has no listing for the domain requested. When fallthrough is enabled, instead of returning NXDOMAIN when a record is not found, the plugin will pass the request down the plugin chain which can include another plugin to handle the query.
ttl allows you to set a custom TTL for responses. The default is 5 seconds. The minimum TTL allowed is 0 seconds, and the maximum is capped at 3600 seconds. Setting TTL to 0 will prevent records from being cached.
Conclusion:
In this blog, we got to know how DNS plays an important role in kubernetes. coreDNS works with kubernetes by utilizing kubernetes plugin. It consists of various plugins that you can customize as per your use case. We got to know the format of kubernetes DNS records for services and pods. We explored kubelet configuration through which we learned how the kubelet component configures resolv.conf file. I hope this blog gives you some exposure to coreDNS which might help you to start off with the topic.
But, what if we are dealing with hundreds of pods that are being created and deleted every minute and need communication?
In this case, instead of making entries in /etc/hosts which is not a suitable solution, we move these entries to a centralised DNS server i.e. 10.96.0.10 as shown in figure 1b. Now, we need to specify this IP in the pods at a certain location which happens to be inside the /etc/resolv.conf file as nameserver.
fig 1(b)
Every time a new pod gets created, k8s do an entry of the new pod in the DNS server and a corresponding entry in /etc/resolv.conf file of the new pod as well, of course, pointing to the IP address of the DNS server as shown in figure 1c.
fig 1(c)
Like I said above that we change the entry of /etc/hosts to centralised DNS server. Well, it is right but partially. DNS does not do the entry of pods as we do by editing /etc/hosts file in pods (Format: <pod_name> <IP>). Instead, it creates a new hostname by replacing dots into dashes in the IP address of pods like hostname 10-244-2-5 (Format: <hostname> <IP>). Refer figure 1d and look at the entry of DNS.
fig 1(d)
Introducing coreDNS
Well, the above discussion was for understanding. Actually, pods communicate via services in a k8s cluster and coreDNS sets record for these services (by default, pods entries are disabled but you can enable them in corefile of coreDNS).
Although CoreDNS and Kube-dns ultimately perform the same task, there are some key differences in implementation that affect resource consumption and performance. You can read about this thoroughly in coreDNS official docs.
CoreDNS has been available in kubernetes since v1.9. It is a fast and flexible DNS server. The keyword flexible here means you are given a lot of freedom with your DNS data which you can exercise using a range of plugins. If some functionality is not provided out of the box you can add it by writing a plugin. It is written in the Go language.
We deploy CoreDNS as a deployment object in the kube-system namespace in a cluster with a service named “kube-dns”. It requires a configuration file that we call corefile located at /etc/coredns/Corefile.
Corefile and plugins:
Corefile consists of a number of plugins, plugins are configured for error handling, reporting health, monitoring metrics, cache etc.
The plugin that makes coreDNS to work with kubernetes is kubernetes plugin. In kubernetes plugin, top level domain of kubernetes cluster is set (cluster.local)
Also, it watches for new services by default. For pods, you have to enable ‘pod mode’ in Corefile under kubernetes plugin by making an entry as ‘pods POD MODE’ in the cluster. If a new object gets created, it adds the record of service or pods in coreDNS server.
The next step for the pods is to point to coreDNS IP address for DNS resolution by specifying nameserver in resolv.conf file. But, what address should it be? Well, you don’t need to care about this because DNS entries have been handled by the kubelet component.
When we install coreDNS in a cluster, we expose it as a service, so the IP address of that service is configured as a nameserver in pods by kubelet.
Again, my question is how does kubelet know this?
You can see the entry of coreDNS server in the kubelet configuration file as shown in figure 2a
You can also configure kubelet and run as service and pass clusterDns IP in that service file.
in minikube:
minikube ssh
cat /var/lib/kubelet/config.yaml
fig 2(a)
Self hosted k8s:
In our project we are not using managed kubernetes service, hence I’ll talk about self-hosted kubernetes cluster. You can check the clusterDns entry in kubelet service by doing ssh to any of the k8s node. Below is the service file we are using in our k8s cluster.
For services: svcname.namespace.type.rootDomain For pods: hostname.namespace.type.rootDomain
Example:
For services: test-service.default.svc.cluster.local
For pods: 10-244-2-5.default.pod.cluster.local
Inside the Corefile:
We pass Corefile as a config map in the cluster so that it remains decoupled from the deployment object of coreDNS. It has the plugins already configured. You can get the list of plugin chains here.
Let’s talk about kubernetes plugin, Using the kubernetes plugin, CoreDNS will read zone data from a Kubernetes cluster. It implements the spec defined for Kubernetes DNS-Based service discovery
Format:
Kubernetes ZONE {
pods POD-MODE
           fallthrough ZONE
           ttl time_in_sec
Inside the kubernetes plugin, there are a lot of options that you can go through here.
Let’s discuss the option we are using in the above Corefile.
pods POD-MODE sets the mode for handling IP-based pod A records, e.g.10-244-2-5.default.pod.cluster.local. in A 10.244.2.5. This option is provided to facilitate the use of SSL certs when connecting directly to pods.
Value for POD-MODE that we have used:
insecure: Always return an A record of pods.
fallthrough [ZONES…] If a query in the zones for which the plugin is authoritative it either returns a result, or it returns NXDOMAIN for the query. NXDOMAIN responses are created when a DNS has no listing for the domain requested. When fallthrough is enabled, instead of returning NXDOMAIN when a record is not found, the plugin will pass the request down the plugin chain which can include another plugin to handle the query.
ttl allows you to set a custom TTL for responses. The default is 5 seconds. The minimum TTL allowed is 0 seconds, and the maximum is capped at 3600 seconds. Setting TTL to 0 will prevent records from being cached.
Conclusion:
In this blog, we got to know how DNS plays an important role in kubernetes. coreDNS works with kubernetes by utilizing kubernetes plugin. It consists of various plugins that you can customize as per your use case. We got to know the format of kubernetes DNS records for services and pods. We explored kubelet configuration through which we learned how the kubelet component configures resolv.conf file. I hope this blog gives you some exposure to coreDNS which might help you to start off with the topic.