Earlier, while writing deployment files in k8s, I found that the pods were getting scheduled in any random node. The pods of small deployments got scheduled in large nodes, due to which large deployment pods were staying in a pending state. Therefore, I had to delete the small deployment pods, so that the large deployment pods could get scheduled in that particular node.
One day, I decided to get rid of this problem. While looking for a solution and exploring about Kubernetes, I got to know about Node taints and pod tolerations in Kubernetes. Here, in this blog, I’ll talk about node taints and pod toleration and how we can use it with nodeselector in kubernetes deployments.
Node taints
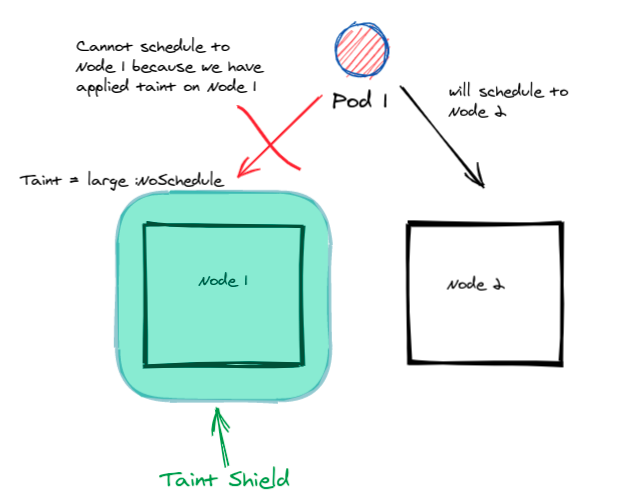
Taint is a property of a node(applied to nodes only) that allows you to repel a set of pods unless those pods explicitly tolerate the node taint.
In simple words, if we apply taints to a node it will create a restriction shield around the node which will prevent the pods to schedule inside that node.
When I got to know about Node taints, the first question that came to my mind was- In Kubernetes, we have 2 nodes Master & Worker and my pod always gets scheduled in the worker node but why not in the master node. Are there any taints applied to the master node?
The answer is yes, the master node is tainted with the “NoSchedule” effect by default so that no pod gets scheduled into it.
Visit here for more information.
Taint has three arguments i.e. a key, value and effect.
Command for applying Taint to the node .
kubectl taint node <Node_Name> <key=value:TAINT_EFFECT>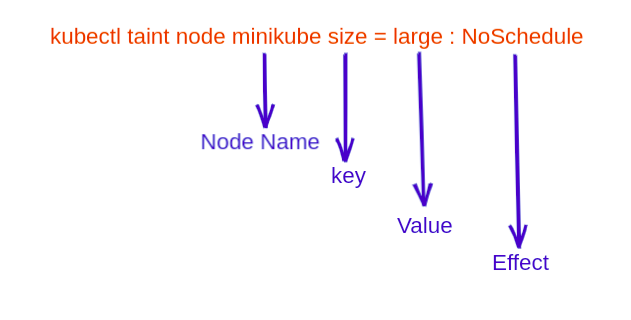
Taint Effects
There are three type’s of taint effect which we can apply to a node and
1- NoSchedule
If we apply this taint effect to a node then it will only allow the pods which have a toleration effect equal to NoSchedule. But if a pod is already scheduled in a node and then you apply taint to the node having effect NoSchedule, then the pod will remain scheduled in the node.
2- PreferNoSchedule
In this effect, it will first prefer for no scheduling of pod but if you have a single node and a PreferNoSchedule taint is applied on it. Then even if the pod didn’t tolerate the taint it will get schedule inside the node which has a taint effect: PreferNoSchedule.
3- NoExecute
This effect will not only restrict the pod to get scheduled in the node but also if a pod is already scheduled a specific node and we have applied a taint of effect NoExecute to the specific node, it will immediately throw out the pod outside the node.
Pod Toleration
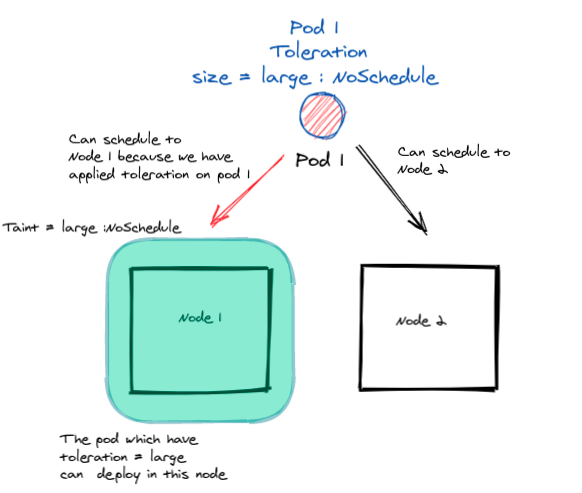
As we know that node taints will repel a pod from scheduling in it. So, in order to prevent this, Kubernetes provides a concept of pod toleration which gives pod an authority to get scheduled on the tainted node, if the toleration matches the node taint. Tolerations are specified in PodSpec:
apiVersion: apps/v1
kind: Deployment
metadata:
  name: noschedule-deployment
spec:
  replicas: 1
  selector:
    matchExpressions:
    - key: name
      operator: In
      values:
      - nginx
  template:
    metadata:
      labels:
        name: nginx
    spec:
      containers:
      - name: nginx-container
        image: nginx
        ports:
        - containerPort: 80
      tolerations:
      - key: size
        operator: "Equal"
        value: large
        effect: NoSchedule
If you take a look at the above deployment you will see tolerations block inside podSpec and inside that you will find some keywords like:
1 – key : The value which you have specified while applying node taint.
2 – value : Value that you have mentioned while applying the node taint.
3 – effect : Effect that you have mentioned while applying the node taint.
4 – Operator : There are 2 values of operator Equal and Exists.
Equal: If we specify operator as Equal, then we have to specify all the key , value, and effect option.
Exists: If we specify operator as Exists then it’s not compulsory to mention key, value, and effect option.
If you want to allow your pod to tolerate every node taint then inside the pod toleration’s part, you should mention only the operator : "Exists" .
By defining this your pod able will tolerate every taint which was applied on the node.
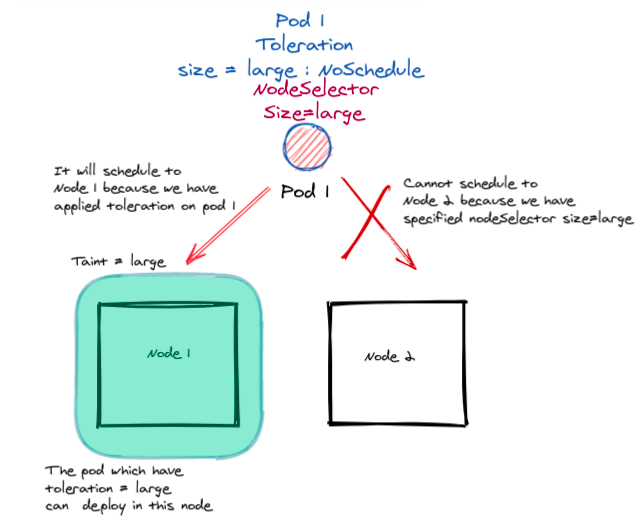
If there is only one node and then we are applying node taints and pod toleration’s then it’s fine but what if we have a number of nodes, then in that case, can we assure that our pod will get scheduled in a specific node?

So, the answer is yes. We can also assure that our pods get scheduled in a specific node by mentioning the nodeSelector property inside our pod specifications. We just have to mention the node label in which we want our pod to get scheduled.
You can use default labels of the node or you can apply custom labels to the node through :
kubectl label nodes <node-name> <label-key>=<label-value>
Yaml file showing nodeSelector property mentioned inside podSpec:
apiVersion: apps/v1
kind: Deployment
metadata:
  name: noschedule-deployment
spec:
  replicas: 1
  selector:
    matchExpressions:
    - key: name
      operator: In
      values:
      - nginx
  template:
    metadata:
      labels:
        name: nginx
    spec:
      containers:
      - name: nginx-container
        image: nginx
        ports:
        - containerPort: 80
      tolerations:
      - key: size
        operator: "Equal"
        value: large
        effect: NoExecute
      nodeSelector:
        size: large
What’s Next?
In the upcoming blog we will learn more into kubernetes scheduling types for example Node Affinity and Anti affinity as well as pod affinity and Anti affinity.
Stay Connected 🙂
Blog Pundit: Kapendra Singh
Opstree is an End to End DevOps solution provider