Recently while trying to set up Apache Nifi in cluster mode manually, I faced the challenge of performing same tasks on all nodes manually. In addition configuring the right cluster configurations was not easy. In my last blog here, I have covered the advantages of having nifi cluster over standalone and the manual steps to configure a Nifi cluster with external zookeeper.
In this article, I will show you how you can set up a three-node Zookeeper and Nifi cluster with terraform which will minimize the steps we have to perform with manual setup.
Apache NiFi is an open-source data integration and automation tool that enables the automation of data flow between different systems. NiFi provides a user-friendly interface to design, control, and manage the flow of data between various sources and destinations. The tool is particularly useful in handling data from different sources, applying transformations, and routing it to different systems in real-time.
Advantage of Using Terraform for Nifi
Terraform allows you to define your NiFi cluster infrastructure as code, making it easily versioned, shareable, and easy to understand. This ensures that your infrastructure is consistent across different environments. This helps in maintaining consistency and reducing the chances of configuration drift. As your NiFi cluster requirements evolve, Terraform makes it simple to scale your infrastructure up or down by adjusting the configuration.
Setting Up Apache Nifi Cluster with External Zookeeper
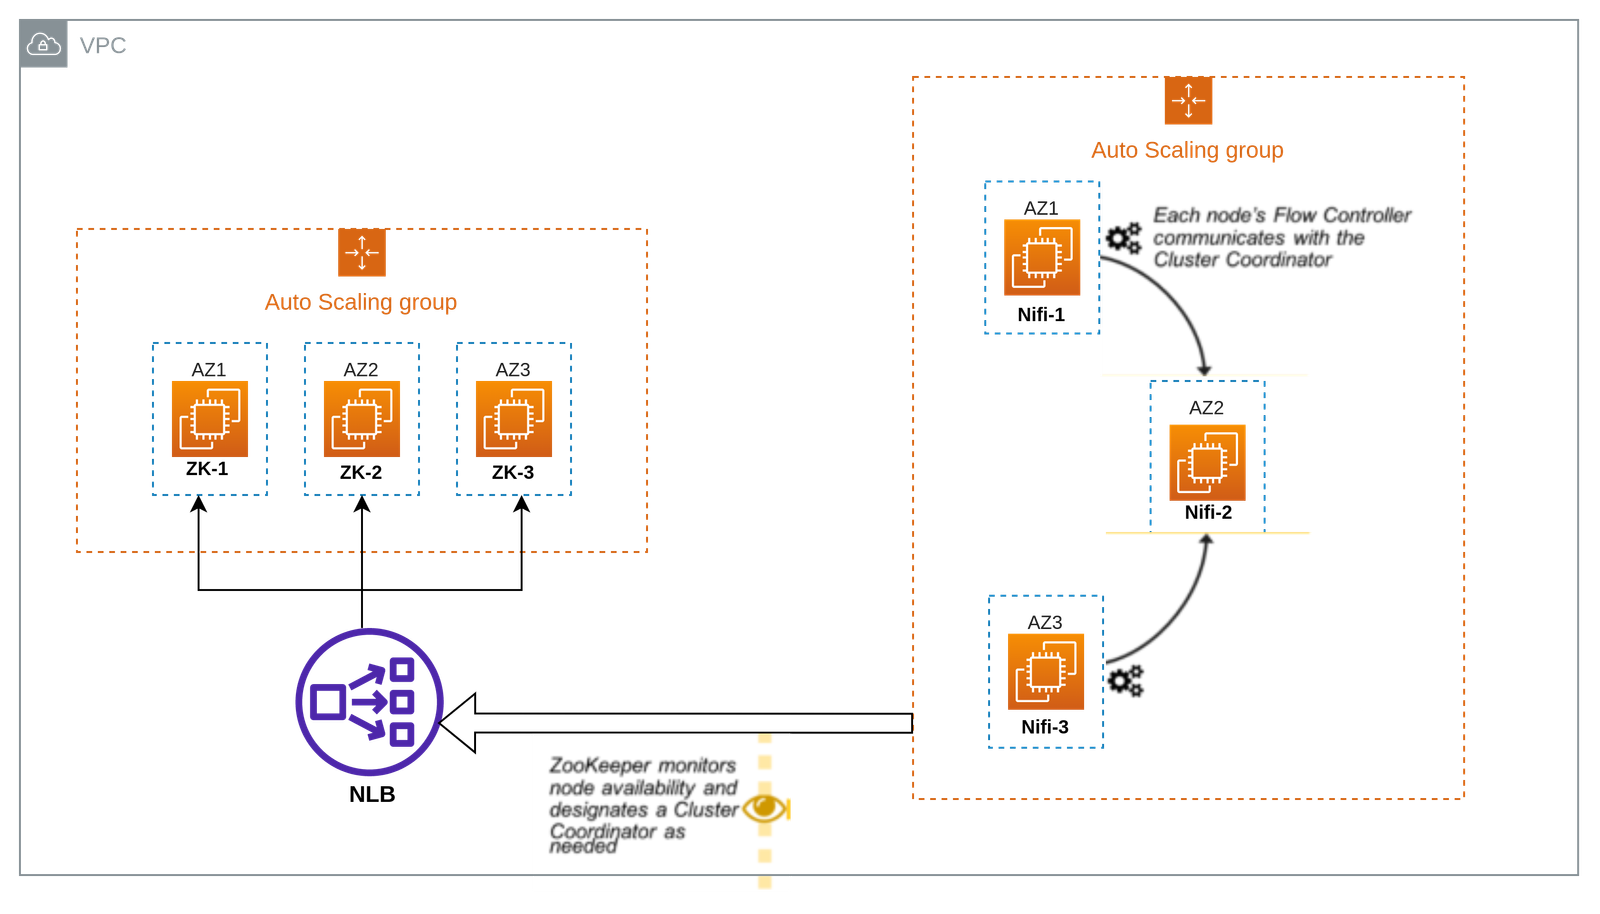
As shown in the diagram above we will setup a highly available zookeeper and nifi cluster across availability zones in AWS.
Three Node Zookeeper Cluster Setup
Prerequisites
Before you begin this installation, you will need the following:
- An AWS account and IAM user with required privileges.
- VPC and three private subnets.
- Terraform is installed on your machine.
Now let’s break down the steps involved in setting up our Zookeeper cluster.
Step 1 – Clone the zookeeper module.
Zookeeper module can be found here
Step 2 – Have a look at ec2-int.sh and terraform.tfvars and modify it according to your requirements.
#!/bin/bash
sudo apt-get update -y
sudo apt-get upgrade -y

#Install Java
sudo apt install openjdk-17-jdk openjdk-17-jre -y
echo 'export JAVA_HOME=/usr/lib/jvm/java-17-openjdk-amd64' | sudo tee -a /etc/profile
echo 'PATH=$PATH:$JAVA_HOME/bin' | sudo tee -a /etc/profile
source /etc/profile

cd /home/ubuntu && wget http://archive.apache.org/dist/zookeeper/zookeeper-3.8.0/apache-zookeeper-3.8.0-bin.tar.gz
cd /home/ubuntu && tar -xvzf apache-zookeeper-3.8.0-bin.tar.gz
cp -R /home/ubuntu/apache-zookeeper-3.8.0-bin /home/ubuntu/zookeeper
cd /home/ubuntu/zookeeper/conf && touch zoo.cfg
chown -R ubuntu: /home/ubuntu/*

cat <<EOT >> /home/ubuntu/zookeeper/conf/zoo.cfg
dataDir=/var/lib/zookeeper
clientPort=2181
initLimit=5
syncLimit=2
server.1=<zookeeper-hostname>:2888:3888
server.2=<zookeeper-hostname>:2888:3888
server.3=<zookeeper-hostname>:2888:3888
EOT

sudo mkdir /var/lib/zookeeper
sudo touch /var/lib/zookeeper/myid
sudo sh -c "echo 'zk-id' > /var/lib/zookeeper/myid"
sudo /home/ubuntu/zookeeper/bin/zkServer.sh restart
This bash script performs the following actions:
- Installing and Configuring Java 17 as it is required for Zookeeper.
- Installing and Extracting Apache-Zookeeper-3.8.0.
- Creating and Updating Zookeeper configuration file.
Step 3- After modifying the values as per your requirement, run terraform commands to provision zookeeper cluster.
Note: Please go through README carefully for more details.
After following the steps above if you check the status of the zookeeper on each node, you will one server elected as leader and the other two as followers. Once the zookeeper cluster is up and we have the NLB DNS we will proceed for Nifi Cluster setup.

Three Node Nifi Cluster Setup
Prerequisites
Before you begin this installation, you will need the following:
- An AWS account and IAM user with required privileges.
- VPC and three private subnets.
- Terraform is installed on your machine.
- Understanding of how nifi works with external zookeeper.
Step 1 – Clone the Nifi-Autoscaling module.
Nifi module can be found here
Step 2 – Have a look at ec2-int.sh and terraform.tfvars and modify it according to your requirements.
#!/bin/bash
sudo apt-get update -y
sudo apt-get upgrade -y

#Install Java
sudo apt install openjdk-17-jdk openjdk-17-jre -y
echo 'export JAVA_HOME=/usr/lib/jvm/java-17-openjdk-amd64' | sudo tee -a /etc/profile
echo 'PATH=$PATH:$JAVA_HOME/bin' | sudo tee -a /etc/profile
source /etc/profile

function prop_replace() {
    local filepath=$1
    local propname=$2
    local propvalue=$3
    local delim="="

    #Check if file exists
    if [ ! -f "${filepath}" ]; then
       echo "File '${filepath}' does not exist"
       return 1
    fi

    #Escape forward slashes in property value
    propvalue=${propvalue//\//\\/}

    #Replace property in file
    sed -i -e "s|^${propname}${delim}.*|${propname}${delim}${propvalue}|" "${filepath}"

    return 0
  }
 # Install unzip
sudo apt-get install unzip -y

#Install nifi
cd /home/ubuntu && wget https://archive.apache.org/dist/nifi/1.19.1/nifi-1.19.1-bin.zip
unzip /home/ubuntu/nifi-1.19.1-bin.zip
mv /home/ubuntu/nifi-1.19.1 /home/ubuntu/nifi

# Install toolkit
wget https://archive.apache.org/dist/nifi/1.19.1/nifi-toolkit-1.19.1-bin.zip
unzip /home/ubuntu/nifi-toolkit-1.19.1-bin.zip
mv /home/ubuntu/nifi-toolkit-1.19.1 /home/ubuntu/nifi-toolkit
chown -R ubuntu: /home/ubuntu/*

#Configure nifi cluster
prop_replace /home/ubuntu/nifi/conf/nifi.properties "nifi.web.http.port" "8443"
prop_replace /home/ubuntu/nifi/conf/nifi.properties "nifi.web.http.host" "<nifi-hostname>"
prop_replace /home/ubuntu/nifi/conf/nifi.properties "nifi.content.claim.max.appendable.size" "1MB"
prop_replace /home/ubuntu/nifi/conf/nifi.properties "nifi.provenance.repository.max.storage.time" "24 hours"
prop_replace /home/ubuntu/nifi/conf/nifi.properties "nifi.remote.input.socket.port" "9997"
prop_replace /home/ubuntu/nifi/conf/nifi.properties "nifi.remote.input.host" "<nifi-hostname>"
prop_replace /home/ubuntu/nifi/conf/nifi.properties "nifi.remote.input.secure" "false"
prop_replace /home/ubuntu/nifi/conf/nifi.properties "nifi.cluster.is.node" "true"
prop_replace /home/ubuntu/nifi/conf/nifi.properties "nifi.cluster.node.address" "<nifi-hostname>"
prop_replace /home/ubuntu/nifi/conf/nifi.properties "nifi.cluster.node.protocol.port" "9998"
prop_replace /home/ubuntu/nifi/conf/nifi.properties "nifi.cluster.node.protocol.max.threads" "10"
prop_replace /home/ubuntu/nifi/conf/nifi.properties "nifi.cluster.flow.election.max.wait.time" "2 mins"
prop_replace /home/ubuntu/nifi/conf/nifi.properties "nifi.zookeeper.connect.string" "<zookeeper-hostname>:2181"
#Restart nifi
/home/ubuntu/nifi/bin/nifi.sh restart
This bash script performs the following actions:
- Installing and Configuring Java 17 as it is required for Nifi.
- Installing and Extracting Nifi-1.19.1 .
- Installing and Extracting Nifi -toolkit-1.19.1 , which is useful for security configurations.
- Updating nifi.properties file with required values.
Step 3- After modifying the values as per your requirement, run the terraform commands.
Note: Please go through README carefully for more details.
After following the steps above, we should see a cluster being formed if we access nifi on
http://<hostname>:8443/nifi
Conclusion
So in this blog, I have shared the terraform code and steps to minimize the time to provision a highly available nifi cluster with external zookeeper. If you guys have any ideas or suggestions about my approach, please comment in the comment section. I would really appreciate your suggestions and feedback. Thanks for reading.
Blog Pundits: Pankaj Kumar and Sandeep Rawat
OpsTree is an End-to-End DevOps Solution Provider.
Connect with Us