why do we need to use cert-manager?
Cert-Manager simplifies the process of creating & renewing certificates. It makes sure your certificate is valid and up to date by renewing the certificate automatically for you in your kubernetes cluster. So that your domain certificate never expires.
What is Cert-Manager?
Cert-Manager is a Kubernetes native certificate management controller consisting of a set of CustomResourceDefinitions. When we add cert-manager in our Kubernetes cluster it adds on the certificate & certificate issuers as custom resource types in the Kubernetes cluster. which helps in adding or renewing the certificate. It also ensures that your certificate is valid and up to date. Cert-manager can issue certificates from a variety of sources such as let’s encrypt, Vault, and SelfSigned, Venafi.
How cert-manager is related to HTTP & HTTPS?
As cert-manager helps in assigning the certificate from certificate Issuers to our domain. Now that certificate will be used by HTTPS protocol where “S” stands for secure. HTTP protocol was developed in the early 1990s and was initiated by Tim Berners-Lee. HTTP gives users a way to interact with web resources such as HTML files by transmitting hypertext messages between clients and servers. However, it does not provide a single level of security when exchanging information between client and server. Therefore it is more prone to attackers as it sends that data as plain text.

That is when HTTPS comes to the rescue. HTTPS uses the SSL/TLS protocol to encrypt communication b/w client and server so that attackers can’t steal the data. It also confirms that a website server is who it says it is, preventing impersonations.
Now it is time to walk you through the configuration steps that are required to automatically enable TLS on your public Kubernetes services.
Prerequisites:
To Follow the steps in this article, you will need the setup
- A Kubernetes cluster up & running with version 1.20+.
- Kubectl CLI is installed and configured to talk to your Kubernetes cluster.
Install Helm
Helm is an official Kubernetes native package manager. It allows you to install applications on your Kubernetes cluster in a similar manner to yum/apt for Linux Distribution. If you are using Debian/Ubuntu in your system, run the following command to install helm
curl https://baltocdn.com/helm/signing.asc | gpg --dearmor | sudo tee /usr/share/keyrings/helm.gpg > /dev/null
sudo apt-get install apt-transport-https --yes
echo "deb [arch=$(dpkg --print-architecture) signed-by=/usr/share/keyrings/helm.gpg] https://baltocdn.com/helm/stable/debian/ all main" | sudo tee /etc/apt/sources.list.d/helm-stable-debian.list
sudo apt-get update
sudo apt-get install helm
If you are using a different OS then you can install it from HELM
documentation.
What is Kong Ingress Controller?
In the Kubernetes world, an Ingress is an object that manages external access to services within a cluster. Kong ingress controller is also used to manage the external traffic that is coming from the outside world to your kubernetes cluster. It is also used in health checks & load balancing the traffic b/w the pods. Kong Ingress controller is available as open source as well as in enterprise version which is paid one. If you want to know more about Kong Ingress Controller CLICK HERE.
Install Kong Ingress
Now we will deploy Kong Controller using the helm chart.
helm repo add kong https://charts.konghq.com
helm repo update
helm install kong/kong --generate-name --set ingressController.installCRDs=false
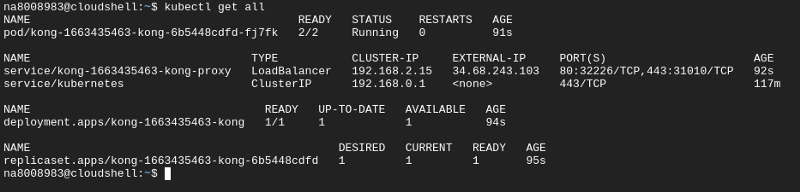
Once we have deployed the Kong Ingress controller. Now we need to verify if it was running or not.
Install Cert-Manager
Cert-manager provides helm chart as the first-class installation on Kubernetes. To install cert-manager in your Kubernetes cluster run the following commands.
helm repo add jetstack https://charts.jetstack.io
helm repo update
kubectl apply -f https://github.com/cert-manager/cert-manager/releases/download/v1.9.1/cert-manager.crds.yaml
helm install \
cert-manager jetstack/cert-manager \
--namespace cert-manager \
--create-namespace \
--version v1.9.1
To Verify your cert-manager pod is up & running run the below command and you will see a similar output as shown in figure 1.0
kubectl get pod -n cert-manager

Issuer
Issuer represents Kubernetes resource certificate authorities (CAs) that are able to generate signed certificates by honoring certificate signing requests. All cert-manager certificates that we created required referenced issuers that are in a ready condition to attempt to honor requests.
There are 2 types of Issuer:
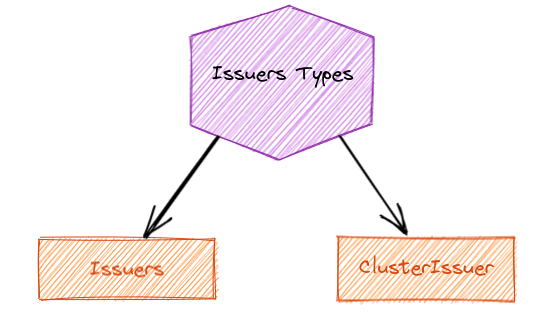
Issuer: This Issuer works at the namespace level for creating and renewing certificates. We need to create different Issuers for each and every namespace.
ClusterIssuer: This ClusterIssuer works at the cluster level. This means we don’t create an Issuer for each and every namespace.
Now let’s create an Issuer that which we will make use of for obtaining the certificate.
Begin by creating a manifest YAML file for it “ClusterIssuer.yaml” and add the following text to it. In the server section of the yaml manifest, you will find the staging URL of the let’s encrypt server that will generate the certificate for the staging environment. Once we will be done with testing our ClusterIssuers i.e Let’s encrypt in that we are successfully able to generate the certificate then we can move to production as well.
apiVersion: cert-manager.io/v1
kind: ClusterIssuer
metadata:
  name: letsencrypt-staging
spec:
  acme:
    server: https://acme-staging-v02.api.letsencrypt.org/directory
    email: abc@gmail.com
    privateKeySecretRef:
      name: letsencrypt-staging-key
    solvers:
    - http01:
        ingress:
          class: kong
To verify that our ClusterIssuer is created successfully or not. Run the command & you will see the output as shown in Figure 1.1
kubectl get ClusterIssuer

As of now, we have deployed the Kong controller, cert-manager & ClusterIssuer. Now it’s time to create a certificate from the ClusterIssuer that we created. But before going ahead with creating a certificate we need to understand the Challenges.
In order for the ACME (Automated Certificate Management Environment) CA server to verify that the certificate that you are requesting for a domain is owned by you or not. It performs challenges validation. cert-manager offers two challenges validation- HTTP01 and DNS01 challenges.
Now we will create a manifest yaml (certificate.yaml) for the certificate.
apiVersion: cert-manager.io/v1
kind: Certificate
metadata:
  name: staging
  namespace: default
spec:
  issuerRef:
    name: letsencrypt-staging
    kind: ClusterIssuer
  secretName: cert-testing
  dnsNames:
  - xyz.besttechclub.site
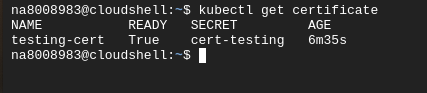
Now you can verify whether your certificate is created or not.
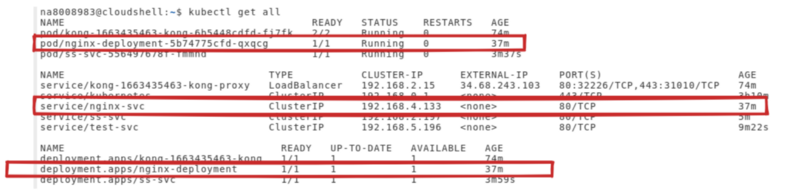
Now you can create a deployment (deployment. yaml ) and expose the svc using the ingress object.
apiVersion: v1
kind: Service
metadata:
  name: nginx-svc
  namespace: default
spec:
  selector:
    app: nginx
  ports:
   - protocol: "TCP"
     port: 80
     targetPort: 80
  type: ClusterIP
---
apiVersion: apps/v1
kind: Deployment
metadata:
  name: nginx-deployment
  namespace: default
spec:
  selector:
    matchLabels:
      app: nginx
  replicas: 1
  template:
    metadata:
      labels:
        app: nginx
    spec:
      containers:
        - name: airport-cab
          image: nginx:latest
          imagePullPolicy: Always
          ports:
          - containerPort: 80
---
apiVersion: "networking.k8s.io/v1"
kind: "Ingress"
metadata:
  name: "nginx-ssl"
  namespace: "default"
  annotations:
    konghq.com/plugins: "global-datadog"
    konghq.com/strip-path: "true"
    certmanager.k8s.io/cluster-issuer: letsencrypt-staging
spec:
  tls:
  - hosts:
    - "xyz.besttechclub.site"
    secretName: cert-testing
  ingressClassName: "kong"
  rules:
  - host: "xyz.besttechclub.site"
    http:
      paths:
      - path: "/"
        pathType: "Prefix"
        backend:
          service:
            name: "nginx-svc"
            port:
              number: 80
kubectl apply -f deployment.yaml
Once done with the deployment Now you can verify it.
Now you can hit your domain URL on a web browser and will see the Let’s encrypt assign the certificate for it.
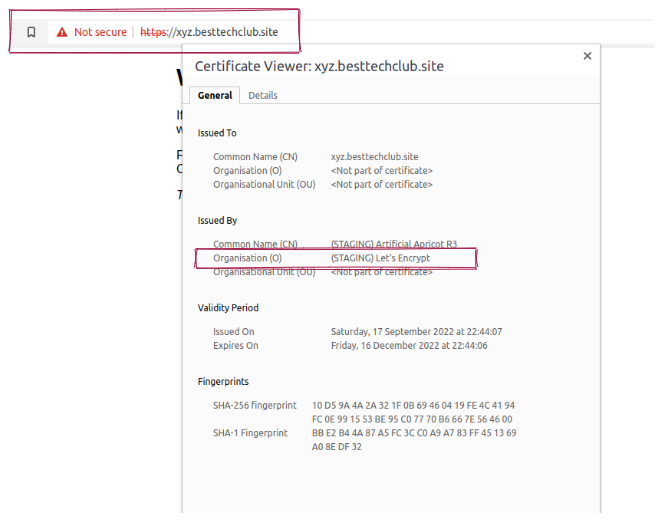
Once we are done with the testing in the staging environment we can implement the ClusterIssuer with the Production URL such that the not secure symbol totally disappeared for the user. To do so we need to change the server URL of Cluster Issuer to
server: https://acme-v02.api.letsencrypt.org/directory
Conclusion
Using cert-manager, kong-ingress & Let’s Encrypt we can automate the process of creating and renewing the certificate in the Kubernetes cluster, and also we can manage the end-to-end encrypted connection between the client & Kubernetes cluster.
References
- https://cert-manager.io/docs/
- https://letsencrypt.org/getting-started/
Blog Pundits: Bhupender rawat and Sandeep Rawat
Opstree is an End to End DevOps solution provider.
Connect with Us