We’re on the verge where all the small to big organisations are shipping software to customers in minutes. Earlier this was not possible, but thank’s to Continuous Integration (CI) and Continuous Delivery (CD) that made it possible.
Continuous Integration (CI) is the practice of integrating code changes from multiple contributors into a single project via automation. Continuous Delivery (CD) is the automated process to build, test, configure & deploy software into the production environment. Both methods combined make it possible to build, test & deploy everyday code changes into the production environment.
There are lots of tools in the market to implement CICD, one among which we are about to discuss today in this post.
Let me introduce you to Buildkite.
Buildkite
Buildkite is a CI and build automation tool that combines the power of your own build infrastructure with the convenience of a managed, centralized web UI. It is a hybrid SaaS platform designed for enterprise scale. You can run as many jobs as you need and buildkite will manage the orchestration and reporting. You’re in charge of your builds, Buildkite is in charge of the platform.
Buildkite consists of three main components:
Buildkite Agent:
The Buildkite agent is a small, reliable, and cross-platform build runner that makes it easy to run automated builds on your own infrastructure. Agents run on several platforms including Ubuntu, Debian, Mac, Windows, Docker, and others. Its main responsibilities are polling buildkite.com for work, running build jobs, reporting back the status code and output log of the job, and uploading the job’s artifacts.
How does Buildkite Agent Work?
The agent works by polling Buildkite’s agent API over HTTPS. Since HTTPS protocol is used there is no need for port forwarding or firewall access for incoming requests. The agent registers itself with Buildkite & places it into your organization’s agents pool. Because of this scaling of agents is very easy with Buildkite.
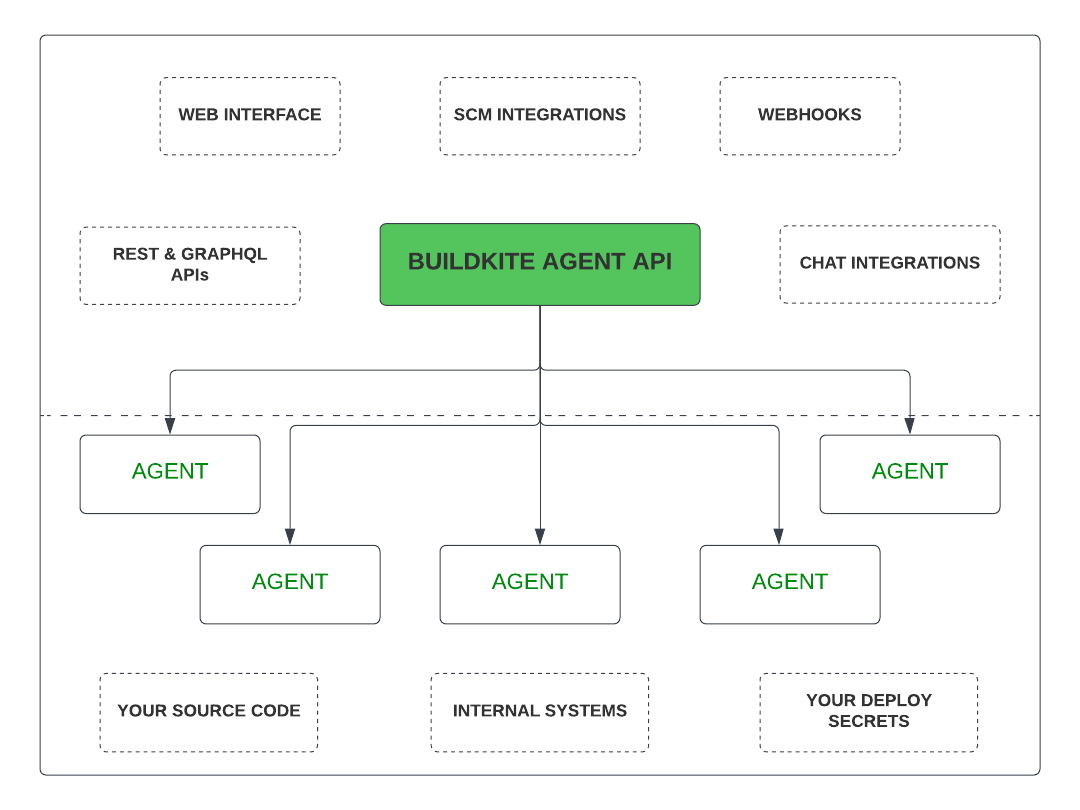
The agent polls Buildkite for a new build job. Once received and accepted, the agent will execute the command, stream back the build script’s output, and then posts the final exit status. Whilst the job is running, you can use the buildkite-agent meta-data command to set and get build-wide meta-data.
Buildkite provides a rich set of metadata that can be used in post-build actions or post-build notifications.
Pipelines:
Pipelines are containers to define and model the build workflows and also to kick off post-build steps.
A pipeline is a template of the steps or instructions that need to be executed during the build. There are many types of steps that can be included in a single pipeline, some run source code pull, code build, some run scripts, some define conditional logic, and others wait for user input. We can include any number of steps in the pipeline template. When the pipeline is run, a build gets created. Each of the steps in the pipeline ends up as jobs in the build, which then get distributed to available agents.
Deployments:
These are steps that run after a build is complete and can be either triggered automatically or manually.
There are many ways to set up both manual and continuous deployment workflows using Buildkite. This covers various ways of architecting deployment pipelines, common workflows, and how to integrate with external deployment systems.
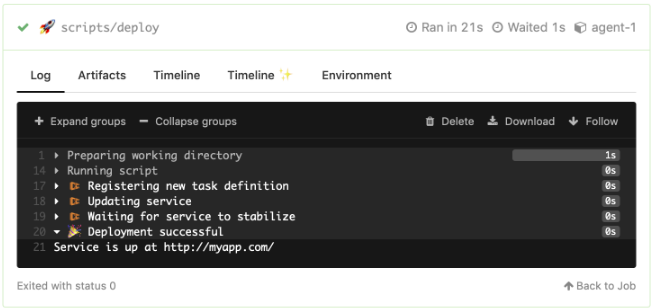
Single deployment steps:
Adding a deployment step that runs after your tests pass is the simplest way to deploy from a Buildkite pipeline.
The example pipeline.yml below shows how to set up continuous deployment using a single step that runs after the tests pass.
steps:
  - label: "🔨"
    command: "scripts/tests"

  - wait

  - label: "🚀"
    command: "scripts/deploy"
    if: build.branch == 'main'
    concurrency: 1
    concurrency_group: "my-app-deploy"
This pipeline uses a conditional to only run on commits to the main branch and sets a concurrency limit of 1 to ensure that only one deployment happens at a time.
Deployment plugins:
There are Buildkite plugins available for various systems and tools. For example, the ECS Deploy plugin and the AWS Lambda Deploy plugin.
The following example shows how to use the ECS Deploy plugin to automatically deploy a pre-built Docker image to an AWS ECS service:
steps:
  - block: "Deploy"
    prompt: "Deploy to production?"
  - label: ":ecs: 🚀"
    concurrency: 1
    concurrency_group: "rails-app-deploy"
    plugins:
      - ecs-deploy#v1.3.0:
        cluster: "production"
        service: "app"
        task-definition: "production-deploy/rails-app.json"
        task-family: "rails-app"
        image: "my.ecr.repo/rails-app:${BUILDKITE_COMMIT}"
        task-role-arn: "deployer"
        deployment-configuration: "100/200"
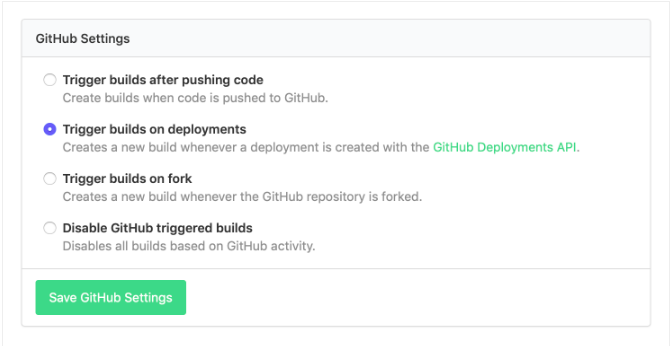
You can set up your pipelines to create a build whenever there is a deployment created in GitHub. You can trigger these builds using a call to GitHub’s Deployments REST API, or using the GitHub Slack app’s /github deploy my-org/my-repo command.
To enable builds to be created from GitHub deployment events, create a pipeline and select ‘Trigger builds on deployment’ in your Buildkite pipeline’s GitHub settings:
To customize the deployment’s environment name and URL in GitHub, you can set the following two build meta-data values in the pipeline that performs the deployment:
buildkite-agent meta-data set "github_deployment_status:environment" "staging"
buildkite-agent meta-data set "github_deployment_status:environment_url" "https://staging.my-app-dev.com/"
Understanding Buildkite’s Hybrid Infrastructure & Scalablity
Scalability
Buildkite is a hybrid SaaS platform designed for enterprise scaling. Since the agents are self-hosted you will have complete control over the parallel scaling of your CI tasks. You can add unlimited agents at no extra cost. Run as many jobs as you need and Buildkite will manage the orchestration and reporting. You’re in charge of your builds, Buildkite is in charge of the platform.
Extensibility
Buildkite makes it easy to create, find, and implement integrations with third-party technologies, with an extensive library of plugins and deep native support for major source control, containers, and dev tool solutions. It also allows you to write & use your own plugins, this helps customize your pipeline to your specific workflow.
Security
With the self-hosted Buildkite agent jobs are run in your environments, behind your firewall. Because your source code is never shared with Buildkite, Buildkite provides the control and security of on-prem combined with the convenience of self-hosting.
Advantages of using Buildkite:
- Hybrid Platform: Buildkite provides a SaaS platform to define and visualize pipelines, and an agent to execute jobs on customer-managed infrastructure.
- Extensive Self-Hosted Job Support: Including team permission management, robust CLI & API controls, built-in DataDog integration, and automatic AWS & Google Cloud tagging/labeling.
- Flexible Pipeline Creation: Pipelines can be defined via an in-UI step builder, as a YAML file, or dynamically via scripts in your source repository.
- Unlimited Job Concurrency: Self-hosted agents give you full control to parallelize your CI tasks at any scale.
- Uncapped Usage Limits: No usage caps. Deploy with confidence whether you need to run 10 or 10,000 builds at a time.
- Unlimited Job Queue Limits: Queue up as much work as you need for as long as you need it.
- Pricing: Buildkite charges USD$ 15 per user, per month for a plan that includes unlimited agents, unlimited builds, unlimited artifacts, Public build pipelines, Private build pipelines, Teams permissions, Single Sign On, Priority email support & Free 14-day trial. Also provides an open source plan that is free of charges that includes Unlimited agents, Unlimited builds, Unlimited artifacts, Public build pipelines.
Conclusion:
There are so many CICD tools in the market that have their own advantages, but deciding which suits your requirement is a challenging task. Hope this blog will help you decide if Buildkite is the perfect CICD tool for your requirement.
That’s all for today!
I hope you guys have enjoyed the reading, if you have any feedback or suggestions, please reach out to me. In the upcoming blog on Buildkite, we will discuss configuring a pipeline in Buildkite.
Blog Pundit: Deepak Gupta and Sanjeev Pandey
Opstree is an End to End DevOps solution provider
Connect Us