The beauty of this service is that it mostly take care of everything .. eg:
- You dont need to manage any servers.
- You dont have to write logic for blue-green or rolling deployment in AWS. CodeBuild has predefined deployment configurations which we can simply use it.
- It’s highly scalable . So no build needs to wait for other builds to complete. we can run as many builds concurrently.
- Pay as you go : With AWS CodeBuild, you are charged based on the number of minutes it takes to complete your build. This means you no longer have to worry about paying for idle build server capacity.
So I hope that now you got some idea how CodeBuild , CodeDeploy and CodePipeline can help us in CI/CD process. So if you dont want to take headache of managing packages and server and builds , then these services would be right option for you.
There are lot of other things that we can do , specifically in buildspec and appspec.yml file which I will cover in different blog. Just wanted to explain simple flow of CI/CD in this blog.
Thanks for reading, I’d really appreciate the feedback. So, please leave your comment below if you guys have any queries related to this blog.
Related Searches – AWS Partner | Cloud Engineering Services
As we know that CI/CD (Continuous Integration/Continuous Deployment) is inevitable process in our DevOps culture , we should always look for a better .. more efficient solution to implement the same.
CI/CD gives us the capability to continuously integrate code changes, test it , deploy it and having continuous feedback which helps us to accelerate our development speed , off-course it reduces time in testing perspective and it helps you to make your releases streamline.
So you dont have to worry about anything except CODING as CI/CD will take care of everything for you. 🙂
There are lot of tools in market which helps you to implement CI/CD . ..Well I was using “Jenkins” as a CI/CD tool which I guess is the best open-source tool that I have ever known 🙂 .
But Today, we will talk about some other good alternatives : AWS CodeBuild , CodeDeploy and CodePipeline and its benefits over other available tools in market.
In this blog, I will explain about the process to implement CI/CD step by step via above mentioned AWS services.
Here, we will deploy a sample Java application spring3hibernate in Ec2 servers which is behind an Application load Balancer using rolling deployment strategy.
STEP -1 Create a CodeBuild Project
We will use CodeBuild project to test and build the above sample Java app and prepares the artifact (WAR file) which we will use it later for deployment.
Search CodeBuild service in AWS console navigation panel and then click on Create Build project.
As you can see below, we need to fill out CodeBuild Project Configuration. Mention Project Name , Description with some Tags as per your choice.

Then next part is Source. This section will describe the source provider from where CodeBuild will fetch your source code.
It can be CODECOMMIT | CODEPIPELINE | GITHUB | S3 | BITBUCKET | GITHUB_ENTERPRISE | NO_SOURCE
In our case it’s S3. We will store our source code as a zip in s3 bucket spring3-hibernate-app-bucket. Mention s3 object key as well and that will be the name of source code file that you have uploaded in s3 bucket.

Next step is to define Environment on which CodeBuild project will run. You can use AWS Managed Image or your Custom Image from ECR. For simplicity I am using AWS managed image here as Amazon Linux 2 OS.
Then you need to select Service Role. AWS by default provides you a new service role which will give your CodeBuild project access to S3 , CloudWatch logs etc as per your configuration.

Select the compute size of CodeBuild project as per the requirement. In our case 3 GB memory would be enough.

Now the main part comes which is BuildSpec. Here you need to specifiy what commands you want to run to build your application. So there are two options to do the same :
Use a Buildspec file : You need to include this file (by default buildspec.yml filename) in root directory of your source code. (This is what we will do in next step).
OR
Insert Build commands: You can simply enter commands in the console that you want to run.
You can use below content to prepare your buildspec.yml file and place it in root directory of your source code.
The first phase “Build” will run mvn test and if it passes, then the second phase “Post_Build” will get triggered and it will execute mvn package command which will generate a WAR file. And then we specify Artifacts name that will get stored in S3 bucket. Change the name of the WAR file according to you. I have mentioned appspec.yml file as an artifact which I will explain later about its significance.
version: 0.2
phases:
  build:
    commands:
      - echo Build started on `date`
      - mvn test
  post_build:
    commands:
      - echo Build completed on `date`
      - mvn package
artifacts:
  files:
    - appspec.yml
    - target/Spring3HibernateApp.war
  discard-paths: yes
Select Use a Buildspec file option and move on to Artifacts section where we will specify where we need to store project’s final artifacts. I am storing in same Source S3 bucket (spring3-hibernate-app-bucket) and selected Zip option to compress the artifacts.

And here comes the last part of Creating a CodeBuild project “LOGS”. This is an optional parameter. If you want to see logs of CodeBuild project execution , you need to select atleast one of the option (Cloudwatch / S3) .

Congratulations 🙂 you just created your CodeBuild project. So Now lets jump onto CodeDeploy part but before that we need to do one thing:
Place this appspec.yml file in the root directory of your source code. Here we are just specifying where our source code will be deployed in server (I mean in which location inside target server. ) In our case we are using tomcat for serving our application. So we are placing zip source code in /var/lib/tomcat7/webapps/ oath.
version: 0.0
os: linux

files:
  - source: / destination: /var/lib/tomcat7/webapps/

permissions:
  - object: /
    pattern: "**"
    owner: tomcat
    group: tomcat
For more info on Codebuild project , refer AWS docs https://docs.aws.amazon.com/codebuild/latest/userguide/welcome.html
STEP -2 Create CodeDeploy App
We will use Codedeploy service to fetch latest build artifact and deploy it to the target instances one by one. But to make it work , you need to install codedeploy–agent in your Ec2 machines .
So Navigate to CodeDeploy service and click on Create Application. Mention CodeDeploy app name and select Ec2/On-premises as a Compute platform as we will be deploying app in Ec2. And then click on Create Application

Now we need to create a deployment group which will define on which instances it will deploy artifatcs.
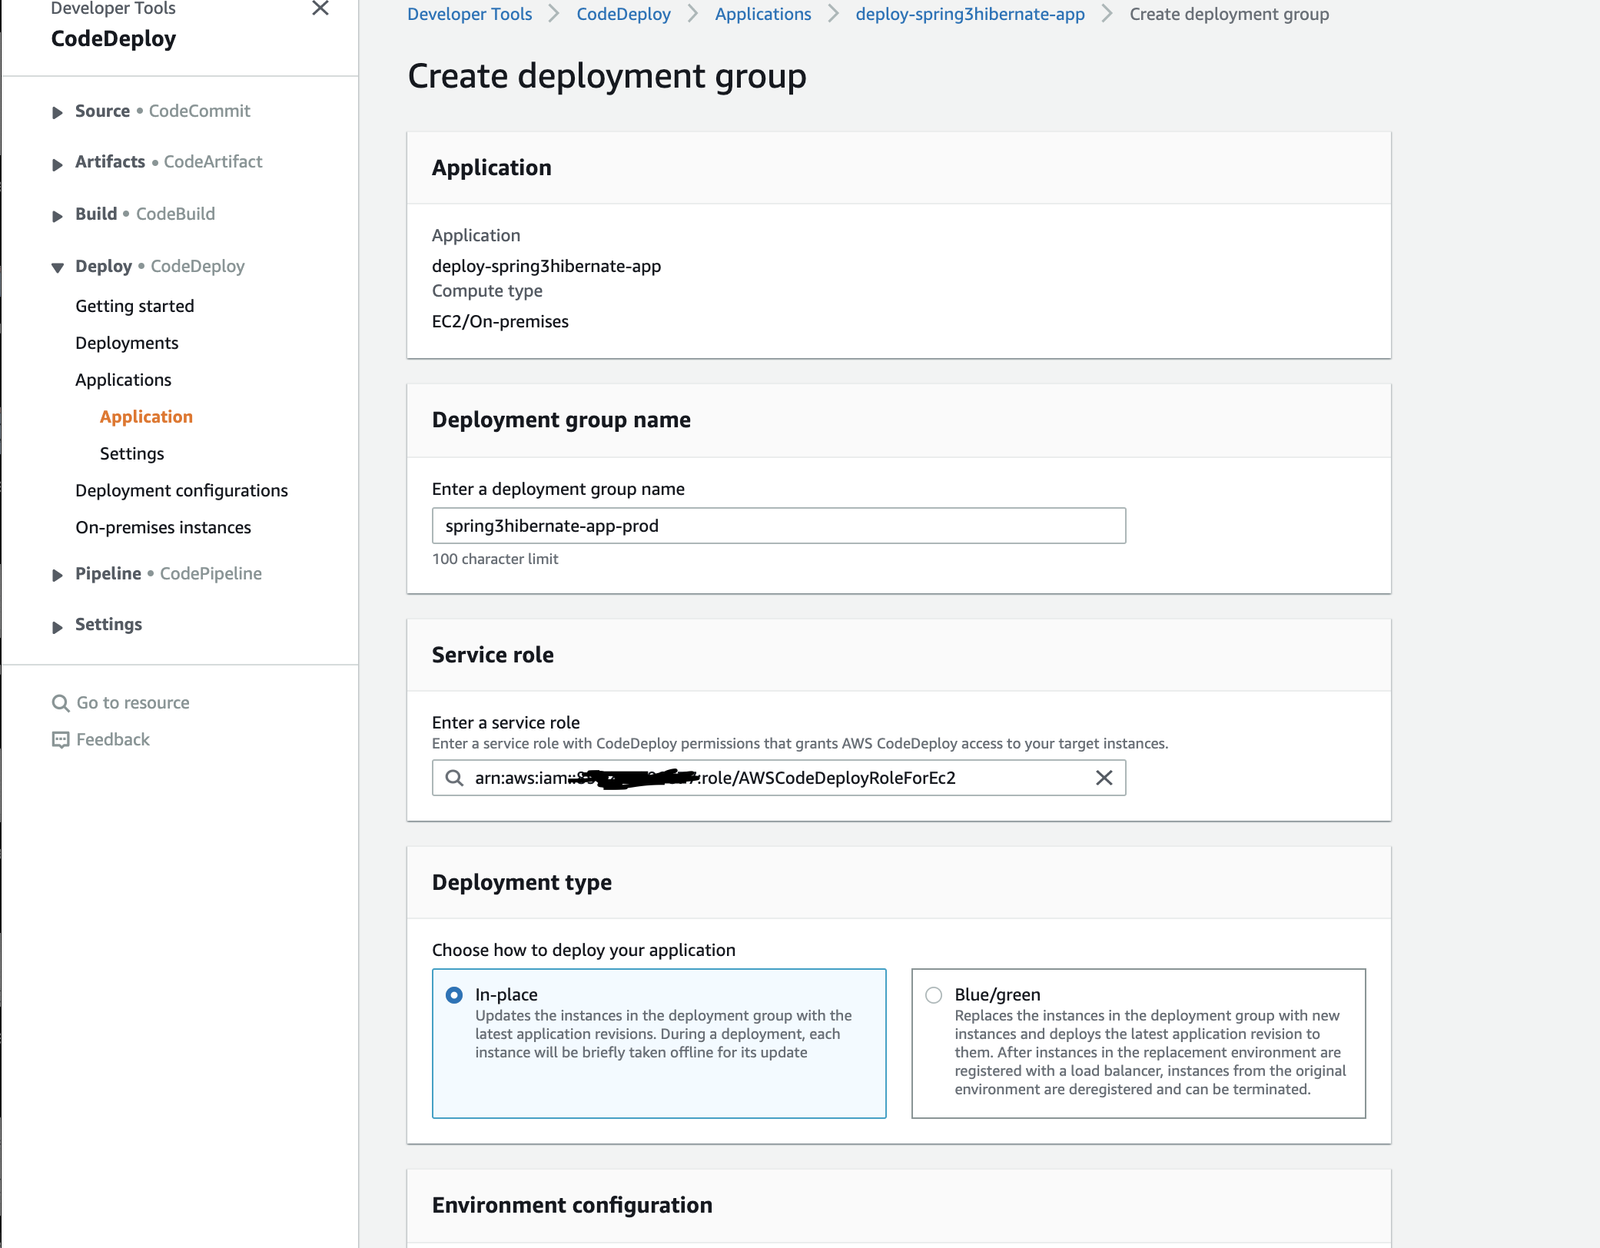
Click on Create Deployment Group

Mention deployment group name. After that provide Service role Arn. You can create a service role in IAM with AWSCodeDeployRole IAM policy attach and add codedeploy service as a Trust entity.
And then you need to specify the type of deployment you need to do .. either IN-PLACE or BLUE/GREEN. In this blog we will be using In-place deployment.
Now Select Amazon Ec2 instance in Environment Configuration and then we need provide tags . On the basis of tags provided CodeDeploy will fetch target instances. In my case I gave tag app:spring3hibernate and env:prod . So whichever Ec2 servers having such tags on them , CodeDeploy will deploy artifacts in them.

Now if you have already installed code-deploy agent in your Ec2 servers, select Never option .. otherwise select other option so that System manager automatically install this agent in your target servers.
In Deployment settings section, select CodeDeployDefaultOneAtATime which is CodeDeploy inbuilt deployment configuration . You can create custom one too.

So in last part of CodeDeploy , we need tell CodeDeploy about the Load Balancer and the target group under which the target instances are attached, so that at the time of deployment Load balancer will block all traffic from each target server.
NOTE: Uncheck Enable Load Balancing in case you dont have target servers under load balancer.

For more info on CodeDeploy, refer AWS docs https://docs.aws.amazon.com/codedeploy/latest/userguide/welcome.html
STEP-3 Create CodePipeline
So Far we have created a CodeBuild project (which will test and build the artifact from java app) and a CodeDeploy application which will deploy the build artifact generated by CodeBuild project. But we need some tool which will integrate both services together and Thats where CodePipeline will help us 🙂
Click on Create Pipeline under CodePipeline service

Enter Pipeline name and select New Service Role. In Advanced settings, select custom s3 Location for artifact store.

Now we need to add Source stage which will act like a trigger for Codepipeline execution . So whenever there will be some changes in source, CodePipeline will start execution .
Select Source provider as S3 and specify bucket name where your source code will be stored.

And now for Build stage , we will use the same CodeBuild project “build-spring3hibernate-app” that we have created above.

And the last part would be the deploy stage and will specify CodeDeploy project “deploy-spring3hibernate-app” which we have configured earlier.

Review and click on Create Pipeline

For more info on CodePipeline, refer AWS docs https://docs.aws.amazon.com/codepipeline/latest/userguide/welcome.html
Step-4 Trigger CodePipeline
Now we just need to trigger our CodePipeline by uploading our source code zip file in s3 bucket.

You have done enough now . It’s time to SIT AND RELAX . ….. 🙂
So CodePipeline triggered and also completed successfully. CodePipeline provides visualisation for us. So in CodePipeline we can see the execution status of each stage in a centralised place.

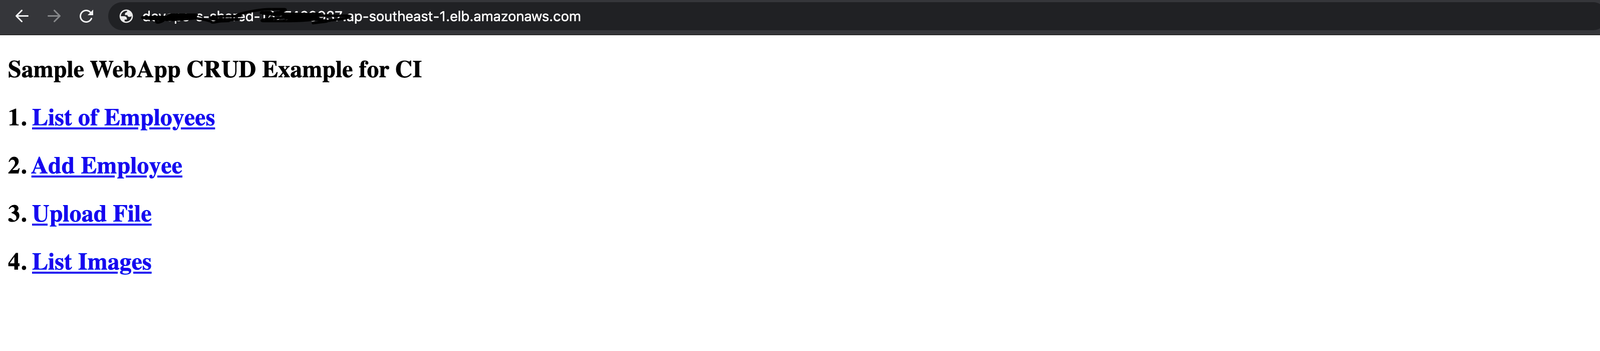
Lets test it whether our code is deployed properly or not by simply hitting ALB DNS.
The beauty of this service is that it mostly take care of everything .. eg:
- You dont need to manage any servers.
- You dont have to write logic for blue-green or rolling deployment in AWS. CodeBuild has predefined deployment configurations which we can simply use it.
- It’s highly scalable . So no build needs to wait for other builds to complete. we can run as many builds concurrently.
- Pay as you go : With AWS CodeBuild, you are charged based on the number of minutes it takes to complete your build. This means you no longer have to worry about paying for idle build server capacity.
So I hope that now you got some idea how CodeBuild , CodeDeploy and CodePipeline can help us in CI/CD process. So if you dont want to take headache of managing packages and server and builds , then these services would be right option for you.
There are lot of other things that we can do , specifically in buildspec and appspec.yml file which I will cover in different blog. Just wanted to explain simple flow of CI/CD in this blog.
Thanks for reading, I’d really appreciate the feedback. So, please leave your comment below if you guys have any queries related to this blog.
Related Searches – AWS Partner | Cloud Engineering Services