Let’s start with a scenario, whenever any application builds, we generally do have 3 environments on the basis of resources – dev for developers resources, test for testers resources, and prod for production resources. Likewise, we used to have a separate IT-Operational Team having strategies to maintain their environment resources. It was very time-consuming and many human resources were required.
We are in the microservices era where we follow the DevOps Methodology. The DevOps Team brings all the environment and strategies to maintain resources in one go. Resources are the ones who decide the behavior of your applications. We can apply the criteria to resources, so how can our application behave? To do this we can give the name to our resources, we can give the resources quota to the application, and can give resource ranges to the application.

Let’s get started!
Which environment resources are being used for which perspective, to bring that we need a kind of grouping dictionary or grouping object that should combine all the resources and identify them respectively. Then Namespace comes into the picture. In simple terms of Kubernetes, namespaces are the logical grouping of resources in Kubernetes Clusters.
Pre-requisites:
- kubectl install (https://kubernetes.io/releases/download/)
- K8s cluster(Master-Node setup)
Let’s create some objects in our K8s cluster :
$ kubectl create ns twitter

# To check namespace in cluster
$ kubectl get ns
#Yaml file to create webserver pod
#We can write namespace in manifests .yaml file as well
$ vi webserver-demo.yaml
apiVersion: v1
kind: Pod
metadata:
name: webserver
namespace: twitter #we can define namespace here.
labels:
app: nginx
tier: front
version: v1
env: dev
spec:
containers:
- name: nginx
image: nginx
ports:
- containerPort: 80#Syntax to create resource in namespace:
$ kubectl apply -f name_of_yaml_file -n namespace
$ kubectl apply -f webserver-demo.yaml -n twitter
#This is the way to list out resources within namespaces.
$ kubectl get pods -n twitter
Now, kubectl creates the respective resources in your defined namespace. You might have a question like – after creating resources in a namespace within a cluster, does it reside on the same node? The answer is No! wherever the scheduler sends the pod on a node. Namespace can pick those resources from any node. Will see how this namespace is used for real-time problems to easily get solved.
Resource Quota:
An application is running inside a pod with all its dependencies. We don’t know how much an application needs resources such as CPU, memory, or storage are enough to run an application successively. In this situation, an application might need fewer or more resource types that won’t be predictable.
Also, just like having a java memory leak issue for Java applications, a situation when the specific garbage collector does not identify the ample number of unused objects and they reside in the memory space indefinitely reduces the amount of memory allocated to the application.

In order to achieve this kind of predictions and issues, k8s provides us to use ResourceQuota object, in that we can define available count or restrict the resource types-
- Compute Resource Quota: Limits the compute resources like CPU and memory that can be requested in a given namespace.
- Storage Resource Quota: Limits the storage resource like storage and persistent-volume-claims that can be requested in a given namespace.
- Object Count Quota: Limits the K8s objects like services, pods, secrets, configmap, etc, that can be requested in a given namespace.
What will happen to pod when a running container might need more resource types like cpu and exceed the mentioned limits?
Pod will get terminated in that case.

Let’s see how it works in real time.
#Create ResourceQuota Object in twitter namespace

$ vi resource-quota-demo.yaml

#Yaml file to create ResourceQuota
apiVersion: v1
kind: ResourceQuota
metadata:
  name: cluster-1-resource-quota
  namespace: twitter
spec:
  hard:
    requests.cpu: "250m"  #containers can only request for 250m CPU.
    limits.cpu: "300m"    #running containers can go up-to 300m CPU.
    pods: "3"          #only 3 pods can be created in defined namespace
    secrets: "5"     #only 5 secrets can be created in defined namespace
    services: "5"   #only 5 services can be created in defined namespace
$ kubectl apply -f resource-quota-demo.yaml
$ kubectl describe resourcequota/cluster-1-resource-quota -n twitter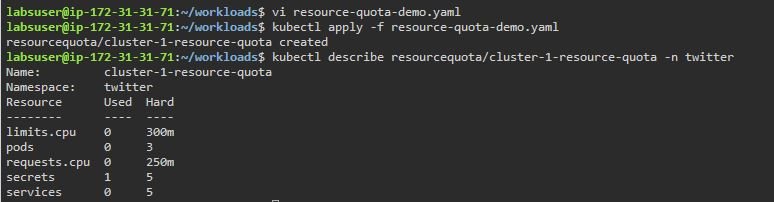
$ vi limits-request-demo.yaml

#Yaml file to create pod with limits and requests for a nginx container.
#I am accessing all the resources (CPU) from ResourceQuota for the below container.

apiVersion: v1
kind: Pod
metadata:
  name: nginx
  namespace: twitter
spec:
  containers:
  - name: nginx
    image: nginx:1.14.2
    ports:
    - containerPort: 80
    resources:
      requests: # Minimum Value
        memory: "100Mi"
        cpu: "250m" # 1 core = 1000m
      limits:  # Maximum Value
        memory: "128Mi"
        cpu: "300m"
#Creating pod with limits & requests from resource quota within twitter namespace
$ kubectl apply -f limits-request-demo.yaml
$ kubectl get pods -n twitter
$ kubectl describe pod nginx -n twitter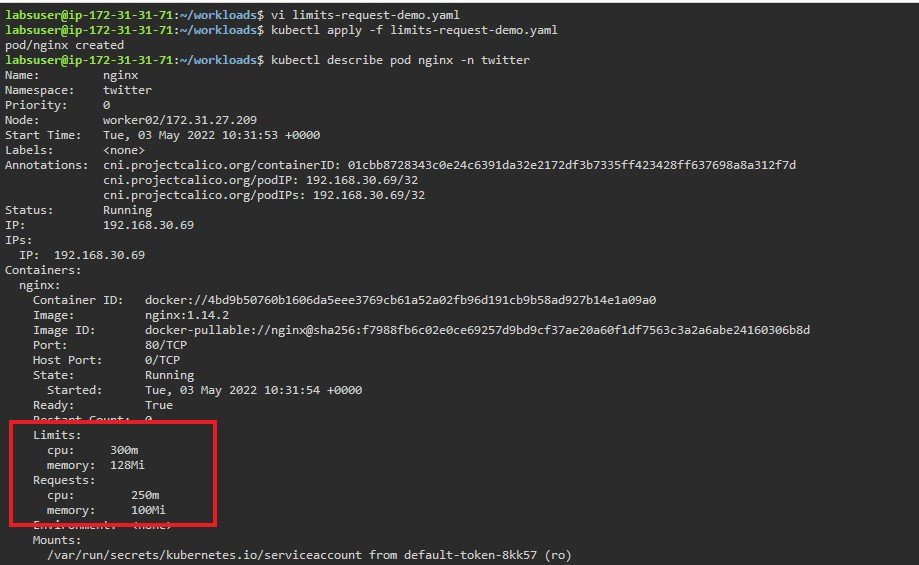
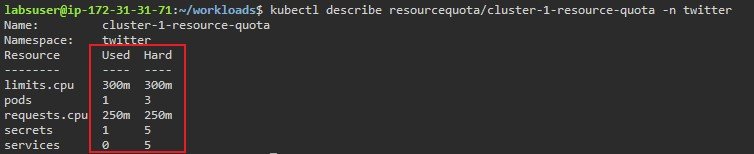
If you are trying to create more than 300m CPU or trying to create more than 3 pods. You will get an error like “forbidden: exceeded quota”. Because you have already reached available limits within the namespace and resource quota restricts you to create other resources and resource types.
So, here is the scenario: whenever you want to create the pods, that pod should pick default limits or assign limits. In a working organization, we are not holding the root access everywhere, not able to edit manifest files that are related to infrastructure. At the same time, you wanted to create a pod with limits. Here is the solution, Mates!! Keep reading–
Limit Range:
LimitRange objects provide resource usage limits for each kind of resource in a namespace. LimtRange comes with constraints like – set minimum and maximum resource type-CPU, memory, etc., and usage limit to container or pods at ground levels within the namespace. The point to remember here is that only one LimitRange object can be created per namespaces.
Let’s see how it works:
$ vi limit-range-demo.yaml

#Yaml file to create LimitRange object

apiVersion: "v1"
kind: "LimitRange"
metadata:
  name: "cluster-limiterange"
  namespace: "twitter"
spec:
  limits:
    -
      type: "Container" #define the type
      max:              #Maximum limit range for containers
        cpu: "1"
        memory: "1Gi"
      min:              #Minimum limit range for containers
        cpu: "100m"
        memory: "4Mi"
      default:          #default limit range for containers
        cpu: "300m"
        memory: "200Mi"
      defaultRequest:   #default request limit range for containers
        cpu: "100m"
        memory: "100Mi"
$ kubectl apply -f limit-range-demo.yaml
#Without defining limits and requests creating the pod
$ kubectl run pod-nginx --image=nginx -n twitter
$ kubectl get pods -n twitter
$ kubectl describe limitrange/cluster-limiterange -n twitter
$ kubectl describe pod/pod-nginx -n twitter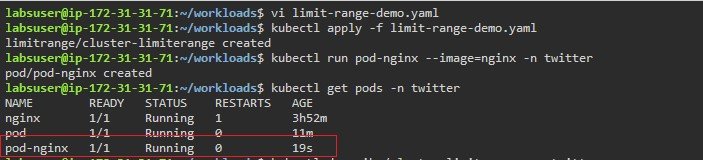
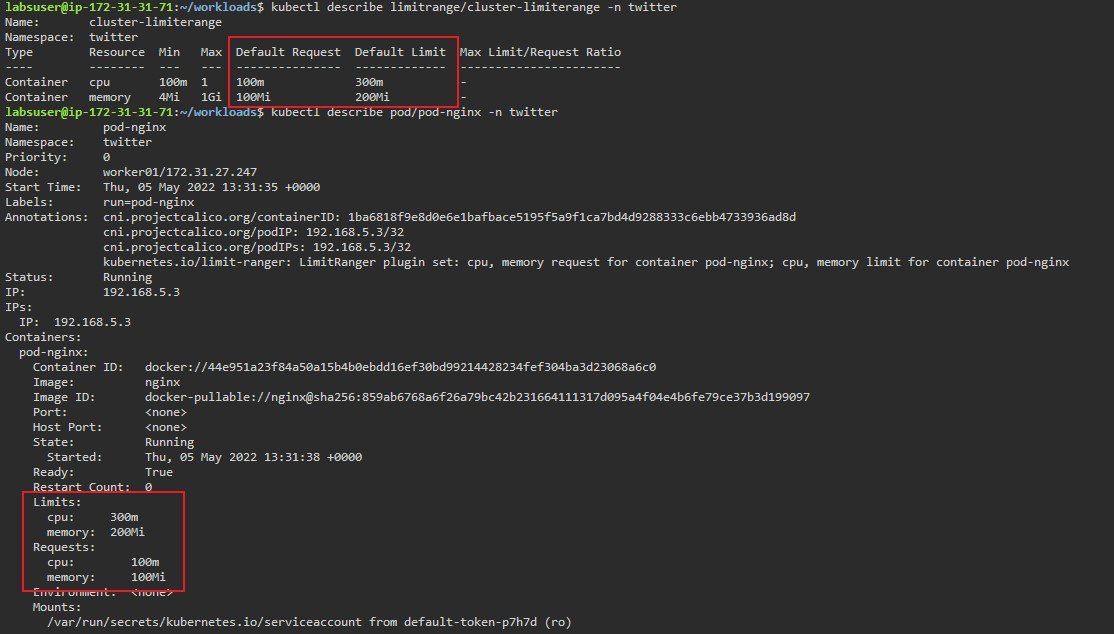
Please see the default entries at cluster-limitrange and pod-nginx that we have created without limits although it took the limits from limitrange.
Conclusion
In times when the adoption of Microservices is increasing day by day logical grouping/namespace, and resource requests/limits are very important objects to identify and segregate. Such as if you do have multiple environments use namespace to separate them, instead of using different k8s clusters for each. It might give you a lesser cost effect. And, at last, this doesn’t end here we will bring more such scenarios dealing in real-time. Thanks and Happy Learning!
Blog Pundit: Deepak Gupta and Sandeep Rawat