Integrating ServiceNow with Azure Alerts (Monitor) requires setting up a dedicated user in ServiceNow with the appropriate evt_mgmt_integration roles. You’ll also need to create a webhook or connector within Azure Monitor’s action groups and arrange the JSON payload required for incident creation.The important steps that must be followed include generating API credentials, configuring URLs, and validating the alert flow to ensure everything is working smoothly.
Topics Breakdown
- Introduction and relevance of this Integration
- Steps of Setup
- Execution Flow Diagram
- ServiceNow Setup Part
- Azure Logic App Creation Part
A. Using ServiceNow Connector (Method 1)
B. Using HTTP Connector (Method 2)
C. Alert Action Group Creation - Testing and Validation of Setup
- Introduction and relevance of this Integration –
In this article, we’ll be going through the step by step instructions to integrate Azure Alerts and ServiceNow with the help of Azure Logic App.
But why do we actually need to integrate any ITSM tool (like ServiceNow) with an Alerting system (like Azure Alerts)? Let’s discuss this below, by highlighting some advantages –
- When each deteriorated system condition is recorded, managed and maintained through a ticket, then this may increase accountability and answerability.
- Monitoring of Application or Infrastructure is a crucial aspect during Application Operations which can ultimately lead to improvement scopes for both Infrastructure and Application itself. ITSM tools (like ServiceNow) when integrated with any monitoring system (like azure alert) to automatically respond with Incident/Ticket when an issue is captured by Azure Alerts, will optimize the flow of Infra/Application improvement. These new tickets can be included (linked) with the ongoing Topics, Sprint Cycles, or new releases.
- This makes the RCA Tracking process more fluent for each captured Issue, as we have a better view of ongoing issue trends and respective RCAs. This time tracking of RCAs is more precise.
When we integrate ServiceNow with Azure Alert, it will automatically generate a ServiceNow Incident whenever an alert is fired(due to failed system conditions) in Azure.
2. Steps of ServiceNow and Azure Alert Integration Setup –
Now coming to the steps for this Integration Setup, we divide the setup into two Parts –
- ServiceNow Setup Part – In this part, we will use a developer Instance of ServiceNow, to find ServiceNow API Endpoints, Header content, Request Body etc and use these details in our Azure Logic App.
- Azure LogicApp Creation Part – In this part, we will create our code logic (using LogicApp Designer) to integrate ServiceNow and call ServiceNow API through Logic App Connectors. We will discuss two different types of LogicApp connectors which can be used alternatively to Integrate Azure Alerts with ServiceNow.
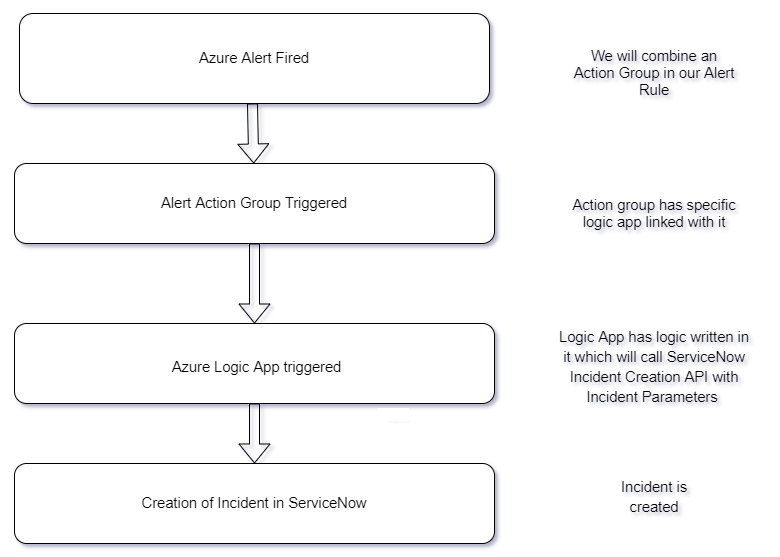
- Execution Flow Diagram –
This flow diagram helps us to understand about the Automation Flow that we have to create for this Integration Setup.
- ServiceNow Setup Part –
ServiceNow is a cloud-based ITSM platform that covers incident management, problem management, change management, release management, and request management. ServiceNow has different types of tables(for example Incident table, Change table etc) to store respective ticket information, which can be modified through REST API Calls. In our below example we are using a REST API call to ServiceNow to Create Incident i.e. adding rows in the Incident Table of ServiceNow.
For Demo purpose, we will use Developer Instance of ServiceNow to fetch API Call information, as your company/client’s ServiceNow instance may have restricted access to explore the “Explore API” feature. Let’s get started by registering a developer ServiceNow Instance and create a Sample Incident through manual calling the API. [Below Demo is to know better about the working of ServiceNow APIs. You may skip this part and jump directly to Azure Logic App Creation part as well].
- Setup developer instance on ServiceNow –
Go to – https://developer.servicenow.com and sign-up to get started.
- After successful login, ‘Request’ a ServiceNow Instance (it’s good to select same location of instance as your client’s/company’s ServiceNow Instance location). Note the credentials of your requested instance.
- Login to your developer Instance with the credentials generated in the previous step.

- From the left-hand search bar, search and select the “REST API Explorer” blade. Select your namespace as “NOW”, and “table API” to get started. On this page we can find – GET, POST, PUT, DELETE API request syntax to modify table contents. Choose “POST” request to create a record in the table. Now choose Table Name as “Incident”
NOTE: Copy-Paste the highlighted URL and save it aside, we require this API endpoint to automate the integration from Azure Logic App.

- Identify the “Request Headers” (and note these aside). Optionally we can Input relevant “Incident fields information” in the “Response body” space shown below by checking any sample incidents present on the instance, we can also leave it empty. Now CLICK on “Send” to trigger the API Call and create the incident.

This will show a 201 response for that API Call, and the response body will display the Incident Number of the newly created Incident.

We can verify the incident creation by searching this Incident Number on Incident Dashboard as shown below.

This is the manual way of triggering the ServiceNow API. Now, in the next part, we have to incorporate this API calling in our Azure Logic App.
Note: For Company/Client’s ServiceNow account we need a service account of the ServiceNow Instance. Domain-based or SSO based logins won’t work. The Service Account will directly talk to the API and update the tables of your Client’s ServiceNow Instance.
5. Logic App Part –
Azure Logic App is a PaaS based service that is used to create Automated workflows and Integrations. We will use Azure Logic App to integrate with ServiceNow. The code logic is also present on the Logic App. Logic App gives two ways to write the logic for our workflows – Logic App Designer with UI and JSON scripting. For the sake of simplicity, we will use UI based Logic App Designer in our Demo below.
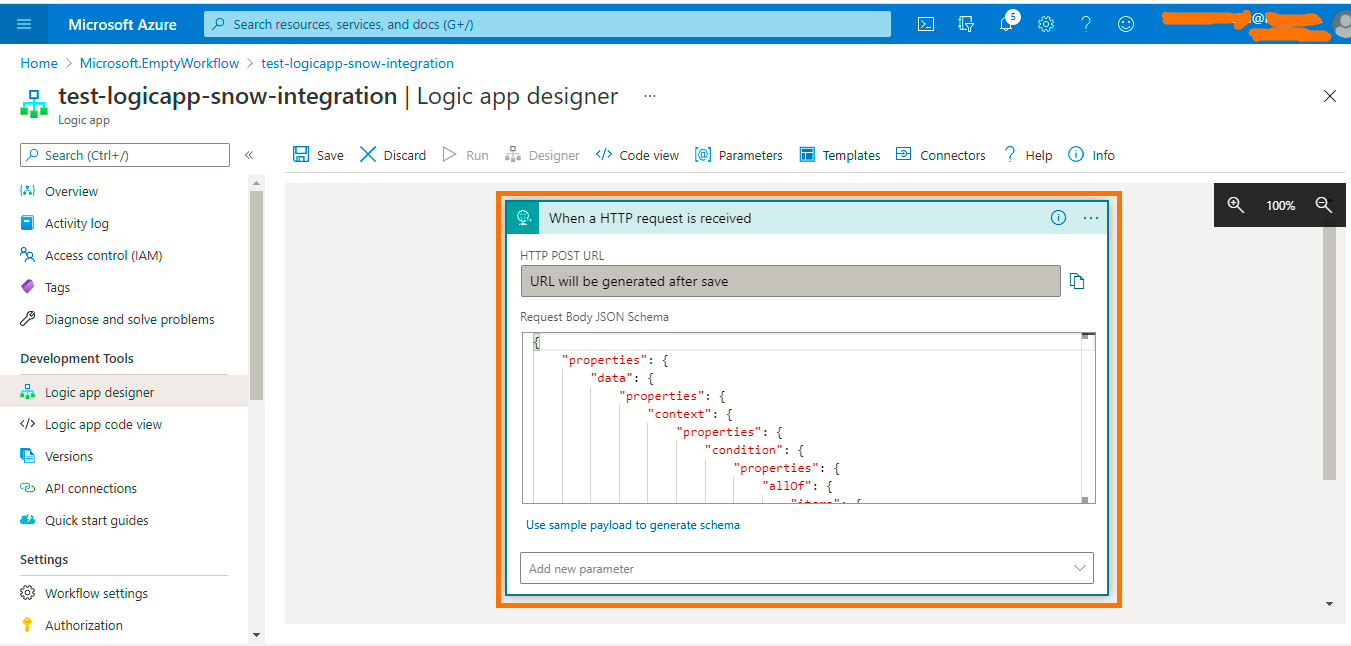
- Create an Azure Logic app which will have our code logic and which will communicate with specified ServiceNow Instance and triggers ServiceNow API. (as shown below)

- From the “Logic App Designer” blade. Select any of these Action modules – “HTTP request received Trigger / Azure Monitor Trigger”

In our example, we will see two separate methods of API Calling to ServiceNow Instance, with two different Azure Logic App connectors –
A. With ServiceNow connector (1st Method)
Add ServiceNow connector Action below HTTP Trigger Action. (as shown below)

In the connection Pop-up, fill Connection details such as –
Connection Name – Your choice of name for this connection setting
Instance Name – URL of your ServiceNow instance
Username – Username of your ServiceNow Service Account or ServiceNow Developer Instance
Password – Password of your ServiceNow Service Account or ServiceNow Developer Instance
Hit on Create, this automatically validates the connection and use this setting.

After creating the connection, this connection is set to be used (as seen in the below image). This connector will hit the ServiceNow API with a POST request in the background. We just have to select the respective table to put the record information. In our case, we need to create an Incident so we use the Incident table.
Also, we get the option of “Add Parameter”, and from the pop-up box, we can select the options which are used as fields of the Incident such as Assigned_To, Assignment_Group, Location, Email etc.

This is UI based selection of Incident Fields, as shown in below example – “Category” field is selected with the value “Sample Application Name”

NOTE:
Similar to this UI based field selection for ServiceNow Incident, we can also alternatively use code view to add ServiceNow Incident Fields. For this – Go to the “Code View” of your Logic App Designer > then find the block named “body” under your “ServiceNow connector name” and add the fields(in JSON syntax) which are present in your Sample Incident. The advantage of using “Code view” to add “field parameters” is that sometimes the required Incident fields are not present in the “Add Parameters” drop-down menu. So, we can define custom fields as per our ServiceNow Instance Incidents by adding those in JSON format of “Code view”.

B. With HTTP Connector (2nd Method)
Add HTTP connector Action below HTTP Trigger Action. (as shown in below image)

Now fill required details as below –
- Select Request Method – which has to be “POST” as we want to create/add a new record in the Table(i.e. Creating a ServiceNow Incident)
- Mention URL of your ServiceNow Instance –
In this format create your URL “https://{MY-CLIENT-NAME}.service-now.com/api/now/table/incident”.
- For Headers – you can write
Accept – application/json
Content-Type – application/json
NOTE: If the default information(such as API Endpoint, Headers Info etc) for the ServiceNow API mentioned above is not working for you, then you have to find the information by following the steps mentioned in the “ServiceNow Activity Part” provided in the starting of this article.

For the “Request Body” of this POST HTTP request, we can mention all the fields of the ServiceNow Incident in a JSON formatted way. As placed in the screenshot below.

For Authentication, there are multiple options provided in this HTTP connector.
In our case, we use “Basic Authentication” and mention the username and password of our ServiceNow Service Account or Developer ServiceNow Instance(if using developer instance)
NOTE: In this example, we are providing credential details in “Plain-Text”. For using Keyvault secrets to be used in Logic Apps, follow this upcoming Blog.

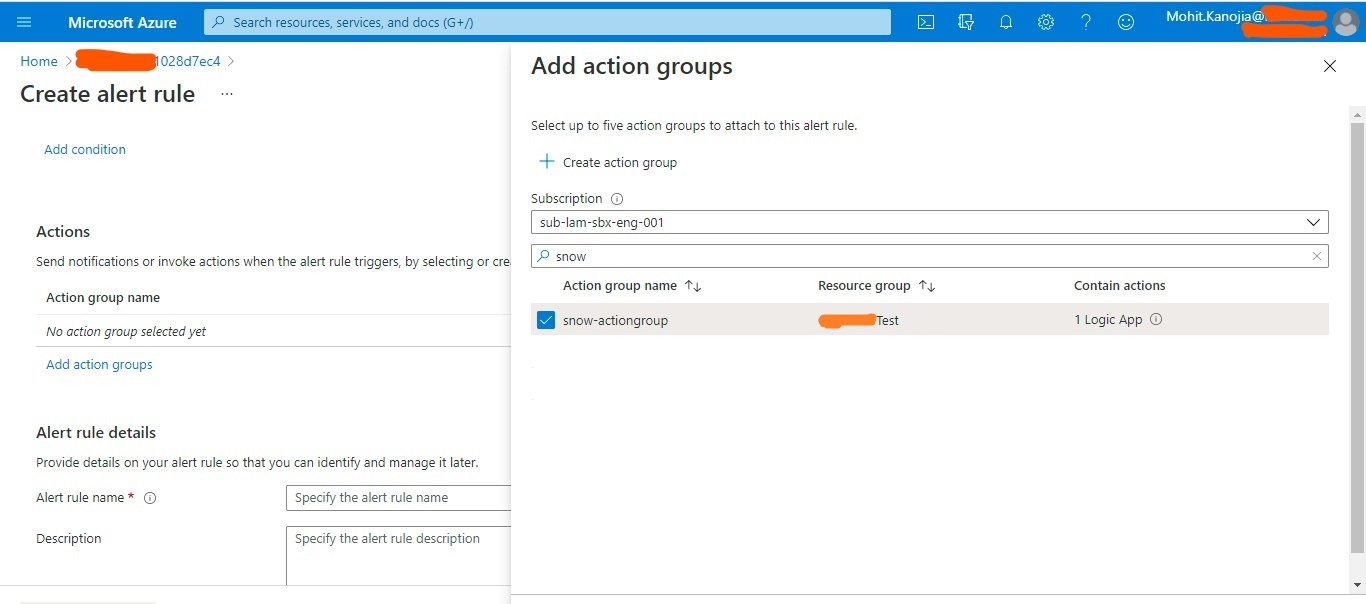
C. Create Action Group (which will be used to test and validate this integration setup)
We have created our Azure Logic App, now to trigger this Logic App from Azure Alerts we need to link this Logic App with an Action Group. For this create an Action Group as shown below.

Remember to enable common Alert Schema, by which you will get common Json Payload of the Alert Information in your Azure Logic App for any type of Azure Alert (either Metric Alert, Log Alert or Activity Log Alert)

6. Test and Validate –
We have created the Logic App, linked the logic app with an Action Group, now it’s time to generate a dummy alert and validate if it is creating a ServiceNow Incident.
For testing purposes, we will create a dummy alert on a sample resource like a storage account and make such alert signal conditions that the alert will be fired and hence the action group is triggered which ultimately triggers the Logic App and creates a ServiceNow Incident.
- Create a storage account for testing this Integration Setup.

- Now create Dummy Alert on this storage account.

Here, using Used Capacity as a signal condition

Create the alert condition in such a way that it will fire the alert on the first check, and the Logic App will be triggered without much waiting. (as shown below).

Select the same Action Group which you have created in part 5C of this article.
- Check Alert and respective Incident –
- Wait for the alert to fire on Azure Portal

- After the alert is fired, check if the Azure Logic App is triggered

Find the Incident Number from the “Logic App Run”


- Find the Incident number on ServiceNow Instance and validate if the Incident has been created.

Voila ..
Azure Logic Apps provides a convenient solution to many integration requirements (like this ServiceNow Integration setup). With Azure Logic Apps we can create ad-hoc automation tasks, serverless code logics, 3rd Party integrations making its usage scope quite vast.
Blog Pundit: Adeel Ahmad & Sanjeev Pandey
Opstree is an End to End DevOps solution provider