Understanding Istio and Service Mesh
Istio is a powerful service mesh designed to manage communication between individual microservices seamlessly. Before diving into Istio, let’s grasp the concept of a service mesh.
Service Mesh: A service mesh is a dedicated infrastructure layer that manages communication between microservices. It offers features like load balancing, service discovery, encryption, fault tolerance, traffic management, and more, making it an indispensable component for organizations navigating the complexities of distributed systems.
Istio Architecture
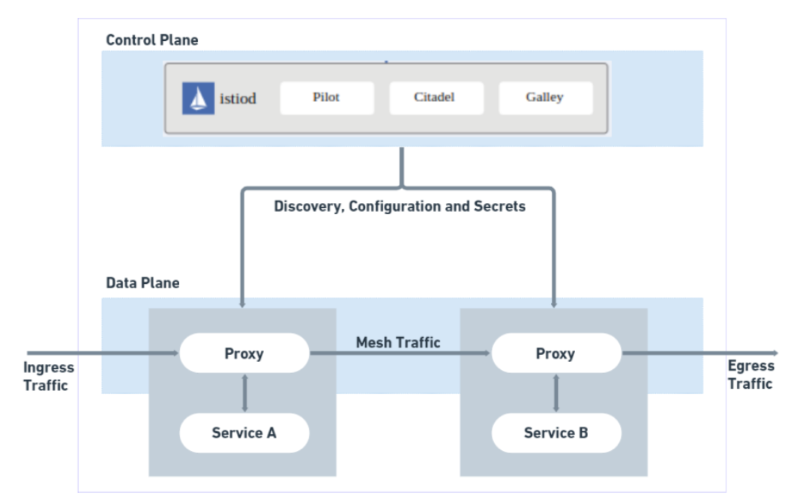
In earlier versions (pre v1.5), Istio consisted of multiple components like Pilot, Citadel, Galley, and Mixer. Post v1.5, these components were consolidated into a single component called Istiod, simplifying operational management.
Istio Components:
- Control Plane: The Istio control plane is managed by the
istiodcomponent. It handles the management and injection of Envoy proxies into each microservice. - Data Plane: This comprises all Envoy proxies responsible for routing and managing traffic.
Additionally, one crucial component integral to Istio’s functioning is the Envoy Proxy.
Envoy Proxy: Envoy is a high-performance, open-source proxy that plays a pivotal role in Istio’s architecture. It’s deployed alongside your microservices to manage and control the flow of traffic between them.
While Istiod handles the control plane, managing the configuration and policies, Envoy operates in the data plane, actively handling the actual data traffic.
Key Features of Istio Configuration
- No Modification to Deployments and Services: Istio allows you to keep your Kubernetes manifest for Deployments and Services untouched.
- Separation of Configuration: The Istio configuration is kept separate from the application configuration.
- CustomResourceDefinitions (CRD): Istio leverages CRDs for third-party technologies, promoting extensibility.
Setting Up Istio in Kubernetes Cluster
Step 1: Download Istio
Download the latest release of Istio using the following command:
curl -L https://istio.io/downloadIstio | sh -
You can specify variables to download a specific version:
curl -L https://istio.io/downloadIstio | ISTIO_VERSION=1.17.8 TARGET_ARCH=x86_64 sh -
Step 2: Navigate to Istio Directory
Move to the Istio package directory (e.g., istio-1.19.3):
cd istio-1.19.3
Step 3: Add Istioctl to Path
Add the istioctl client to your path (Linux or macOS):
export PATH=$PWD/bin:$PATH
Step 4: Pre-Installation Check
Begin the Istio pre-installation by verifying that it can be installed or upgraded:
istioctl x precheck
Step 5: Install Default Profile
Install the default profile on the cluster defined by your Kubernetes configuration:
istioctl install
Step 6: Verify Installation
Check if the Istio installation succeeded:
istioctl verify-install
Step 7: Confirm Istio System Namespace
Use kubectl to check that the istio-system namespace has been created.
Kubectl get ns

Step 8: Examine Istio System Components
In an ideal setup, deployments and Istio pods should be functioning seamlessly. Execute the following to observe the deployment status:


Step 9: Application Deployment with Envoy Proxy Injection
Consider two services, frontend and backend, both residing under the default namespace. By default, Envoy proxies are not injected. This behavior can be altered by explicitly instructing Istio to inject proxies into the application pods.
Configuring Proxy Injection
Step 1: Check Istio Injection Status
Validate if Istio injection is enabled for the desired namespace:
kubectl get ns --show-labels

Step 2: Enable Injection for the Namespace
Enable injection for the chosen namespace; here, we use the default namespace:
kubectl label ns default istio-injection=enabled
Step 3: Verify Injection Success
Confirm that injection has been successfully executed:
kubectl get ns --show-labels

Now, Istio components running in the container will automatically inject the Envoy Proxy Container into the default namespace.
Step 4: Enable Injection for Running Pods
Delete the existing pods or deployments to enable injection for the running pods:

Step 5: Redeploy Manifests
Re-deploy the application manifests to observe successful injection:
kubectl apply -f '*.yaml'


Unveiling the Power of Istio
Upon the successful installation and configuration of Istio, you unlock a multitude of benefits for your microservices architecture.
1. Streamlined Microservices Communication: Istio acts as a service mesh, seamlessly managing communication between individual microservices. This ensures that your services can interact with each other efficiently and reliably.
2. Simplified Management with Istiod: The introduction of Istiod as a consolidated component simplifies the management of Istio. This component, part of the control plane, efficiently handles tasks such as proxy injection into microservices.
3. Effortless Configuration: Istio brings an elegant separation between application and Istio configurations. You no longer need to modify Kubernetes manifests for deployments and services. This separation is facilitated by Istio’s use of CustomResourceDefinitions (CRD), providing a cleaner and more maintainable configuration approach.
4. Telemetry Insights: With Istio’s telemetry features, you gain invaluable insights into the behavior and performance of your microservices. This data visualization capability allows you to monitor, analyze, and optimize your applications with ease.
Conclusion
In simpler terms, a service mesh is a powerful pattern, and Istio stands out as an ideal implementation. It brings unparalleled management and control to microservices communication, making it a go-to solution for modern cloud-native applications. Istio ensures that your applications not only talk to each other effortlessly but also stay secure and perform at their best, shaping the trajectory of modern application architecture.
Blog Pundits: Prakash Jha and Sandeep Rawat
OpsTree is an End-to-End DevOps Solution Provider.
Connect with Us