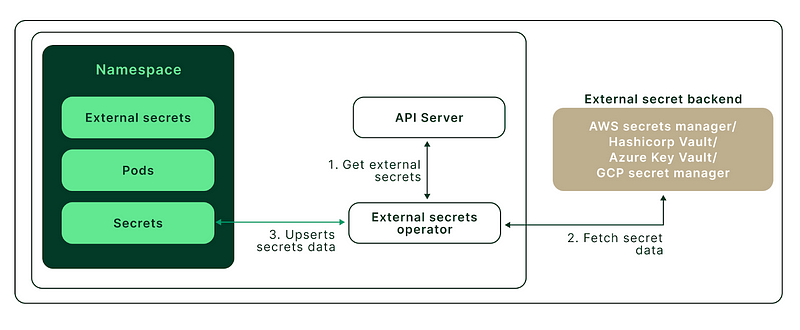
In the Previous Blog, we discussed the significant role that ESO(External Secret Operator) plays within in Kubernetes cluster in handling sensitive information. How it is bridging the gap between the external secret manager and Kubernetes cluster.
Today I’m going to discuss one of the problems that we faced on our client side in terms of managing secrets in Kubernetes. Kubernetes makes use of basic Base64 encoding to encrypt the secrets and anyone who has access to the Kubernetes cluster can easily access those secrets which can get compromised. So to overcome this problem we found a solution called ESO.
So In this blog, I will walk you through how we implemented ESO in the GKE Kubernetes Cluster while making use of Google Secret Manager.
PREREQUISITES:
To Follow the steps in this blog, you will need the setup
- A Kubernetes cluster is up & running with version 1.24+.
- Kubectl CLI is installed and configured to talk to your Kubernetes cluster.
- Google Account for storing secrets in Google Secret Manager service.
STEP1: Installing ESO using Helm
Let’s go ahead with the installation of an External secret Operator using the official Helm Repo.
helm repo add external-secrets https://charts.external-secrets.io
helm install external-secrets \
  external-secrets/external-secrets \
    --namespace external-secrets \
    --create-namespace \
    --set installCRDs=true
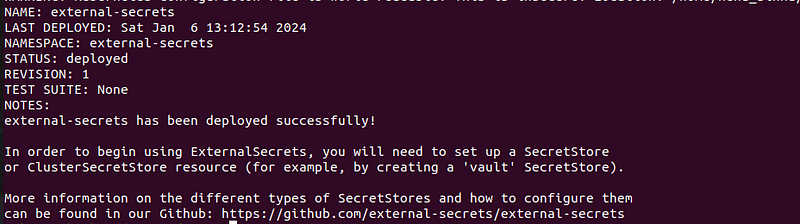
Once the external secret is successfully deployed you will see the below message.
STEP2: Creating a Secret in Google Secret Manager
Now we will store the database secret in Google Secret Manager and later it will get fetched by ESO and will expose it inside our deployment.
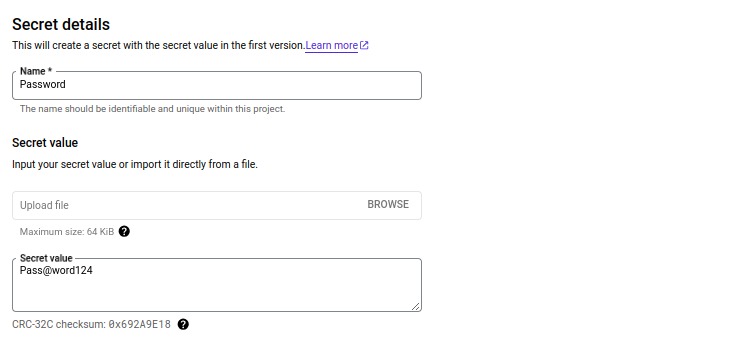
You can create 2 types of secrets in Google Secret Manager
- Secret with Single Key value pair as shown in the Below image
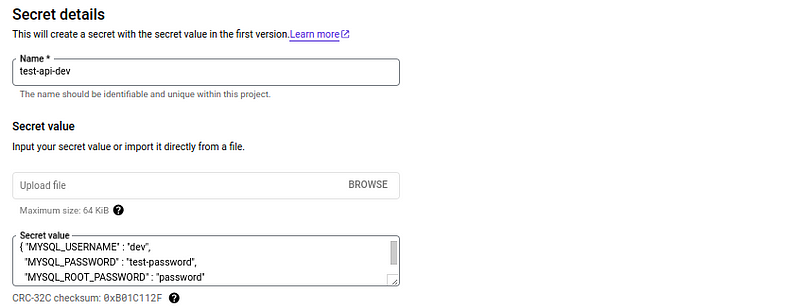
2. Secret with multiple values but for these types of secrets we have to make sure that values are JSON formatted.
STEP3: Creating IAM role and Service Account
Once secrets are created in the GCP secret Manager. Now, we will have to create a serviceaccount that will be used by Secretstore later through which ESO will access Secret Manager to fetch secrets.

Attach the below role with serviceaccount to access Secret Manager.
- roles/secretmanager.secretAccessor
STEP4: Create a Kubernetes Secret Using Service Account Authentication Credentials
Once the role is attached to the serviceaccount then download the JSON file of the serviceaccount and create a Secret in Kubernetes to store the GCP authentication creds which will be used by SecretStore.
apiVersion: v1
kind: Secret
metadata:
  name: gcpsm-secret
  labels:
    type: gcpsm
type: Opaque
stringData:
  secret-access-credentials: |-
    {
        "type": "service_account",
        "project_id": "test-dev",
        "private_key_id": "46066dab6a694b0bcf655c30a50956356fefd624",
        "private_key": "-----BEGIN PRIVATE KEY-----\n9w0BAQEFAASCBKcwggSjAgEAAoIBAQC3EarE3p4lYj/s\n/JnrfUrdCsQnDdjvVLjLPz56wlDxDrG9X9GT8/8fNWJODDFqtlUqbh0+TC+YmlF8dn+yNmbwgIhVll+E8q4/IMcn2fFDnBNOrBCIouAxEwrl5\nngJqJacs+TdVDEwYJxrsadNcCmDTa/ruJ6tAjv44DYuNRhWEcr19aL51bntlHZfO\nBjdy2faDI3Gkcixm/LNHz3A=\n-----END PRIVATE KEY-----\n",
        "client_email": "secret@test-dev.iam.gserviceaccount.com",
        "client_id": "*************",
        "auth_uri": "https://accounts.google.com/o/oauth2/auth",
        "token_uri": "https://oauth2.googleapis.com/token",
        "auth_provider_x509_cert_url": "https://www.googleapis.com/oauth2/v1/certs",
        "client_x509_cert_url": "https://www.googleapis.com/robot/v1/metadata/x509/secret%40test-dev.iam.gserviceaccount.com",
        "universe_domain": "googleapis.com"
    }
NOTE: Make sure you replace the above json file content with you’re json file content that you have just downloaded in previous step
Now create the secret in Kubernetes by applying the above manifest.
kubectl apply -f gcp-secret.yaml
STEP5: Creating a SecretStore
Once GCP serviceaccount credentials are stored in Kubernetes secrets we can call these credentials inside the Secret Store.
apiVersion: external-secrets.io/v1beta1
kind: SecretStore
metadata:
  name: gcp-store
spec:
  provider:
    gcpsm:        # gcpsm provider
      auth:
        secretRef:
          secretAccessKeySecretRef:
            name: gcpsm-secret       # secret name containing SA key
            key: secret-access-credentials  # key name containing SA key
      projectID: test-dev         # name of Google Cloud project
Now create the SecretStore by applying the manifest.
kubectl apply -f secret-store.yaml

STEP6: Creating External Secret
Now finally create an external secret that will fetch the secrets from Google Secret Manager using the authentication credential from the secretstore that we created in the above step.
- First, we will fetch a secret from the GCP Secret Manager, which contains a secret with a singular key-value pair.
apiVersion: external-secrets.io/v1alpha1
kind: ExternalSecret
metadata:
  name: db-password
spec:
  refreshInterval: 1h
  secretStoreRef:
    kind: SecretStore
    name: gcp-store           # name of the SecretStore (or kind specified)
  target:
    name: mysql-password  # name of the k8s Secret to be created
    creationPolicy: Owner
  data:
  - secretKey: MYSQL_ROOT_PASSWORD
    remoteRef:
      key: Password # name of the GCPSM secret keyAbove external secret will create the secret in key value format as it will be created in GCP secret Manager.
Now create the SecretStore by applying the manifest.
kubectl apply -f mysql-secret.yaml


2. Next, to access a secret from the GCP Secret Manager that consists of multiple values, we will make use of the below manifest.
apiVersion: external-secrets.io/v1alpha1
kind: ExternalSecret
metadata:
  name: test-dev
spec:
  refreshInterval: 1h           # rate SecretManager pulls GCPSM
  secretStoreRef:
    kind: SecretStore
    name: gcp-store              # name of the SecretStore (or kind specified)
  target:
    name: test-api              # name of the k8s Secret to be created
    creationPolicy: Owner
  dataFrom:
  - key: test-api-dev
Now create the external secret by applying these YAML manifests.
kubectl apply -f external-secret.yaml


STEP7: Database Deployment
Now we will create a dummy database deployment to use the secrets that are created by ESO.
apiVersion: apps/v1
kind: Deployment
metadata:
  name: mysql
spec:
  replicas: 1
  selector:
    matchLabels:
      app: mysql
  template:
    metadata:
      labels:
        app: mysql
    spec:
      terminationGracePeriodSeconds: 10
      containers:
        - name: mysql
          image: mysql:5.7
          ports:
            - name: tcp
              protocol: TCP
              containerPort: 3306
          envFrom:
            - secretRef:
                name: "mysql-password"
Now create the resources by applying these YAML manifests.
kubectl apply -f deployment.yaml

Once deployment is done you can check the value of the secret which is created by ESO inside the deployment as shown below

Conclusion:
Implementing the External Secret Operator (ESO) with Google Secret Manager in a GKE Kubernetes cluster provides a robust and secure solution for managing sensitive data. This integration not only enhances security by centralizing secret management but also streamlines operations, reducing the complexity involved in handling secrets within Kubernetes. This step-by-step guide demonstrates the practicality and efficiency of the ESO, showcasing its ability to effectively bridge Kubernetes with external secret management systems.
It’s important to note that while this scenario specifically demonstrates the use of ESO with GKE, ESO is compatible with all major cloud providers’ managed vault services. Whether you’re working with AWS Secret Manager, Azure Key Vault, or other cloud platforms, ESO offers a versatile solution to meet the unique needs of different environments. For more details about ESO & its integration with different cloud providers, you can refer to the below links.
REFERENCES:
- https://external-secrets.io/latest/introduction/getting-started/
- https://external-secrets.io/latest/provider/azure-key-vault/
- https://external-secrets.io/latest/provider/aws-secrets-manager/
- https://external-secrets.io/latest/provider/google-secrets-manager/
Blog Pundits: Shweta Tyagi and Sandeep Rawat
OpsTree is an End-to-End DevOps Solution Provider.
Connect with Us