In the world of iOS mobile app development, implementing a robust CI/CD (Continuous Integration/Continuous Delivery) pipeline is essential to ensure efficient and reliable software delivery. Capacitor JS is a powerful framework that allows developers to build cross-platform mobile apps using web technologies. When combined with Azure DevOps, it enables a seamless CI/CD pipeline for iOS app development. In this blog post, we will guide you through the process of setting up a CI/CD pipeline for iOS mobile apps using Capacitor JS and Azure DevOps.
A Note on Capacitor JS
Capacitor is a free and open source (MIT-licensed) platform that enables web developers to build cross-platform apps with standard web technology that runs in modern browsers. Capacitor takes your existing web application and runs it as a native app on each platform, providing hooks into the native platform via JavaScript. These hooks can be built directly into the app, or as standalone plugins to be reused and distributed to others.
Can I reuse existing web code and share new code with a web app?
Yes! One of the strengths of Capacitor is that it runs normal web apps natively. In many cases, teams have a single codebase for web and mobile using Capacitor.
Prerequisite –
1. An azure devops account.
2. Working Web app code
3. App center account for distribution
Let’s begin …
Setup an azure devops account.
By default under free subscription we get to use linux VMs. In order to use mac VM, we will need to get subscription. Only one agent will be more than enough for our CICD pipeline.
Create an organization and a project. Once we have create our project, we move forward to create a new pipeline.

Configure to link the current project with your code base, which can reside in any VCS. We will be using bitbucket cloud so need to configure the same.

Connect, select, configure and review according to your requirements.
Once done, we will start with writing code for the pipeline. If you already worked with azure pipelines, you might know how easy it is to add steps since azure provides us with an assistant.
Step 1 – configure pool image – we are developing for ios so have configured macOS-12, since the default xcode version provided by macOS-12 is xcode 14, which satisfies our requirement.


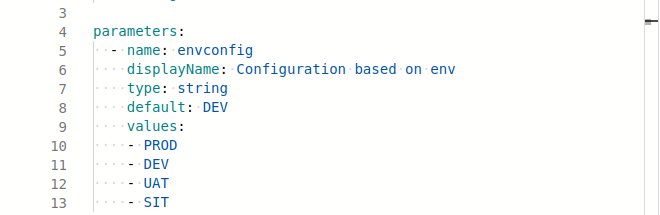
Step 2 – optional – configure environment variables for your pipeline. In this I’m adding variable to specify the deployment environment.
Step 3 – Download the required node version on the agent.

Step 4 – Installing dependencies and capacitor core and cli.

Step 5 – Building the app using “npm run ng build”

Step 6 – npx sync for ios/android folder

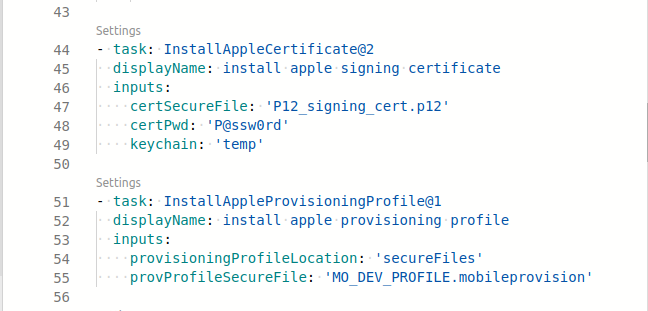
Step 7 – Install apple provisioning certificate and profiles. This requires us to first upload the certificate and profile files to azure, under secure files inside the library in pipelines.
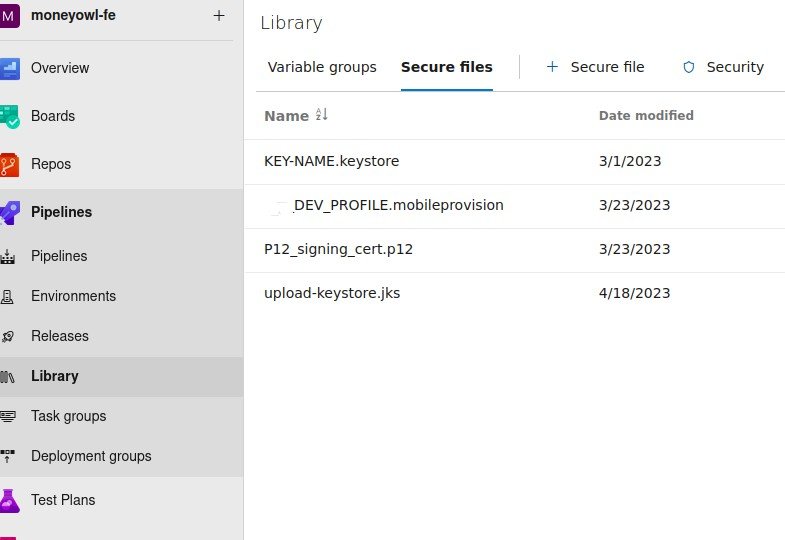
Once uploaded, we need to add step in our pipeline to install the profile and certificate
Step 8 – Install cocoapods in synced ios folder. Cocoapods helps you to manage and incorporate third-party libraries into your project without getting concerned about setting up and configuring your project.

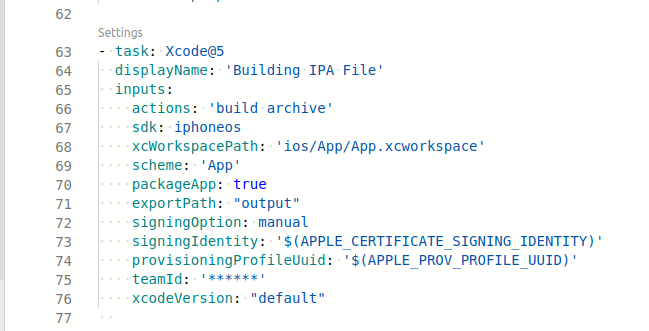
Step 9 – Xcode build- this will be the step where we bundle and package our application to .ipa file
Step 10 – optional – Naming ipa file.It is best practice to name the app with some meaningful name, based on environment and version and moving finished app to artifact staging

Step 11 – Publish artifact

Step 12 – Publish to App center. For this, add a service connection for App center in Project setting>Service connection. To generate a service connection, create an account at app center and create a new API token, making sure the API token has full access (so that Azure DevOps can create new releases for distribution), then copy the key. We will use this service connection to establish communication between azure devops and the app center. Alternatively, we can upload the artifact at s3 bucket as well, depending upon the requirements.
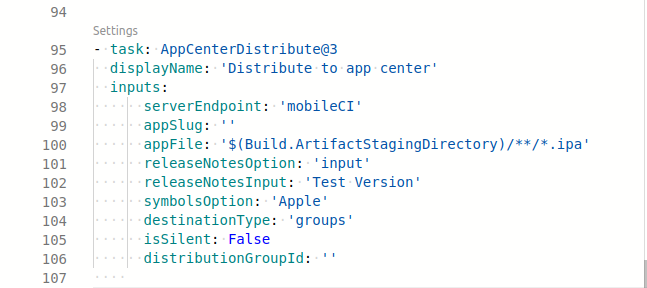
We’ll need to add the appSlug and distributionGroupId from app center account as well.
Once done, this is what the pipeline looks like –
pool:
    vmImage: macOS-12

parameters:
  - name: environment
    displayName: Configuration based on env
    type: string
    default: DEV
    values:
    - PROD
    - UAT
    - SIT
    - DEV

steps:

- task: NodeTool@0
  displayName: install node version
  inputs:
    versionSource: 'spec'
    versionSpec: '16.18.0'

- task: CmdLine@2
  displayName: install dependecies
  inputs:
    script: |
      npm install --ignore-scripts
      npm install typescript@4.6.4 --save-dev
      npm i @capacitor/core
      npm i -D @capacitor/cli
      npm install @capacitor/ios

- task: CmdLine@2
  displayName: npm build
  inputs:
    script: 'npm run ng build -- --c=${{ parameters.environment }}'

- task: CmdLine@2
  displayName: sync up android and iOS folder
  inputs:
    script: |
        npx cap sync

- task: InstallAppleCertificate@2
  displayName: install apple signing certificate
  inputs:
    certSecureFile: 'P12_signing_cert.p12'
    certPwd: '****'
    keychain: 'temp'

- task: InstallAppleProvisioningProfile@1
  displayName: install apple provisioning profile
  inputs:
    provisioningProfileLocation: 'secureFiles'
    provProfileSecureFile: 'DEV_PROFILE.mobileprovision'

- task: CocoaPods@0
  displayName: install cocoapods
  inputs:
    workingDirectory: 'ios/App'
    forceRepoUpdate: false

- task: Xcode@5
  displayName: 'Building IPA File'
  inputs:
    actions: 'build archive'
    sdk: iphoneos
    xcWorkspacePath: 'ios/App/App.xcworkspace'
    scheme: 'App'
    packageApp: true
    signingOption: manual
    signingIdentity: '$(APPLE_CERTIFICATE_SIGNING_IDENTITY)'
    provisioningProfileUuid: '$(APPLE_PROV_PROFILE_UUID)'
    teamId: '******'
    xcodeVersion: "default"


- task: CmdLine@2
  displayName: Naming ipa file
  inputs:
    script: |
        appversion=$(cat package.json | head | grep -w "version" | awk '{print $2}' |cut -c 2-6)
        mv /Users/runner/work/1/s/output/App.ipa /Users/runner/work/1/s/output/myapp_${{parameters.environment}}_${appversion}.ipa

- task: CopyFiles@2
  displayName: 'Copy Files to: $(build.artifactStagingDirectory)'
  inputs:
    SourceFolder: '/Users/runner/work/1/s/output'
    Contents: '*.ipa'
    TargetFolder: '$(Build.ArtifactStagingDirectory)'


- task: PublishBuildArtifacts@1
  displayName: 'Publish Artifact: drop'
  inputs:
    PathtoPublish: '$(Build.ArtifactStagingDirectory)'
    ArtifactName: 'ios'
    publishLocation: 'Container'

- task: AppCenterDistribute@3
  displayName: distribute to app center
  inputs:
      serverEndpoint: 'mobileCI'
      appSlug: '******'
      appFile: '$(Build.ArtifactStagingDirectory)/**/*.ipa'
      releaseNotesOption: 'input'
      releaseNotesInput: 'Test Version'
      symbolsOption: 'Apple'
      destinationType: 'groups'
      isSilent: False
      distributionGroupId: '*******'
Save and run the pipeline. Once completed, we can see the published artifact on Azure devops pipelines build page. Check at the app center for the latest version of the app available.
Additionally, we can also configure teams channel notifications to notify team whenever a build is triggered :
Create a teams channel, and add azure pipelines app to the channel.
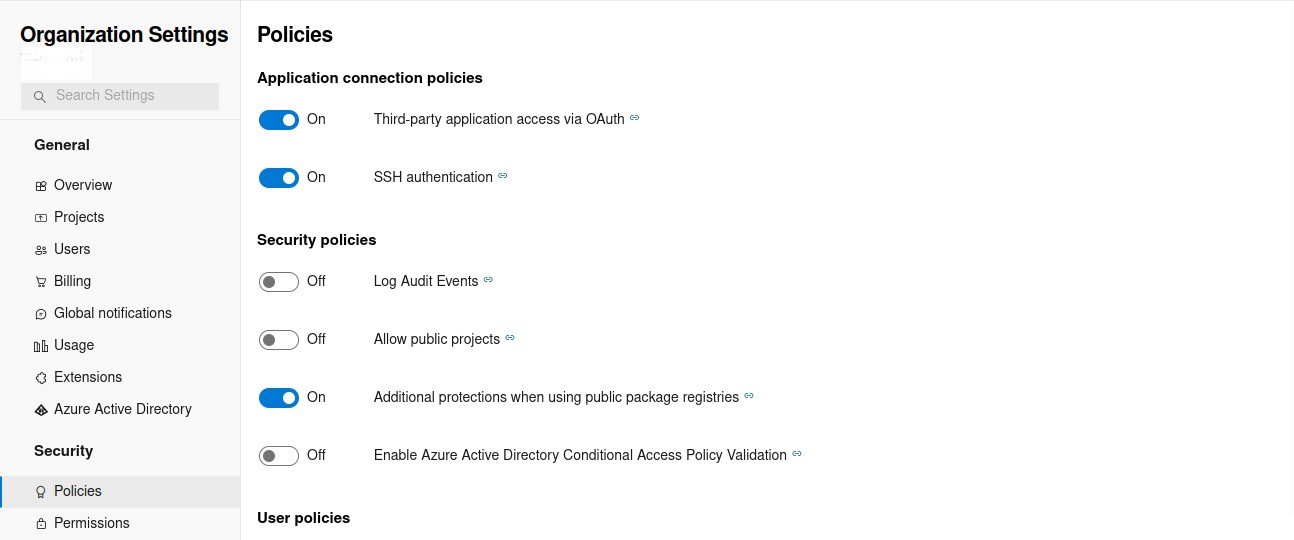
Login to the azure account, but first we will also need to allow third party application access via oAuth in our azure organization settings – under Security > Policies
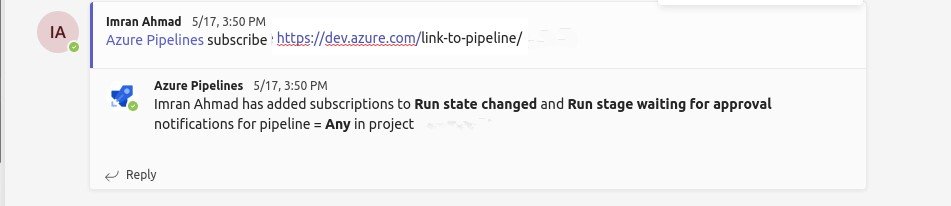
Now from teams channel, we need to subscribe to our pipeline/project, depending on what all notifications we need.
Conclusion
Implementing a CI/CD pipeline for iOS mobile app development using Capacitor JS and Azure DevOps streamlines the software delivery process, enhances collaboration, and ensures the quality of your iOS apps. By following the steps outlined in this blog post, you can establish an efficient CI/CD pipeline to automate build, test, and deployment processes, allowing you to deliver high-quality iOS apps to your users quickly and reliably.
Blog Pundits: Mehul Sharma and Sandeep Rawat
Related Searches – DevOps Solution | Data Engineering Services