
Table of Contents
Introduction
Keeping your infrastructure healthy means keeping a close eye on it—and that is where monitoring tools like Node Exporter and VictoriaMetrics VMagent come in. They are great at collecting and shipping system metrics from your servers, but here is the catch: installing and configuring them manually across dozens of machines is tedious, messy, and frankly, a recipe for inconsistency. That is where automation saves the day. In this guide, we will walk through how to use Ansible to deploy Node Exporter and VMagent cleanly and reliably, following best practices that are ready for real-world production environments.
Why Use Ansible for Monitoring Setup
Using Ansible provides several advantages:
- No manual installation on servers
- Consistent configuration across all environments
- Easy to reuse the same setup for multiple projects
- Clean separation between configuration and dependencies
Most importantly, this approach ensures that roles are not permanently stored on the system but are downloaded dynamically at runtime.
Are you looking for the best data engineering solutions provider in India?
Core Idea of This Setup
The key principles followed in this setup are:
- Do NOT store roles permanently on your system
- Declare only role dependencies
- Download roles on-demand from Git repositories
- Keep the local system lightweight and clean
All required roles and dependencies are fetched automatically when the playbook is executed.
Components Installed
Node Exporter
- Exposes Linux system metrics such as CPU, memory, disk, and network
- Runs as a systemd service
- Metrics are available on port 9100
- Used by monitoring systems like VictoriaMetrics or Prometheus
VMagent
- Lightweight metrics collection agent from VictoriaMetrics
- Scrapes metrics from Node Exporter
- Pushes metrics to a remote VictoriaMetrics server
- Optimized for low CPU and memory usage
Project Structure
This setup intentionally uses only two files, keeping everything simple, readable, and production-ready.
Playbook.yml – What Gets Installed
The playbook.yml file defines
- Target hosts
- Required privileges
- Configuration variables
- Which roles should be executed
Configuration Like this
---
- hosts: all
  become: true
  gather_facts: true

  vars:
    bare_metal: false
    dc: "{{ dc | default('default_dc') }}"
    env: "{{ env | default('default_env') }}"
    owner: default_owner
    node_exporter_version: "1.8.2"
    vmagent_remote_write_url: "{{ remote_write_url }}"
    vminsert_ip: "34.68.92.89"
    vminsert_hostname: "vminsert.k8s.opstree.dev"

    vmagent_scrape_config:
      global:
        scrape_interval: 15s
        external_labels:
          bare_metal: "{{ bare_metal }}"
          dc: "{{ dc }}"
          env: "{{ env }}"
          owner: "{{ owner }}"
      scrape_configs:
        - job_name: node_exporter
          static_configs:
            - targets:
                - "localhost:9100"
              labels:
                service: node_exporter

  pre_tasks:
    - name: Add vminsert host entry in /etc/hosts
      lineinfile:
        path: /etc/hosts
        line: "{{ vminsert_ip }} {{ vminsert_hostname }}"
        state: present
        create: false

  roles:
    - role: node-exporters
    - role: Vmagent
What This Playbook Does
- Runs on all target hosts
- Uses privilege escalation (become: true)
- Installs Node Exporter and VMagent
- Configures metric scraping and remote write automatically
requirements.yml – Role Dependencies
The requirements.yml file defines where the roles are downloaded from
roles:

  - name: node_exporter
    src: https://github.com/geerlingguy/ansible-role-node_exporter.git
    scm: git
    version: master

collections:
  - name: https://github.com/VictoriaMetrics/ansible-playbooks.git
type: git
version: master
Why This File Is Important
- Roles are fetched directly from GitHub
- No manual role installation required
- Ensures the same role versions across all environments
How to Use This Setup
Step 1: Install Role Dependencies
ansible-galaxy install -r requirements.yml
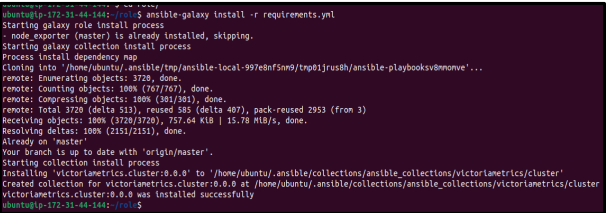
By default, roles are downloaded into
~/. ansible/roles/

Step 2: Run the Playbook
ANSIBLE_ROLES_PATH= ~/. ansible/roles ansible-playbook playbook.yml
-e remote_write_url ="https://vminsert.k8s.opstree.dev/insert/0/prometheus/api/v1/write" \
- e env=testing \
-e dc= hanuman \
--ask-become-pass
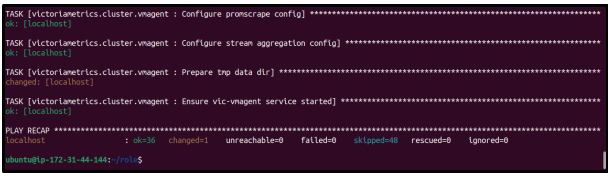
- This command sets the ANSIBLE_ROLES_PATH to locate the downloaded roles and runs the playbook.yml.
- Runtime variables like remote_write_url, env, and dc are passed using -e, while –ask-become-pass enables sudo access during execution
Why This Approach Works Well
- Minimalistic – only two files
- Reusable – roles can be reused across projects
- Clean – no unnecessary files on the system
- Production-ready – follows Ansible best practices
Conclusion
By using Ansible in this structured way, you can build a clean, scalable, and maintainable monitoring setup. Separating playbook logic from role dependencies keeps the system simple and easy to manage while remaining fully production ready.