
When docker was released as a new containerization tool, it took the market by a storm. With its lightweight images, multi-os support, and ability to ship containers, it’s popularity only roared. I have been using it for more than six months now, I can see why it is so. Hypervisors, another type of virtualizing tools, have been hard on hardware. Which means they require a lot of resources to run. This increases the cost of running applications way more than those running on containers. This is the problem docker solved and hence, it’s popularity. Docker engine just sits on host OS and translates the instructions from an application to the underlying OS. It does not need one extra layer of virtual OS, just the binaries and libraries of application bundled in the image. Right? Now, hold on to that thought. We all have been working with docker and an extension with docker-compose. Why? Because it makes our job easy, We are spared from typing hundreds of ad-hoc commands in terminal to set up a slightly or very complicated application with certain dependencies. We can just describe it in a `docker-compose.yml` file and our job is done. However, the problem arises when we have to share that compose file:
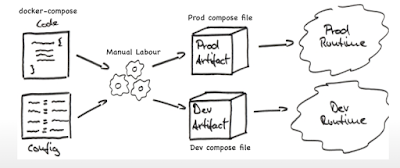
- Other users might need to use the file in a different environment, so they will need to edit all the values pertaining to their need, manually, and keep separate compose files for each environment.
- Troubleshooting various configuration issues can be a tedious task since there is no single place where the configuration of the application can be stored. Changes will have to be made in the file.
- This also makes communication between Dev and Ops team more tricky than it has to be resulting in communication gap and time wastage.
To have a more clear picture of the issue, we can have look at the below image:
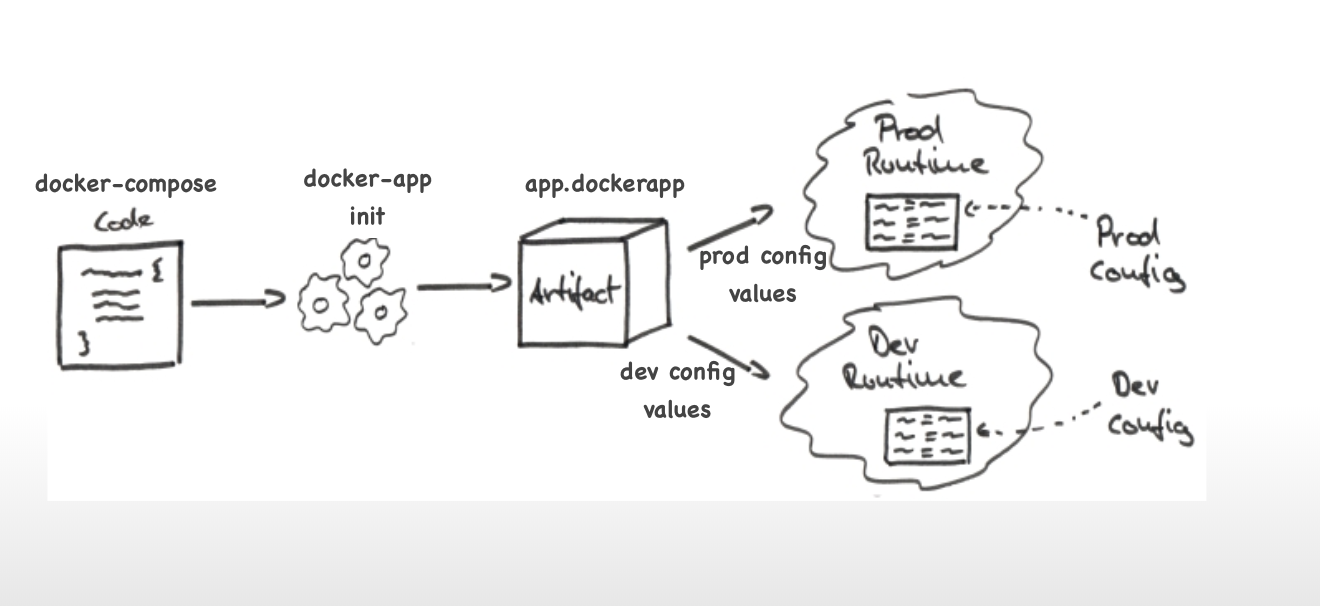
All of this points to the fact that there is no way to bundle the applications that use efficiently-bundled docker images. See the irony here? Well, there “was” no way, until there was. Enter ‘docker-app’. This, relatively, new tool is the answer to packaging docker-compose applications. I came across it when I was, myself, struggling to re-use a docker-compose application I had written in another environment. As soon as I read about it, I had to try it, which I did and loved. It made the task much easier as it provided a template of compose file and a key-value store for environment dependent parameters.
Let us now go through an example of how the docker app works. I am going to deploy a dummy application Spring3hibernate from Opstree Github repository in QA env and later in PROD by making simple configuration changes.
Installing docker-app is easy, though, there is one thing one should keep in mind: it can be installed as a plugin in docker-CLI or as standalone CLI tool itself. I will be installing it as a standalone CLI tool on linux. If you wish to install it as a plugin to docker-CLI and/or on another OS, visit their Github page: https://github.com/docker/app (Also, please visit github page for basics)
Before continuing, please ensure you have docker-CLI and docker-compose installed.
Please follow below steps to install docker-app:
$ export OSTYPE="$(uname | tr A-Z a-z)"
$ curl -fsSL --output "/tmp/docker-app-${OSTYPE}.tar.gz" \
"https://github.com/docker/app/releases/download/v0.8.0/docker-app-${OSTYPE}.tar.gz"
$ tar xf "/tmp/docker-app-${OSTYPE}.tar.gz" -C /tmp/
$ install -b "/tmp/docker-app-standalone-${OSTYPE}" /usr/local/bin/docker-app
Create a new directory in your home, we’ll call it app home:
$ cd ~
$ mkdir spring3hibernate-app
$ cd spring3hibernate-app/
Now, clone the app from Opstree Github repository. This app needs only mysql as a dependency.
$ git clone https://github.com/opstree/spring3hibernate.git
We need to update database properties file and nginx config file with below contents respectively:
$ vim ~/spring3hibernate-app/spring3hibernate/src/main/resources/database.properties
Replace below content over there:
database.driver=com.mysql.jdbc.Driver
database.url=jdbc:mysql://mysql:3306/employeedb
database.user=admin
database.password=password
hibernate.dialect=org.hibernate.dialect.MySQLDialect
hibernate.show_sql=true
hibernate.hbm2ddl.auto=update
upload.dir=c:/uploads
For nginx conf file:
$ vim ~/spring3hibernate-app/spring3hibernate/nginx/default.conf
server {
    listen       80;
    server_name  localhost;

    location / {
        stub_status on;
        proxy_pass http://springapp1:8080/;

    }
# redirect server error pages to the static page /50x.html
    error_page   500 502 503 504  /50x.html;
    location = /50x.html {
        root   /usr/share/nginx/html;
    }

}
Move
‘default.conf’ to ~/spring3hibernate-app/spring3hibernate/nginx/conf/qa/
as we have different conf file for PROD which goes to
~/spring3hibernate-app/spring3hibernate/nginx/conf/prod/
upstream s3hbackend {
    server springapp1:8080;
    server springapp2:8080;
}
server {
       listen 80;
       location / {
           stub_status on;
           proxy_pass http://s3hbackend;
       }

       # redirect server error pages to the static page /50x.html
       error_page   500 502 503 504  /50x.html;
       location = /50x.html {
           root   /usr/share/nginx/html;
       }

}
This is the configuration for the nginx load balancer. Remember this, we’ll use it later.
Let’s create our docker-app now, make sure you are in the app home directory
when executing this command:
$ docker-app init --single-file s3h
This will create a single file named s3h.dockerapp which will look like this:
# This section contains your application metadata.
# Version of the application
version: 0.1.0
# Name of the application
name: s3h
# A short description of the application
description:
# List of application maintainers with name and email for each
maintainers:
  - name: ubuntu
    email:


---
# This section contains the Compose file that describes your application services.
version: "3.6"
services: {}


---
# This section contains the default values for your application parameters.

{}
As you can see this file is divided into three parts, metadata, compose, and parameters. They are all in one file because we used –single-file switch. We can divide them up in multiple files by using docker-app split command in app home directory, docker-app merge will put them back in one file.
Now, for QA, we have the following configuration for s3h.dockerapp file:
version: 0.1.0
name: s3h
description:
maintainers:
  - name: atbk5
    email: adeel.ahmad@opstree.com


---
version: "3.7"
services:
  mysql:
    image: mysql:5.7
    container_name: mysql
    environment:
      MYSQL_ROOT_PASSWORD: ${mysql.env.rootpass}
      MYSQL_DATABASE: ${mysql.env.database}
      MYSQL_USER: ${mysql.env.user}
      MYSQL_PASSWORD: ${mysql.env.userpass}
    restart: always
    networks:
      - backend
    volumes:
      - db_data:/var/lib/mysql


  spring1:
    depends_on:
      - mysql
    build:
      context: ./spring3hibernate/
      dockerfile: Dockerfile
    container_name: springapp1
    restart: always
    networks:
      - backend
      - frontend


  spring2:
    depends_on:
      - mysql
    build:
      context: ./spring3hibernate/
      dockerfile: Dockerfile
    container_name: springapp2
    restart: always
    networks:
      - backend
      - frontend
    x-enabled: ${spring.app2}


  nginx:
    depends_on:
      - spring1
    image: nginx:alpine
    container_name: proxy
    restart: always
    networks:
      - frontend
    volumes:
      - ${nginx.conf}:/etc/nginx/conf.d
    ports:
      - ${nginx.port}:80
    x-enabled: ${nginx.status}


networks:
  frontend:
  backend:


volumes:
  db_data:


---
mysql:
  env:
    rootpass: password
    database: employeedb
    user: admin
    userpass: password
nginx:
  conf: /home/ubuntu/dockerApp/spring3hibernate/nginx/conf/qa
  port: 81
  status: true
spring:
  app2: false
As mentioned before, first part contains app metadata, second part contains actual compose file with lots of variables, and last part contains values of those variables. Special mention here is x-enabled variable, docker-app provides functionality to temporarily disable a service using this variable. Now, try a few commands:
$ docker-app inspect
It will produce summary of whole app.
$ docker-app render
It will replace all variables with their values and will produce a compose file
$ docker-app render --set nginx.status=”false”
It will remove nginx from docker-app compose as well as deploy
$ docker-app render | docker-compose -f - up
It
will spin up all the containers according to rendered compose file. We
can see the application running on port 81 of our machine.
$ docker-app --help
To check out more commands and play around a bit.
At this point, it will be better to create two directories in app home: qa and prod. Create a file in qa: qa-params.yml. Another file in prod: prod-params.yml. Copy all parameters from above s3h.dockerapp file to qa-params.yaml (or not). More importantly, copy below changes in parameters to prod-params.yml
mysql:
  env:
    rootpass: password
    database: employeedb
    user: admin
    userpass: password
nginx:
  conf: /home/ubuntu/dockerApp/spring3hibernate/nginx/conf/prod
  port: 80
  status: true
spring:
  app2: true
We are going to loadbalance springapp1 and springapp2 in PROD environment, since we have enabled springapp2 using x-enabled parameter. We have also changed nginx conf bind path to the new conf file and host port for nginx to 80 (for Production). All so easily. Run command:
$ docker-app render --parameters-file ./prod/prod-params.yaml
This command will produce a compose file ready for production deployment. Now run:
$ docker-app render --parameters-file ./prod/prod-params.yml | docker-compose -f - up
And production is deployed … Visit port 80 of your localhost to verify. What’s more exciting is that we can also share our docker-apps through docker hub, we can tag the app and push it to our remote registry as images after logging in:
$ docker login
Provide your username and password for docker hub, create an account if not yet created.
$ docker-app push --tag atbk5/s3h.dockerapp:latest
If we wish to upload additional files as well, we will have to split our project using docker-app split and put additional files in the directory before pushing. The additional files will go as attachments which can be accessed later.
Conclusion
With the arrival of docker app, our large, composite, and containerized applications can also be shipped and re-used as images. That is cool. But there’s something cooler which we haven’t explored yet. Deploying our docker-apps on kubernetes with the goal of exploring how far in management, and how optimal in delivery, we can go with our applications. Let’s keep this as a topic for the next blog. Until then, have a nice one. 🙂
Image Source: https://reflectoring.io/externalize-configuration/