
Samurai are powerful warriors. We also need the same power in our infrastructure to get Control over Security threats over IP or URL Redirect attacks. So let me introduce to you the AWS Managed Firewall.
In MNCs, we have separate Network and Security teams – which is good by the way. They have the proper tool to block incoming or outgoing traffic. For this, they set up a firewall on their side which helps them establish a Network Control Centre.
But managing this firewall is not easy and cheap because you have to purchase a license and to maintain that you need SMEs for particular that firewall. So to overcome all these issues we now have a managed service aws that is AWS Firewall.
So what were the current Requirements that help me go deep-dive into this?
- We need to block some Public URLs for our egress traffic.
- We want to do so with a managed service.
- It should be quite easy to implement
- No Hustle and Bustle is required for setting and maintaining the firewall
- It should be a centralized Service. Should have control over your multiple accounts. Ex- It would be treated as Single Control Network for multi Accounts
[ Are you looking: AWS Solutions]
So, to fulfill all these requirements. The first fully managed service that came to my mind is the AWS firewall.
Well, don’t be afraid this document look difficult but quite easy to implement. So let’s start.
Basic Requirements:
- AWS Account
- Basic knowledge of the Creation of VPC and Subnets and EC2 and transit Gateway
- Please read the first Blog Transit Gateway Setup on AWS
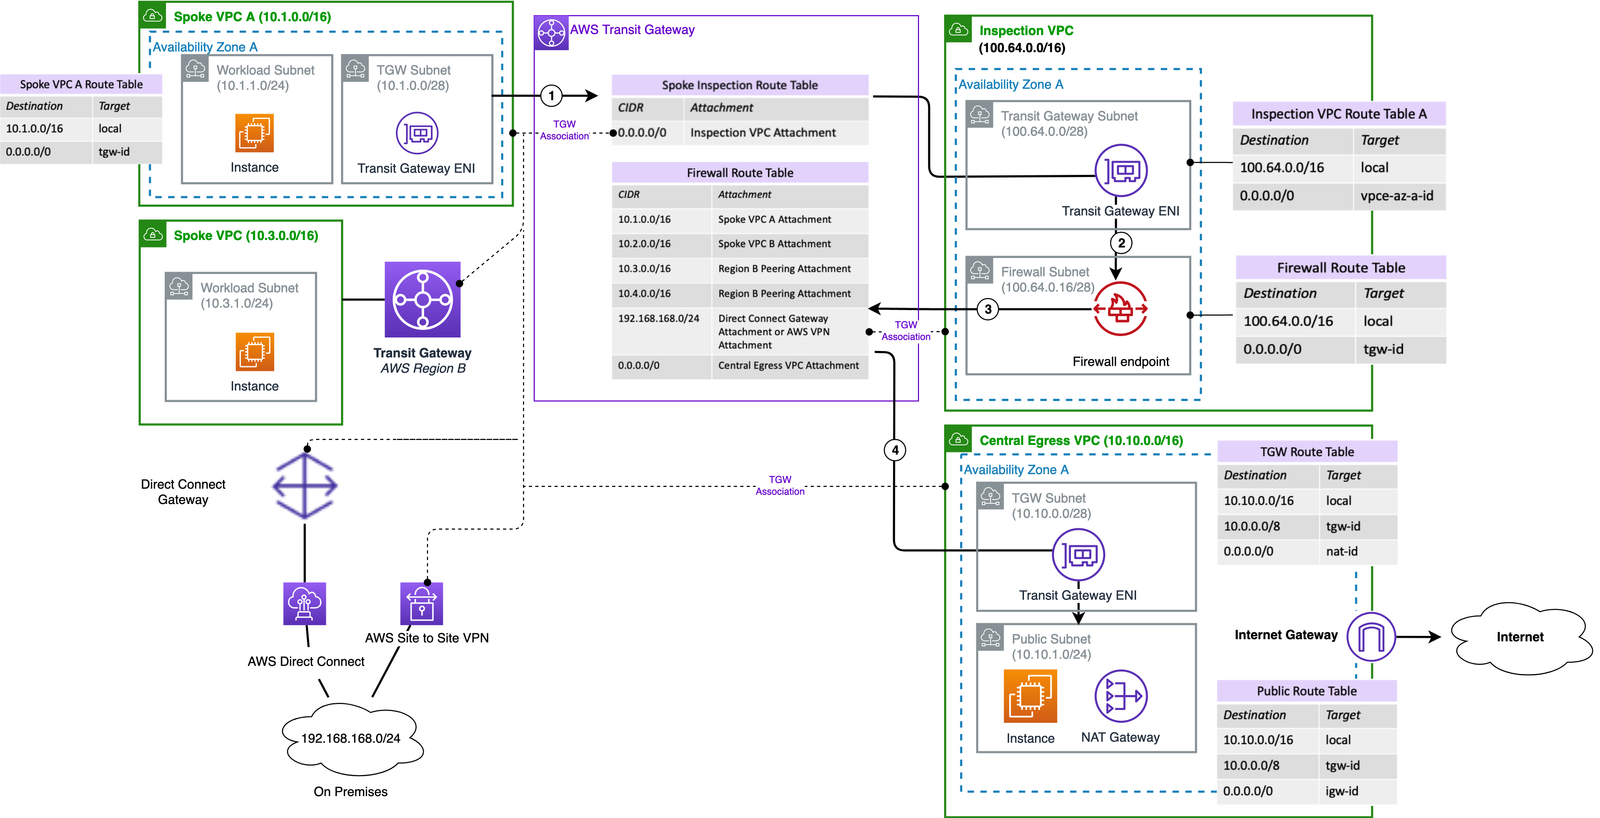
The Diagram has some basic terms:
- Hub VPC: It’s a VPC in which your transit gateway is residing
- Spoke VPC: It’s your VPC that has to be exposed to the firewall
- Availability Zones: It’s your isolated location in which you have made your VPC
- VPC: Virtual Private Cloud is like your data-center
- Public/Private subnet: Public are those which are exposed to Internet and Private are not exposed
- NAT/Internet gateway: They are just like your routers which help you to connect to the outer world
[ Check Our Case Study: Migrating from On-Prem to AWS with Enhanced Observability, Security, and Cost Optimization ]
We will do Implementation in 4 Steps:
First, we will set up Transit Gateway:
- Click on Create Transit GATEWAY: Select NAME > SELECT DESCRIPTION > CREATE TRANSIT GATEWAY
- Now CREATE two ROUTE TABLE :
- FIREWALL-ROUTE-TABLE
- SPOKE-ROUTE-TABLE
- Now Create a TGW attachment for the VPC which you want to peer
- If you want to peer VPC in the different account you just need to share that Transit gateway to a particular Account and create a new attachment from that account
[ Also Read: Understanding AWS Cost and Usage Reports (CUR) ]
Now next setup would be configuration of your Hub/Spoke/Inspection VPC
Note: We will not discuss the creation of VPC. For VPC creation we can refer to this AWS Documentation
https://docs.aws.amazon.com/directoryservice/latest/admin-guide/gsg_create_vpc.html
Creation of Spoke VPC:
As told earlier, Spoke VPC are those whose traffic has to be filtered through the firewall. You can use your existing VPC or create a new one with tgw-subnet in each availability zone
Now create Inspection VPC
Inspection VPC is in which you will have your Firewall setup.
- Inspection VPC will be having subnet name TGW subnet
Now create central Egress VPC
Central Egress VPC will be forwarding your Traffic which is getting filtered from Inspection(Firewall) VPC
- Central Egress VPC will have TGW Subnet/Public Subnet
- NAT Gateway
- Internet Gateway
After setting up Transit Gateway and 3 VPCs we will be moving towards our third step, setup of Firewall
Firewall Setup is easy we will follow bottom to above approach
FIREWALL RULES –> FIREWALL POLICIES —-> FIREWALL
We will first setup Rules
- Go to AWS Firewall > Select Firewall Rules
- Choose action RULE GROUP TYPE > Forward to stateful groups
- Choose Stateful Group Option > DOMAIN LIST
- Select Stateful Rule Order > Strict
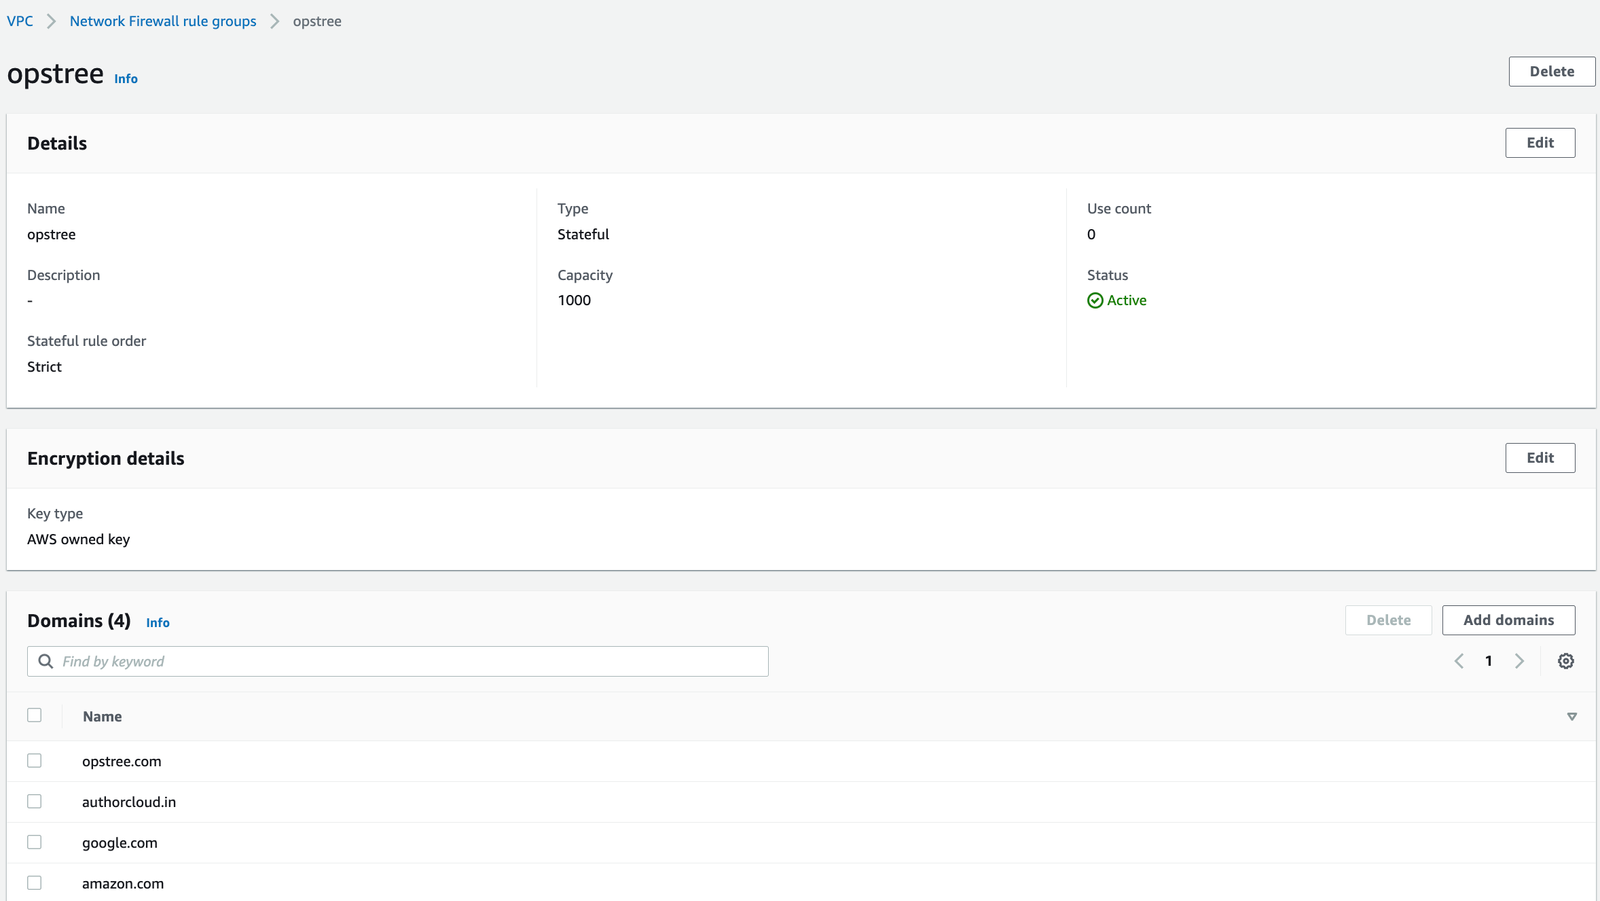
- Now create Rule Groups
- Group Name: Opstree
- Capacity 10000
- List the number of Domains you want to allow
- Choose a rule to ALLOW
- Traffic to Inspect HTTP/HTTPS
- Under Source IP Types: You can also choose Source IPs from where you are allowing the traffic to be going through firewall Here you can enter your VPC Ranges
Now Create the firewall Policy
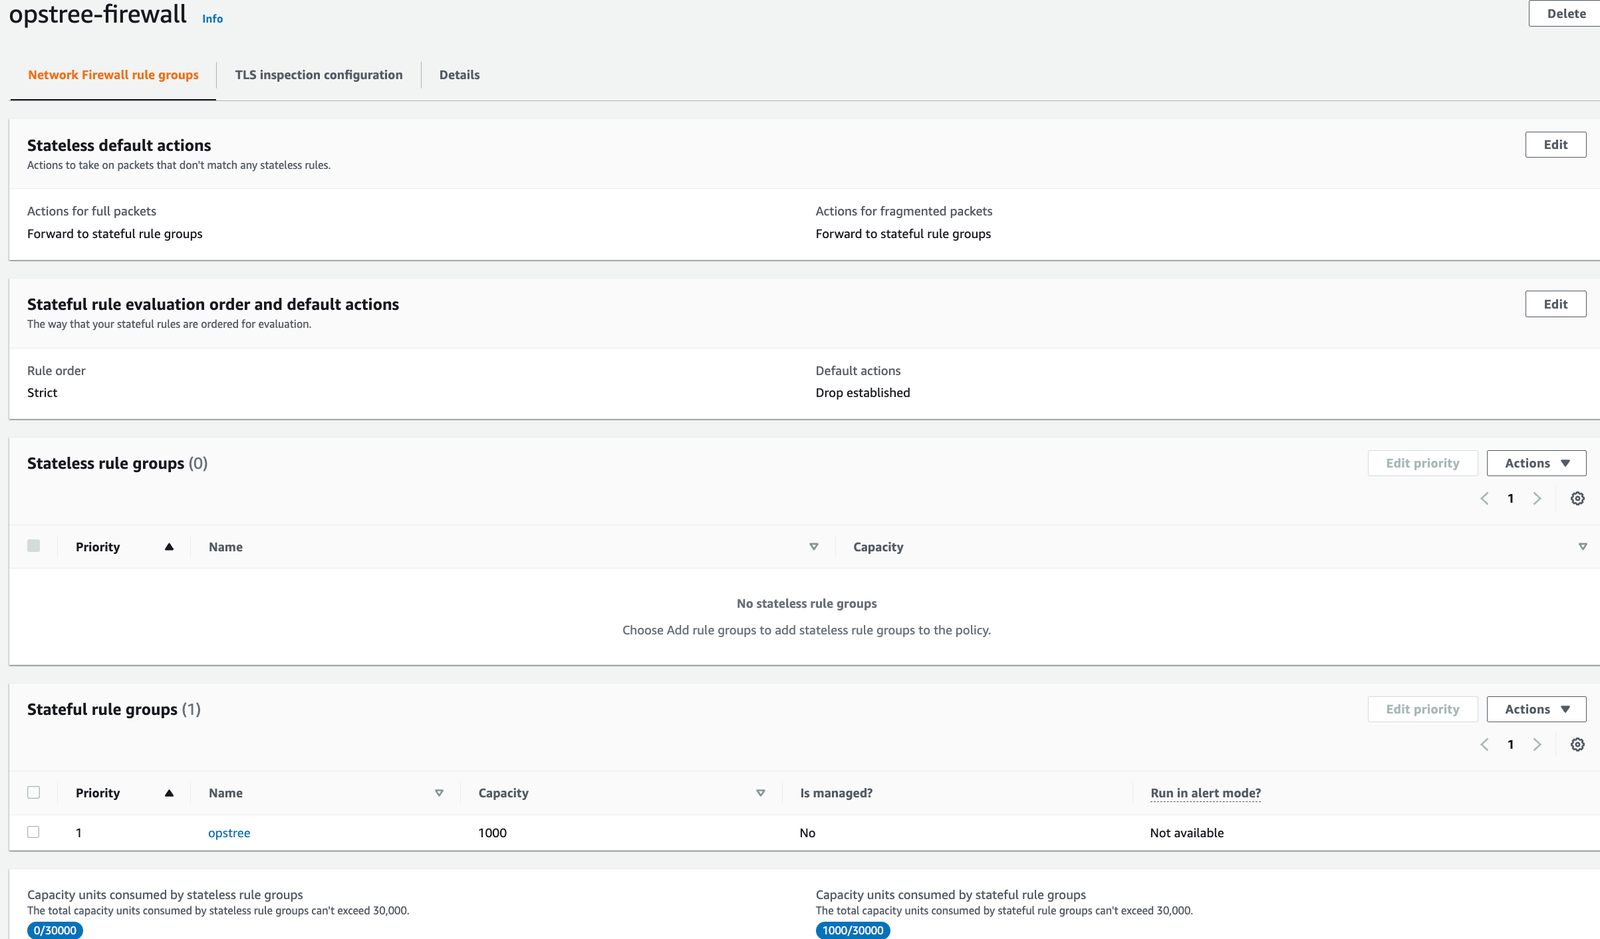
- Select > Firewall Policies
- Choose Name > Opstree Firewall
- Select > Select Exception policy (Drop)
- Select Default Actions
- Fragmented packets > Use same actions for all packets
- Action > Forward to stateful rule groups
- In stateful rule evaluation
- Rule order > Strict
- Default Action > Drop established
- Now Add Stateful rule group you have created before in firewall rules by the names Opstree
[ Must Read Ebook: Getting Started with Generative AI on AWS ]
Now create the BIG FISH FIREWALL
- Enter the Name > Opstree-Firewall
- Chose your VPC > Inspection VPC
- Choose Firewall Subnets > Select all the three Subnets you have created for Firewall
- Associated Firewall Policy > Select your existing policy > opstree-Firewall
- Enable Delete protection and Subnet change protection
Now you are all ready to block any Website on your Infrastructure
NOTE: Deploying Firewall in different subnet create different VPC endpoints.
We will not go deep Dive into VPC endpoints. It established private endpoint to connect with any AWS service within that VPC.
So now all the 3 Steps are done Let’s move towards the final step that Adding routes of tgw-id replacing your NAT Id in your spoke VPCs
When you have created TGW in our first step you have got a tgw-id just replace it with the NAT id in your route table of your Spoke VPC subnets
Now the Egress traffic flow will be like this in your VPCs.
- Now traffic coming from Spoke VPC will have an entry for Transit gateway id for the traffic 0.0.0.0/0 in the route tables
- Traffic will be from SPOKE to TRANSIT GATEWAY Spoke VPC Route table
- Spoke VPC Route table in Transit Gateway has entry to enter route coming from spoke VPC to Inspection VPC
- After traffic is entered into Inspection VPC it now has an entry over the firewall endpoint
- The firewall Endpoint will filter the traffic according to the rules
- Now it will throw back traffic to TGW Firewall TGW Route table
- Now TGW has filtered traffic, Now it will throw traffic to Central Egress VPC
- Where traffic goes to the outer world. Like if you have not allowed xyz.com into your firewall rules. you will not be able to access that into your Instance from where there the traffic is being originated
The same can be created for ingress traffic also you just need to add one more VPC Central-ingress VPC
Conclusion
I hope I could shed some light on the role and importance of the managed service – AWS Firewall. If you guys enjoyed reading this and found it insightful do share it amongst your community. Want to give any feedback or suggestions, you can reach out to me. If you have any interesting use-case for AWS Firewall, do share them in the comments section.