Pre-signed URLs are unique web links designed to provide temporary access to a private resource, such as an Amazon S3 object, without requiring the user to provide their own security credentials.
This approach allows you to generate a URL that includes authentication details and permissions, so users or applications can upload files directly to cloud storage without needing to have credentials for the storage service.
Here’s a step-by-step guide on how to implement file uploads using pre-signed URLs to a specific storage class, specifically with AWS S3. I’ll cover how to generate a pre-signed URL in Python and how to use it in Postman.
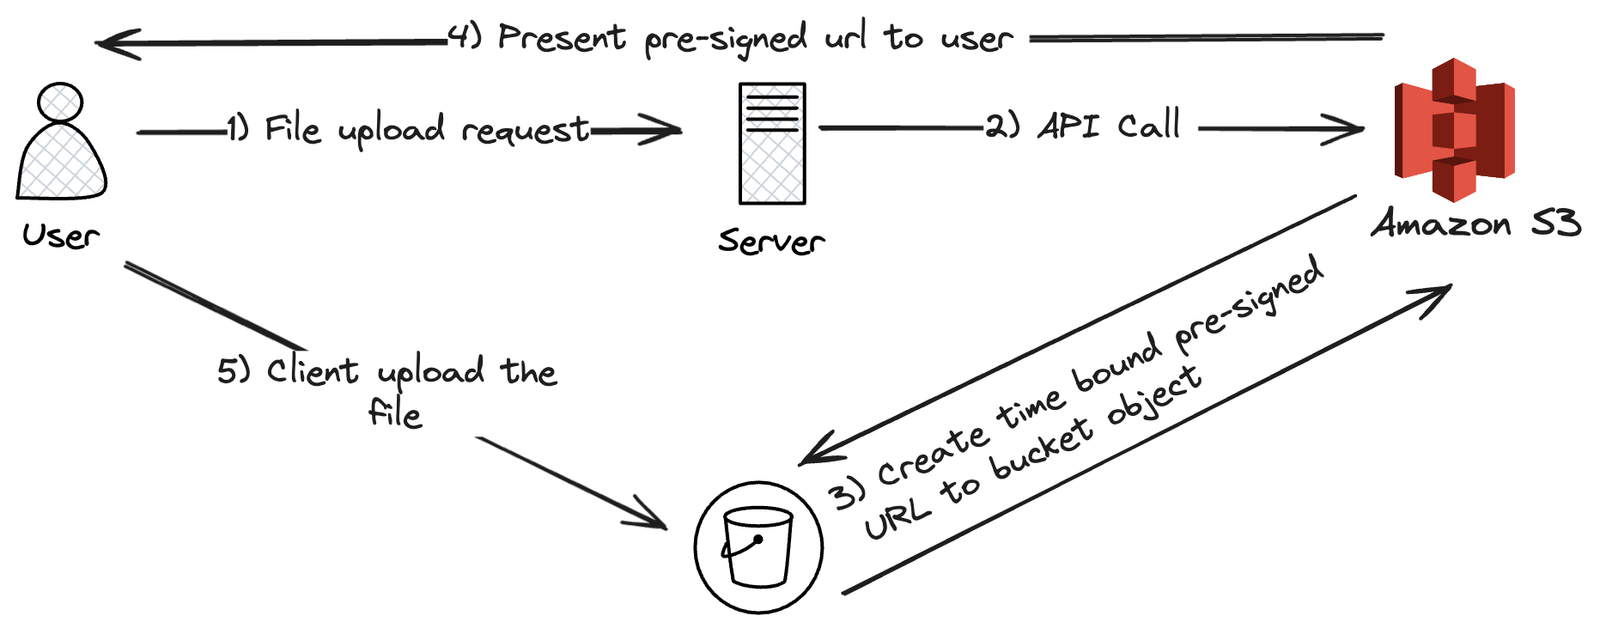
Architecture:
Create an IAM User:
- Sign in to the AWS Management Console.
- Navigate to IAM (Identity and Access Management):
- Open the IAM Console.
- Create a New User:
- Click on Users in the sidebar.
- Click the Add user button.
- Enter a user name (e.g., s3-uploader).
- Select Programmatic access for the access type to generate an access key ID and secret access key.
- Click Next: Permissions.
Create an S3 Bucket:
- Navigate to S3:
- Open the S3 Console.
- Create a New Bucket:
- Click on Create bucket.
- Enter a unique bucket name (e.g., data-from-resign).
- Choose a region.
- Configure options as needed (default settings are usually sufficient for this example).
- Click Create bucket.
Edit Cross-origin resource sharing (CORS):
- Under the Permissions tab, find the CORS configuration section.
- Click on Edit to modify the CORS settings.
- Replace the existing CORS configuration with the following JSON configuration. This example allows PUT requests from a specific domain (e.g., https://example.com) and specifies which headers are allowed:
[

    {

        "AllowedHeaders": [

            "*"

        ],

        "AllowedMethods": [

            "PUT"

        ],

        "AllowedOrigins": [

            "https://example.com"

        ],

        "ExposeHeaders": []

    }

]
Attach a Custom Policy to the User:
- Create a Custom Policy:
- In the IAM Console, go to Policies.
- Click Create policy.
- Select the JSON tab and enter a policy that grants permission to upload files to your specific bucket. For example:
```

{

    "Version": "2012-10-17",

    "Statement": [

        {

            "Sid": "VisualEditor0",

            "Effect": "Allow",

            "Action": "s3:PutObject",

            "Resource": "arn:aws:s3:::data-from-presign/*"

        }

    ]

}
- Click Next: Tags (optional) and then Next: Review.
- Provide a name (e.g., S3UploadPolicy) and description.
- Click Create policy.
Attach the Policy to the User:
- Go to Users and select the user you created (s3-uploader).
- Click the Permissions tab.
- Click Add Permissions.
- Select Attach policies directly.
- Search for and select the policy you created (S3UploadPolicy).
- Click Next: Review and then Add permissions.
Generate Programmatic Access Credentials:
- Get Access Keys
- Go to Users and select the user (s3-uploader).
- Click the Security credentials tab.
- Under Access keys, click Create access key.
- Download the CSV file containing the Access key ID and Secret access key or copy them. These are needed for programmatic access.
Generate a Pre-Signed URL:
Using the AWS SDK (Boto3 for Python), generate a pre-signed URL. Here’s a Python script to do this:
import boto3
import botocore

# Assuming your S3 bucket name and image file name
ACCESS_KEY = 'access_key'
SECRET_ACCESS_KEY = 'secret_key'
BUCKET_NAME = 'data-from-presign'
OBJECT_KEY = 'image.png'
STORAGE_CLASS =  'ONEZONE_IA'

# Initialize a session using the AWS SDK for Python (Boto3)
session = boto3.Session(
    aws_access_key_id=ACCESS_KEY,
    aws_secret_access_key=SECRET_ACCESS_KEY,
    region_name='ap-south-1'  # Specify the region where your bucket is located
)

# Generate the presigned URL
s3_client = session.client('s3')
try:
    response = s3_client.generate_presigned_url(
        'put_object',
        Params={'Bucket': BUCKET_NAME, 'Key': OBJECT_KEY , 'StorageClass': STORAGE_CLASS},
        ExpiresIn=60
    )
except botocore.exceptions.ClientError as e:
    print(e)
    # Handle the error here

print(f'Presigned URL to upload file to S3: {response}')
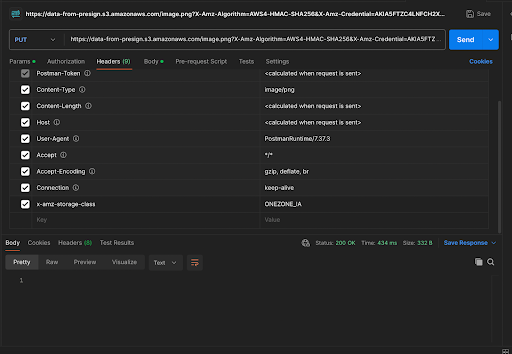
Upload a File Using the Pre-Signed URL:
- Copy the URL generated from the Python script and paste it into Postman. Change the request method to PUT. Additionally, add the following header: {‘x-amz-storage-class’: ‘STANDARD_IA’}.
- Navigate to the Body tab, select binary, and choose the file you want to upload.
Wrapping Up
Implementing file uploads using pre-signed URLs is a secure and efficient way to handle file transfers to AWS S3, bypassing the need for direct access credentials. This method not only ensures secure uploads but also streamlines the process for both users and applications. You should consider exploring additional S3 features, such as lifecycle policies for automated data management and versioning for maintaining data integrity.
Blog Pundits: Deepak Sood and Sandeep Rawat
OpsTree is an End-to-End DevOps Solution Provider.
Connect with Us