
Introduction
In today’s cloud-native ecosystem, managing API traffic efficiently is crucial for application performance and security. As organizations migrate to microservices architectures on Kubernetes, the need for a robust API Gateway becomes paramount. Enter Kong Gateway — a powerful solution that acts as the intelligent traffic director for your Kubernetes cluster.
Having worked with multiple API gateway solutions in production environments, I’ve found Kong Gateway to be exceptionally well-suited for Kubernetes deployments. In this comprehensive guide, I’ll walk you through how Kong Gateway orchestrates traffic flow within a Kubernetes cluster, using a real-world Grafana deployment as our example.
By the end of this article, you’ll understand the complete journey of a request from your browser to a Kubernetes pod and back, with Kong Gateway managing every step of the process.
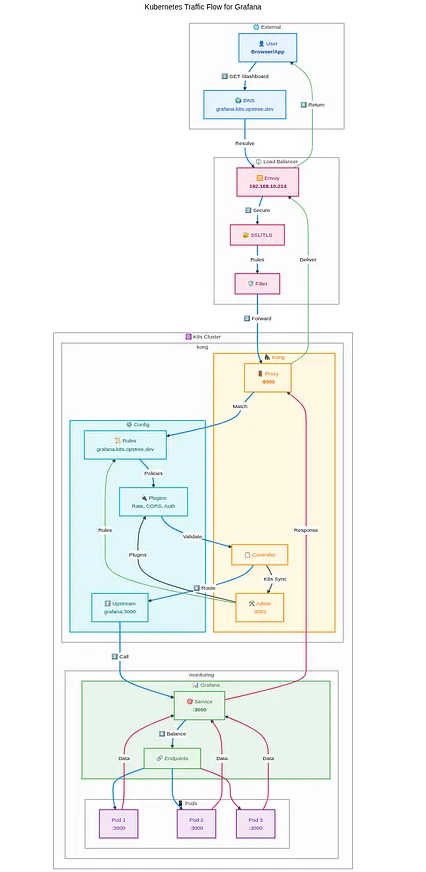
Table of Contents
- Introduction
- What is Kong Gateway?
- Key Capabilities
- Installing Kong Gateway in Kubernetes
- Kong Gateway Architecture in Kubernetes
- Complete Traffic Flow: Browser to Pod
- Practical Implementation: Grafana with Kong
- Advanced Kong Features for Production
- Monitoring and Troubleshooting
- Performance Optimization
- Security Best Practices
- Future Considerations
- Conclusion
What is Kong Gateway?
Kong Gateway is an open-source, cloud-native API Gateway and ingress controller designed specifically for modern microservices architectures. Built on top of NGINX and OpenResty, Kong provides a lightweight yet powerful platform for managing API traffic.
Key Capabilities
Traffic Management
- Intelligent request routing based on paths, headers, and methods
- Load balancing across multiple service instances
- Circuit breaker patterns for fault tolerance
Security Features
- Authentication and authorization (JWT, OAuth2, Basic Auth)
- Rate limiting and DDoS protection
- SSL/TLS termination and mTLS support
Observability
- Comprehensive metrics and logging
- Distributed tracing support
- Real-time monitoring and alerting
Extensibility
- Plugin-based architecture with 50+ official plugins
- Custom plugin development support
- Seamless integration with existing tools
Installing Kong Gateway in Kubernetes
Before we dive into the architecture, let’s start with a clean Kong installation. I’ll show you multiple installation methods so you can choose what works best for your environment.
Prerequisites
Before installing Kong Gateway, ensure you have:
# Kubernetes cluster (v1.19+)
kubectl version --short
# Helm 3.x installed
helm version --short# Sufficient cluster resources
kubectl get nodes
Method 1: Helm Installation (Recommended)
This is the quickest and most reliable way to install Kong in production environments.
# Add Kong Helm repository
helm repo add kong https://charts.konghq.com
helm repo update
# Create dedicated namespace
kubectl create namespace kong# Install Kong with DB-less mode
helm install kong kong/kong \
  --namespace kong \
  --set ingressController.enabled=true \
  --set image.repository=kong/kong-gateway \
  --set image.tag="3.4" \
  --set env.database=off \
  --set env.router_flavor=traditional \
  --set ingressController.installCRDs=false \
  --set serviceMonitor.enabled=true \
  --set serviceMonitor.labels.release=prometheus
Method 2: Kubectl Manifest Installation
For those who prefer direct YAML deployment:
# Install Kong CRDs first
kubectl apply -f https://raw.githubusercontent.com/Kong/kubernetes-ingress-controller/main/config/crd/bases/configuration.konghq.com_kongplugins.yaml
# Deploy Kong Gateway
kubectl apply -f - <<EOF
apiVersion: apps/v1
kind: Deployment
metadata:
  name: kong-gateway
  namespace: kong
  labels:
    app: kong-gateway
spec:
  replicas: 2
  selector:
    matchLabels:
      app: kong-gateway
  template:
    metadata:
      labels:
        app: kong-gateway
    spec:
      containers:
      - name: kong
        image: kong/kong-gateway:3.4
        ports:
        - containerPort: 8000
          name: proxy
        - containerPort: 8443
          name: proxy-ssl
        - containerPort: 8001
          name: admin
        - containerPort: 8444
          name: admin-ssl
        env:
        - name: KONG_DATABASE
          value: "off"
        - name: KONG_DECLARATIVE_CONFIG
          value: "/opt/kong/kong.yaml"
        - name: KONG_PROXY_ACCESS_LOG
          value: "/dev/stdout"
        - name: KONG_ADMIN_ACCESS_LOG
          value: "/dev/stdout"
        - name: KONG_PROXY_ERROR_LOG
          value: "/dev/stderr"
        - name: KONG_ADMIN_ERROR_LOG
          value: "/dev/stderr"
        - name: KONG_ADMIN_LISTEN
          value: "0.0.0.0:8001"
        livenessProbe:
          httpGet:
            path: /status
            port: 8001
          initialDelaySeconds: 30
        readinessProbe:
          httpGet:
            path: /status
            port: 8001
          initialDelaySeconds: 10
---
apiVersion: v1
kind: Service
metadata:
  name: kong-proxy
  namespace: kong
spec:
  type: LoadBalancer
  ports:
  - port: 80
    targetPort: 8000
    name: http
  - port: 443
    targetPort: 8443
    name: https
  selector:
    app: kong-gateway
---
apiVersion: v1
kind: Service
metadata:
  name: kong-admin
  namespace: kong
spec:
  ports:
  - port: 8001
    targetPort: 8001
    name: admin
  selector:
    app: kong-gateway
EOF
Method 3: Kong Operator Installation
For advanced users who want GitOps-style management:
# Install Kong Operator
kubectl apply -f https://github.com/Kong/kong-operator/releases/latest/download/kong-operator.yaml
# Deploy Kong Gateway via Operator
kubectl apply -f - <<EOF
apiVersion: charts.konghq.com/v1alpha1
kind: Kong
metadata:
  name: kong-gateway
  namespace: kong
spec:
  values:
    ingressController:
      enabled: true
    env:
      database: off
    image:
      repository: kong/kong-gateway
      tag: "3.4"
EOF
Installation Verification
After installation, verify Kong is running properly:
# Check Kong pods status
kubectl get pods -n kong
# Expected output:
# NAME                            READY   STATUS    RESTARTS   AGE
# kong-gateway-xxxxxxxxxxxxxxxx   1/1     Running   0          2m
# kong-gateway-xxxxxxxxxxxxxxxx   1/1     Running   0          2m# Check Kong services
kubectl get svc -n kong# Test Kong Admin API
kubectl port-forward -n kong svc/kong-admin 8001:8001 &
curl -i http://localhost:8001/status# Expected response:
# HTTP/1.1 200 OK
# {
#   "database": {
#     "reachable": true
#   },
#   "server": {
#     "connections_accepted": 1,
#     "connections_active": 1,
#     "connections_handled": 1,
#     "connections_reading": 0,
#     "connections_waiting": 0,
#     "connections_writing": 1,
#     "total_requests": 1
#   }
# }
Post-Installation Configuration
1. Install Kong Ingress Controller CRDs
# Install all Kong CRDs
kubectl apply -f https://raw.githubusercontent.com/Kong/kubernetes-ingress-controller/main/config/crd/bases/configuration.konghq.com_kongplugins.yaml
kubectl apply -f https://raw.githubusercontent.com/Kong/kubernetes-ingress-controller/main/config/crd/bases/configuration.konghq.com_kongconsumers.yaml
kubectl apply -f https://raw.githubusercontent.com/Kong/kubernetes-ingress-controller/main/config/crd/bases/configuration.konghq.com_kongingresses.yaml
2. Configure External Access
# Get LoadBalancer IP (if using cloud provider)
kubectl get svc kong-proxy -n kong
# For on-premise, use NodePort or configure Ingress
kubectl patch svc kong-proxy -n kong -p '{"spec":{"type":"NodePort"}}'
3. Enable Kong Manager (Optional)
# Update Kong deployment to enable Manager
kubectl patch deployment kong-gateway -n kong -p '{
  "spec": {
    "template": {
      "spec": {
        "containers": [{
          "name": "kong",
          "env": [
            {
              "name": "KONG_ADMIN_GUI_URL",
              "value": "http://localhost:8002"
            },
            {
              "name": "KONG_ADMIN_LISTEN",
              "value": "0.0.0.0:8001, 0.0.0.0:8444 ssl"
            }
          ]
        }]
      }
    }
  }
}'
[ Also Read: Building a High-Availability Ingress Solution with Envoy Proxy on Kubernetes ]
Kong Gateway Architecture in Kubernetes
Now that Kong is installed, let’s understand how it works within your Kubernetes cluster.
Core Components
- Kong Gateway Pods: The main data plane handling traffic processing
- Kong Ingress Controller: Manages configuration and communicates with Kubernetes API
- Kong Admin API: Provides programmatic access to Kong configuration
- Kong Manager: Web-based GUI for configuration management (Enterprise feature)
Deployment Modes
DB-less Mode (Recommended for Kubernetes)
- Configuration stored as Kubernetes CRDs
- Faster startup and better cloud-native integration
- No database dependency
- Perfect for GitOps workflows
Traditional Mode
- Configuration stored in external database
- Better for complex, multi-environment setups
- Supports advanced features like Kong Manager
- Required for Enterprise features
Complete Traffic Flow: Browser to Pod
Let’s trace a complete request journey using our Grafana example. This real-world scenario demonstrates how Kong Gateway seamlessly integrates with Kubernetes networking.
Step-by-Step Request Flow
1. User Initiates Request
User Browser → grafana.k8s.xyz.dev
The user enters the Grafana URL in their browser, triggering the DNS resolution process.
2. DNS Resolution
DNS Query: grafana.k8s.xyz.dev
DNS Response: 192.168.x.x ✅
The DNS server resolves the domain to the external load balancer IP address.
3. External Load Balancer Processing
External LB (Envoy Proxy): 192.168.x.x
├── SSL Termination (if configured)
├── Initial traffic filtering
└── Forward to Kong Gateway Service
The external load balancer (Envoy Proxy in this case) receives the request and forwards it to the Kong Gateway service within the Kubernetes cluster.
4. Kong Gateway Ingress Processing
Kong Gateway Service: 192.168.x.x
├── Ingress rule matching
├── Authentication (if required)
├── Rate limiting checks
├── Plugin execution
└── Route to target service
Kong Gateway analyzes the request against configured ingress rules and applies any relevant policies or transformations.
5. Kubernetes Service Discovery
Target Service: grafana-service:3000
├── Service endpoint lookup
├── Load balancing algorithm
└── Pod selection
Kong forwards the request to the Grafana service, which then selects an available pod based on the configured load balancing strategy.
6. Pod Processing and Response
Grafana Pod: 192.168.x.x:3000
├── Application processing
├── Generate response
└── Return through the same path
The selected Grafana pod processes the request and sends the response back through the entire chain.
Practical Implementation: Grafana with Kong
Let’s implement a real example to solidify these concepts. Here’s how to expose Grafana through Kong Gateway in your Kubernetes cluster.
1. Deploy Grafana Service
apiVersion: apps/v1
kind: Deployment
metadata:
  name: grafana
  namespace: monitoring
spec:
  replicas: 2
  selector:
    matchLabels:
      app: grafana
  template:
    metadata:
      labels:
        app: grafana
    spec:
      containers:
      - name: grafana
        image: grafana/grafana:latest
        ports:
        - containerPort: 3000
        env:
        - name: GF_SERVER_ROOT_URL
          value: "https://grafana.k8s.opstree.dev"
---
apiVersion: v1
kind: Service
metadata:
  name: grafana-service
  namespace: monitoring
spec:
  selector:
    app: grafana
  ports:
  - port: 3000
    targetPort: 3000
    name: http
2. Configure Kong Ingress
apiVersion: networking.k8s.io/v1
kind: Ingress
metadata:
  name: grafana-ingress
  namespace: monitoring
  annotations:
    kubernetes.io/ingress.class: kong
    konghq.com/strip-path: "true"
    konghq.com/preserve-host: "true"
spec:
  tls:
  - hosts:
    - grafana.k8s.opstree.dev
    secretName: grafana-tls
  rules:
  - host: grafana.k8s.opstree.dev
    http:
      paths:
      - path: /
        pathType: Prefix
        backend:
          service:
            name: grafana-service
            port:
              number: 3000
3. Add Kong Plugins (Optional)
apiVersion: configuration.konghq.com/v1
kind: KongPlugin
metadata:
  name: grafana-rate-limit
  namespace: monitoring
config:
  minute: 100
  hour: 1000
plugin: rate-limiting
---
apiVersion: configuration.konghq.com/v1
kind: KongPlugin
metadata:
  name: grafana-cors
  namespace: monitoring
config:
  origins:
  - "https://grafana.k8s.opstree.dev"
  methods:
  - GET
  - POST
  headers:
  - Accept
  - Content-Type
plugin: cors
4. Apply Plugins to Ingress
apiVersion: networking.k8s.io/v1
kind: Ingress
metadata:
  name: grafana-ingress
  namespace: monitoring
  annotations:
    kubernetes.io/ingress.class: kong
    konghq.com/plugins: grafana-rate-limit,grafana-cors
spec:
  # ... rest of ingress configuration
Advanced Kong Features for Production
Traffic Splitting and Canary Deployments
apiVersion: configuration.konghq.com/v1
kind: KongIngress
metadata:
  name: grafana-traffic-split
spec:
  upstream:
    algorithm: weighted-round-robin
    slots: 1000
  proxy:
    connect_timeout: 10000
    retries: 3
Health Checks and Circuit Breaker
apiVersion: configuration.konghq.com/v1
kind: KongPlugin
metadata:
  name: grafana-health-check
config:
  active:
    healthy:
      interval: 10
      successes: 3
    unhealthy:
      interval: 10
      tcp_failures: 3
      http_failures: 3
  passive:
    unhealthy:
      http_failures: 3
      tcp_failures: 3
plugin: upstream-health-check
Monitoring and Troubleshooting
Essential Monitoring Metrics
Kong Gateway Metrics:
- Request rate and latency
- Error rates by service
- Plugin execution time
- Upstream health status
Kubernetes Integration Metrics:
- Pod scaling events
- Service endpoint changes
- Ingress rule modifications
Common Troubleshooting Scenarios
1. 502 Bad Gateway Errors
# Check Kong Gateway pods
kubectl get pods -n kong -l app=kong
# Check Kong configuration
kubectl logs -n kong deployment/kong-gateway# Verify service endpoints
kubectl get endpoints grafana-service -n monitoring
2. SSL/TLS Issues
# Check certificate status
kubectl describe secret grafana-tls -n monitoring
# Verify Kong SSL configuration
kubectl get kongingress grafana-ingress -o yaml
3. Plugin Configuration Problems
# List applied plugins
kubectl get kongplugins -n monitoring
# Check plugin status
kubectl describe kongplugin grafana-rate-limit -n monitoring
[ Our Case study: Self-Managed Deployment of Kafka & Airflow on Linode Kubernetes ]
Performance Optimization
Kong Gateway Tuning
apiVersion: v1
kind: ConfigMap
metadata:
  name: kong-config
data:
  KONG_WORKER_PROCESSES: "auto"
  KONG_WORKER_CONNECTIONS: "4096"
  KONG_UPSTREAM_KEEPALIVE_POOL_SIZE: "60"
  KONG_UPSTREAM_KEEPALIVE_MAX_REQUESTS: "100"
Resource Allocation
apiVersion: apps/v1
kind: Deployment
metadata:
  name: kong-gateway
spec:
  template:
    spec:
      containers:
      - name: kong
        resources:
          requests:
            cpu: 200m
            memory: 256Mi
          limits:
            cpu: 1000m
            memory: 512Mi
Security Best Practices
1. Network Policies
apiVersion: networking.k8s.io/v1
kind: NetworkPolicy
metadata:
  name: kong-network-policy
spec:
  podSelector:
    matchLabels:
      app: kong
  policyTypes:
  - Ingress
  - Egress
  ingress:
  - from:
    - namespaceSelector:
        matchLabels:
          name: ingress-nginx
    ports:
    - protocol: TCP
      port: 8000
2. RBAC Configuration
apiVersion: rbac.authorization.k8s.io/v1
kind: ClusterRole
metadata:
  name: kong-ingress
rules:
- apiGroups: [""]
  resources: ["services", "endpoints"]
  verbs: ["get", "list", "watch"]
- apiGroups: ["networking.k8s.io"]
  resources: ["ingresses"]
  verbs: ["get", "list", "watch"]
- apiGroups: ["configuration.konghq.com"]
  resources: ["*"]
  verbs: ["*"]
Future Considerations
Kong Gateway Roadmap
- Enhanced service mesh capabilities
- Improved GraphQL support
- Advanced traffic analytics
- Better integration with cloud providers
Migration Strategies
When considering Kong Gateway adoption:
- Phase 1: Deploy alongside existing ingress
- Phase 2: Migrate non-critical services
- Phase 3: Full migration with monitoring
- Phase 4: Advanced features implementation
Conclusion
Kong Gateway represents a mature, production-ready solution for API management in Kubernetes environments. Its combination of powerful traffic management, robust security features, and extensive plugin ecosystem makes it an excellent choice for organizations serious about their API infrastructure.
Through our Grafana example, we’ve seen how Kong seamlessly integrates with Kubernetes networking, providing intelligent traffic routing while maintaining the flexibility to add advanced features like authentication, rate limiting, and monitoring.
The key takeaways from this deep dive:
- Seamless Integration: Kong works naturally with Kubernetes ingress patterns
- Production Ready: Comprehensive feature set for enterprise requirements
- Extensible Architecture: Plugin system enables custom functionality
- Strong Community: Active development and extensive documentation
Whether you’re just starting with Kubernetes or looking to upgrade your existing ingress solution, Kong Gateway provides the foundation for scalable, secure API management.
As microservices architectures continue to evolve, having a robust API Gateway like Kong becomes not just beneficial, but essential for maintaining service reliability and security at scale.