
As a DevOps activist I am exploring Percona XtraDB. In a series of blogs I will share my learnings. This blog intends to capture theoretical knowledge of Percona XtraDB Cluster.
Prerequisites
- You should have basic knowledge of mysql.
- OS – Ubuntu
What is Percona?
Percona XtraDB cluster is an open source, free MySql high availability and scalability software.
It provides:
-
Synchronous Replication: Transaction either committed on all nodes or none.
-
Multi-Master Replication: You can write to any node
-
Parallel applying events on slave. Real “parallel replication”.
-
Automatic node provisioning.
-
Data consistency. No more unsynchronized slaves.
Introduction
-
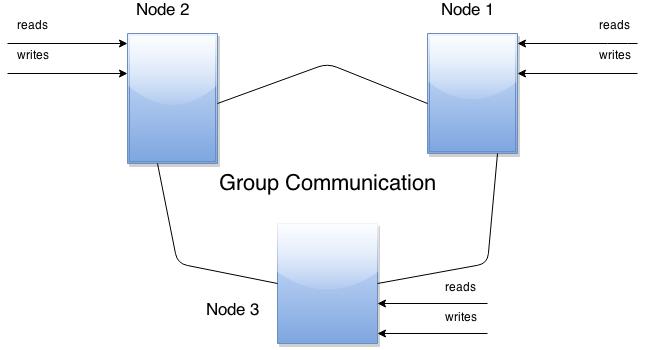
The cluster consists of nodes. The cluster’s recommended configuration is to have 3 nodes, however 2 nodes can be used as well.
-
Every node is a regular Mysql / Percona server setup. You can convert your existing MySQL / Percona Server into Node and roll Cluster using it as a base or you can detach Node from Cluster and use it as a regular server.
-
Each node will contain full copy of data.
Benefits of this approach:
- Whenever you execute a query, it is executed locally. All data is available locally, so no remote access is required.
- No central management. You can loose any node at any time, and cluster will continue functioning.
- It is a good solution for scaling read workload. You can put read queries to any of the nodes.
Drawbacks:
-
Overhead of joining new node. New node will copy all data from an existing node. If it is 100 GB, it will copy 100 GB.
-
Not an effective write scaling solution. All writes have to go on all nodes.
-
Duplication of data. If you have 3 nodes, there will be 3 duplicates.
Difference between Percona XtraDB Cluster and MySQL Replication
For this we will have to look into the well known CAP theorem for distributed systems. According to this theorem, characteristics of Distributed systems are:
C – Consistency (all your data is consistent on all nodes),
A – Availability (your system is AVAILABLE to handle requests in case of failure of one or several nodes),
P – Partitioning tolerance (in case of inter-node connection failure, each node is still available to handle requests).
CAP theorem says that any Distributed system can have any two out of these three.
-
MySQL replication has: Availability and Partitioning tolerance.
-
Percona XtraDB Cluster has: Consistency and Availability.
So, MySql replication does not guarantee Consistency of data, while Percona XtraDB cluster provides consistency while it looses partitioning tolerance.
Components
Percona XtraDb Cluster is based on:
-
Percona Server with XtraDB and includes Write Set Replication patches.
It uses:
-
Galera Library: A generic synchronous Multi-Master replication plugin for transactional applications.
-
Galera supports:
-
Incremental State Transfer (IST), useful in WAN deployments.
-
RSU, Rolling Schema Update. Schema change does not block operations against table.
-
Percona XtraDB cluster limitations
-
Currently replication work only with InnoDB storage engine.
That means writes to table of other types, including (mysql.*) tables, are not replicated.
DDL statements are replicated in statement level and changes to mysql.* tables will get replicated that way.
So you can issue: CREATE USER …. , this will be replicated,
but issuing: INSERT INTO mysql.user …. , will not be replicated.
You can also enable experimental MyISAM replication support with wsrep_replicate_myisam.
-
Unsupported queries:
-
LOCK/UNLOCK tables
-
lock function (GET_LOCK(), RELEASE_LOCK()….)
-
-
Due to cluster level concurrency control, transaction issuing COMMIT may be aborted at that stage.
There can be two transactions writing to same rows and committing in separate Percona XtraDB Cluster nodes, and only one of the them can successfully commit. The failing one will be aborted. For cluster level aborts, Percona will give back deadlock error code.
-
The write throughput of whole cluster is limited by weakest node. If one node becomes slow, whole cluster will become slow.
FEATURES
High Availability
In a basic setup with 3 nodes, the Percona XtraDB cluster will continue to function if you take any of the nodes down. Even in a situation of node crash, or if node becomes unavailable over network, the cluster will continue to work, and queries can be issued on working nodes.
In case, when there are changes in data while node was down, there are two options that Node may use when it joins the cluster:
-
State Snapshot Transfer (SST): SST method performs full copy of data from one node to other. It’s used when a new node joins the cluster. One of the existing node will transfer data to it.
There are three available methods of SST:
-
- mysqldump
- rsync
- xtrabackup
Downside of “mysqldump” and “rsync” is that your cluster becomes READ-ONLY while data is copied from one node to other.
while
xtrabackup SST does not require this for entire syncing process.
-
Incremental State Transfer (IST): If a node is down for a short period of time, and then starts up, the node is able to fetch only those changes made during the period it was down.
This is done using caching mechanism on nodes. Each node contains a cache, ring-buffer of last N changes, and the node is able to transfer part of this cache. IST can be done only if the amount of changes needed to transfer is less than N. If it exceeds N, then the joining node has to perform SST.
Multi-Master Replication
-
Multi-Master replication stands for the ability to write to any node in the cluster, and not to worry that it will get out-of-sync situation, as it regularly happens with regular MySQL replication if you imprudently write to the wrong server.
-
With Percona XtraDB Cluster you can write to any node, and the Cluster guarantees consistency of writes. That is, the write is either committed on all the nodes or not committed at all.
All queries are executed locally on the node, and there is a special handling only on COMMIT. When the COMMIT is issued, the transaction has to pass certification on all the nodes. If it does not pass, you will receive ERROR as a response on that query. After that, transaction is applied on the local node.


