One day I got a call from one of my friend and he said to me that he is facing difficulties while setting up AlertManager with Prometheus. Then, I observed that most of the people face such issues while establishing a connection between AlertManager and receiver such as E-mail, Slack etc.
From there, I got motivation for writing this blog so AlertManager setup with Prometheus will be a piece of cake for everyone.
If you are new to AlertManager I would suggest you go through with our Prometheus blog.
What Actually AlertManager Is?
AlertManager is used to handle alerts for client applications (like Prometheus). It also takes care of alerts deduplicating, grouping and then routes them to different receivers such as E-mail, Slack, Pager Duty.
In this blog, we will only discuss on Slack and E-mail receivers.
AlertManager can be configured via command-line flags and configuration file. While command line flags configure system parameters for AlertManager, the configuration file defines inhibition rules, notification routing, and notification receivers.
Architecture
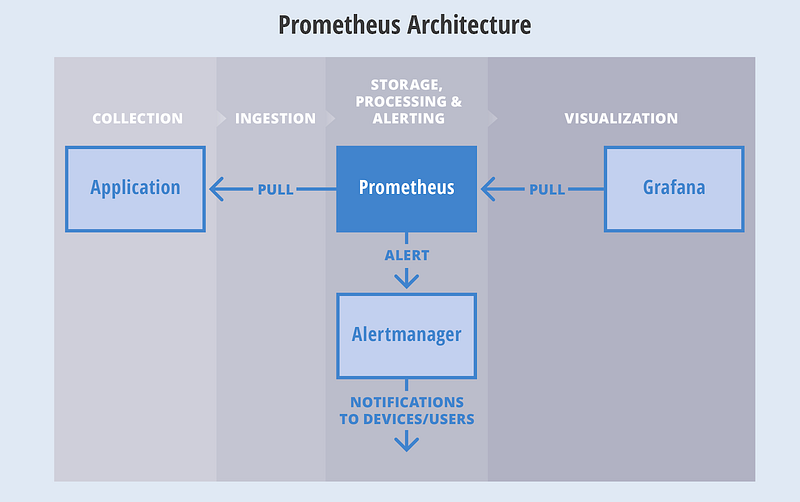
Here is a basic architecture of AlertManager with Prometheus.

This is how Prometheus architecture works:-
- If you see in the above picture Prometheus is scraping the metrics from its client application(exporters).
- When the alert is generated then it pushes it to the AlertManager, later AlertManager validates the alerts groups on the basis of labels.
- and then forward it to the receivers like Email or Slack.
If you want to use a single AlertManager for multiple Prometheus server you can also do that. Then architecture will look like this:-

Installation
Installation part of AlertManager is not a fancy thing, we just simply need to download the latest binary of AlertManager from here.
$ cd /opt/
$ wget https://github.com/prometheus/alertmanager/releases/download/v0.11.0/alertmanager-0.11.0.linux-amd64.tar.gz
After downloading, let’s extract the files.
$ tar -xvzf alertmanager-0.11.0.linux-amd64.tar.gz
So we can start AlertManager from here as well but it is always a good practice to follow Linux directory structure.
$ mv alertmanager-0.11.0.linux-amd64/alertmanager /usr/local/bin/
Configuration
Once the tar file is extracted and binary file is placed at the right location then the configuration part will come. Although AlertManager extracted directory contains the configuration file as well but it is not of our use. So we will create our own configuration. Let’s start by creating a directory for configuration.
$ mkdir /etc/alertmanager/
Then the configuration file will take place.
$ vim /etc/alertmanager/alertmanager.yml
The configuration file for Slack will look like this:-
global:


# The directory from which notification templates are read.
templates:
- '/etc/alertmanager/template/*.tmpl'

# The root route on which each incoming alert enters.
route:
  # The labels by which incoming alerts are grouped together. For example,
  # multiple alerts coming in for cluster=A and alertname=LatencyHigh would
  # be batched into a single group.
  group_by: ['alertname', 'cluster', 'service']

  # When a new group of alerts is created by an incoming alert, wait at
  # least 'group_wait' to send the initial notification.
  # This way ensures that you get multiple alerts for the same group that start
  # firing shortly after another are batched together on the first
  # notification.
  group_wait: 3s

  # When the first notification was sent, wait 'group_interval' to send a batch
  # of new alerts that started firing for that group.
  group_interval: 5s

  # If an alert has successfully been sent, wait 'repeat_interval' to
  # resend them.
  repeat_interval: 1m

  # A default receiver
  receiver: mail-receiver

  # All the above attributes are inherited by all child routes and can
  # overwritten on each.

  # The child route trees.
  routes:
  - match:
      service: node
    receiver: mail-receiver

    routes:
    - match:
        severity: critical
      receiver: critical-mail-receiver

  # This route handles all alerts coming from a database service. If there's
  # no team to handle it, it defaults to the DB team.
  - match:
      service: database
    receiver: mail-receiver
    routes:
    - match:
        severity: critical
      receiver: critical-mail-receiver

receivers:
- name: 'mail-receiver'
  slack_configs:
  - api_url:  https://hooks.slack.com/services/T2AGPFQ9X/B94D2LHHD/jskljaganauheajao2
    channel: '#prom-alert'

   - name: 'critical-mail-receiver'
  slack_configs:

  - api_url:   https://hooks.slack.com/services/T2AGPFQ9X/B94D2LHHD/abhajkaKajKaALALOPaaaJk  channel: '#prom-alert'
You just have to replace the channel name and api_url of the Slack with your information.
The configuration file for E-mail will look something like this:-
global:

templates:
- '/etc/alertmanager/*.tmpl'
# The root route on which each incoming alert enters.
route:
  # default route if none match
  receiver: alert-emailer

  # The labels by which incoming alerts are grouped together. For example,
  # multiple alerts coming in for cluster=A and alertname=LatencyHigh would
  # be batched into a single group.
  # TODO:
  group_by: ['alertname', 'priority']

  # All the above attributes are inherited by all child routes and can
  # overwritten on each.

receivers:
- name: alert-emailer
  email_configs:
  - to: '[email protected]'
    send_resolved: false
    from: '[email protected]'
    smarthost: 'smtp.example.com:587'
    auth_username: '[email protected]'
    auth_password: 'IamPassword'
    auth_secret: '[email protected]'
    auth_identity: '[email protected]'
In this configuration file, you need to update the sender and receiver mail details and the authorization password of the sender.
Once the configuration part is done we just have to create a storage directory where AlertManger will store its data.
$ mkdir /var/lib/alertmanager
Then only last piece which will be remaining is my favorite part i.e creating service 🙂
$ vi /etc/systemd/system/alertmanager.service
The service file will look like this:-
[Unit]
Description=AlertManager Server Service
Wants=network-online.target
After=network-online.target

[Service]
User=root
Group=root
Type=Simple
ExecStart=/usr/local/bin/alertmanager \
    --config.file /etc/alertmanager/alertmanager.yml \
    --storage.tsdb.path /var/lib/alertmanager

[Install]
WantedBy=multi-user.target
Then reload the daemon and start the service
$ systemctl daemon-reload
$ systemctl start alertmanager
$ systemctl enable alertmanager
Now you are all set to fire up your monitoring and alerting. So just take a beer and relax until Alert Manager notifies you for alerts. All the best!!!!


