When I began my journey of learning Kubernetes, I always thought why Kubernetes has made the pod its smallest entity, why not the container. But when I started diving deep in it I realized, there is a big rationale behind it and now I thank Kubernetes for making the Pod as an only object, not containers.
After being inspired by the working of a Pod, I would like to share my experience and knowledge with you guys.
What exactly Pod means?
The literal meaning of pod means the peel of pea which holds the beans and following the same analogy in Kubernetes pod means a logical object which holds a container or more than one container. The bookish definition could be – a pod represents a request to execute one or more containers on the same node.
Why Pod?
The question that needs to be raised why pod?So let me clear this, pods are considered the fundamental building blocks of Kubernetes, because all the Kubernetes workloads, like Deployments, ReplicaSets or Jobs are eventually expressed in terms of pods.
Pods are the one and only objects in Kubernetes that results in the execution of containers which means No Pod No Containers !!!
Now after the context setting over pod I would like to answer my beloved question:- Why Pod over container??
My answer is why not 🙂
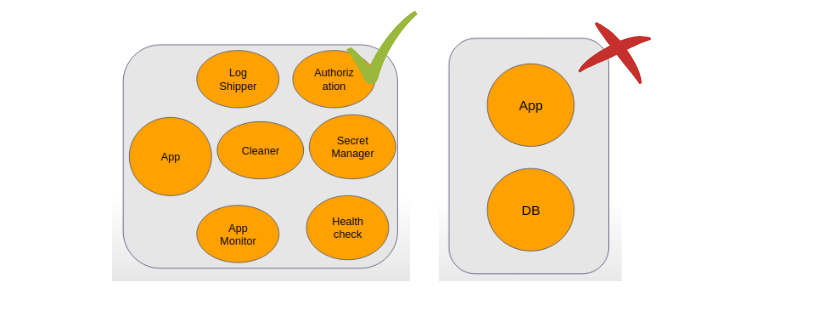
Let’s take an example, suppose you have an application which generates two types of logs one is access log and other logs are error log. Now you have to add log shipper agent, In case of the container, you will install the log shipper in the container image. Now you got another request to add application monitoring in the application. So again you have to recreate the container image with APM agent in it. Don’t you think this is quite an untidy way to do it? Of course, it is, why I have to add these things in my application image, it makes my image quite bulky and difficult to manage.
What if I tell you that Kubernetes has its own way of dealing situations like this.
Yup the solution is a sidecar. Just like in real life if I have a two sitter bike and I want to take 3 persons on a ride, So I will add a sidecar in my bike to take 2 persons together on the ride. In a similar fashion, I can do the same thing with Kubernetes as well. To solve the above problem I will just create 3 containers (application, log-shipper and APM agent) in the same pod. Now the question is how they will access the data between them and how the networking magic will happen. The answer is quite simple containers within the pod can share Pod IP address and can listen on localhost. For volume, we can share volumes also across the containers in a pod.
The architecture would be something like this:-
Now another interesting query arises that when to use sidecar and when not.
Just as shown in the above image we should not keep application and database as a sidecar in the same pod. The reason behind it is Kubernetes does not scale a container it scales a pod. So when autoscaling will happen it scales the application as well as database which could not be required.
Instead of that, we should keep log-shippers, health-check containers and monitoring agent as a sidecar because anyhow application will scale these agents also needs to be scaled with the application.
Now I am assuming you are also madly in love with the pods.
For diving deep in the pod stay tuned for the next part of this blog Why I love pods in Kubernetes? Part – 2. In my next part, I will discuss the different phases and lifecycle of the pod and how pod makes our life really smooth. Thanks for reading, I’d really appreciate any and all feedback, please leave your comment below if you guys have any feedback.
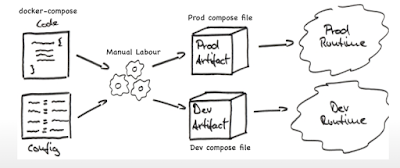
When docker was released as a new containerization tool, it took the market by a storm. With its lightweight images, multi-os support, and ability to ship containers, it’s popularity only roared. I have been using it for more than six months now, I can see why it is so. Hypervisors, another type of virtualizing tools, have been hard on hardware. Which means they require a lot of resources to run. This increases the cost of running applications way more than those running on containers. This is the problem docker solved and hence, it’s popularity. Docker engine just sits on host OS and translates the instructions from an application to the underlying OS. It does not need one extra layer of virtual OS, just the binaries and libraries of application bundled in the image. Right? Now, hold on to that thought. We all have been working with docker and an extension with docker-compose. Why? Because it makes our job easy, We are spared from typing hundreds of ad-hoc commands in terminal to set up a slightly or very complicated application with certain dependencies. We can just describe it in a `docker-compose.yml` file and our job is done. However, the problem arises when we have to share that compose file:
Other users might need to use the file in a different environment, so they will need to edit all the values pertaining to their need, manually, and keep separate compose files for each environment.
Troubleshooting various configuration issues can be a tedious task since there is no single place where the configuration of the application can be stored. Changes will have to be made in the file.
This also makes communication between Dev and Ops team more tricky than it has to be resulting in communication gap and time wastage.
To have a more clear picture of the issue, we can have look at the below image:
We have compose file and configuration for separate environments, we make changes according to environment needs in different compose files, which could be a long manual task depending on the size of our project.
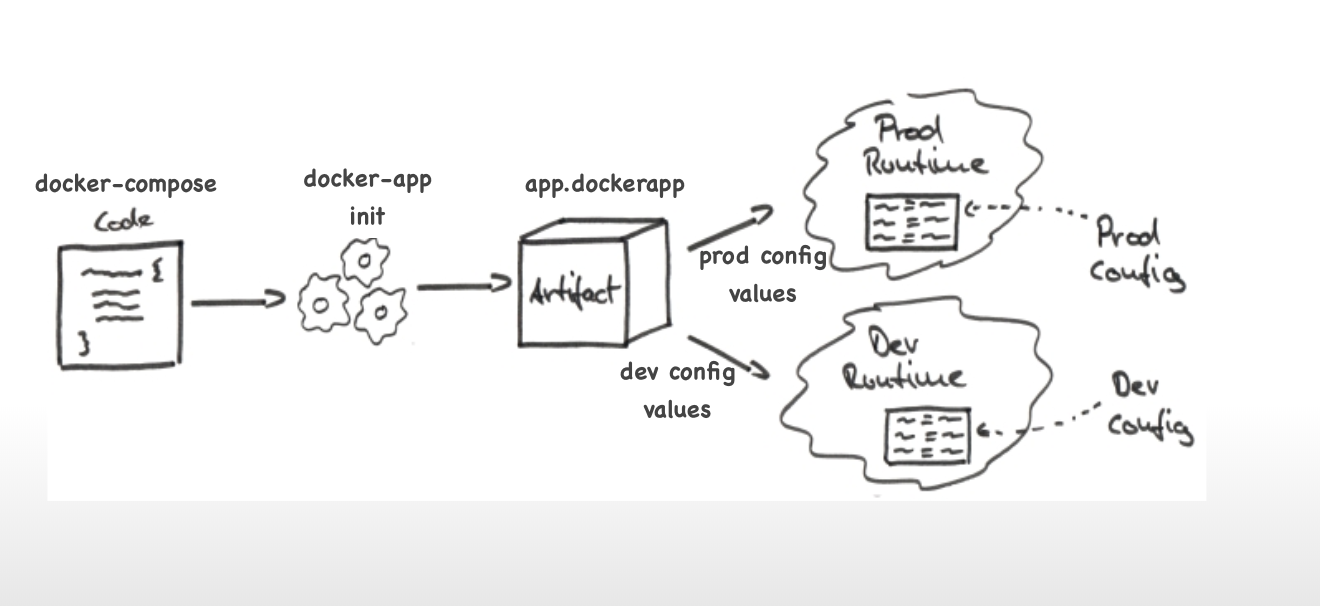
All of this points to the fact that there is no way to bundle the applications that use efficiently-bundled docker images. See the irony here? Well, there “was” no way, until there was. Enter ‘docker-app’. This, relatively, new tool is the answer to packaging docker-compose applications. I came across it when I was, myself, struggling to re-use a docker-compose application I had written in another environment. As soon as I read about it, I had to try it, which I did and loved. It made the task much easier as it provided a template of compose file and a key-value store for environment dependent parameters.
Now, we have an artefact with extention of ‘.dockerapp’. We can pass configuration values either through CLI or files or both and it will render compose file according to those values.
Let us now go through an example of how the docker app works. I am going to deploy a dummy application Spring3hibernate from Opstree Github repository in QA env and later in PROD by making simple configuration changes.
Installing docker-app is easy, though, there is one thing one should keep in mind: it can be installed as a plugin in docker-CLI or as standalone CLI tool itself. I will be installing it as a standalone CLI tool on linux. If you wish to install it as a plugin to docker-CLI and/or on another OS, visit their Github page: https://github.com/docker/app (Also, please visit github page for basics)
Before continuing, please ensure you have docker-CLI and docker-compose installed.
Please follow below steps to install docker-app:
$ vim ~/spring3hibernate-app/spring3hibernate/nginx/default.conf
server {
    listen       80;
    server_name  localhost;

    location / {
        stub_status on;
        proxy_pass http://springapp1:8080/;

    }
# redirect server error pages to the static page /50x.html
    error_page   500 502 503 504  /50x.html;
    location = /50x.html {
        root   /usr/share/nginx/html;
    }

}
Move
‘default.conf’ to ~/spring3hibernate-app/spring3hibernate/nginx/conf/qa/
as we have different conf file for PROD which goes to
~/spring3hibernate-app/spring3hibernate/nginx/conf/prod/
upstream s3hbackend {
    server springapp1:8080;
    server springapp2:8080;
}
server {
       listen 80;
       location / {
           stub_status on;
           proxy_pass http://s3hbackend;
       }

       # redirect server error pages to the static page /50x.html
       error_page   500 502 503 504  /50x.html;
       location = /50x.html {
           root   /usr/share/nginx/html;
       }

}
This is the configuration for the nginx load balancer. Remember this, we’ll use it later.
Let’s create our docker-app now, make sure you are in the app home directory
when executing this command:
$ docker-app init --single-file s3h
This will create a single file named s3h.dockerapp which will look like this:
# This section contains your application metadata.
# Version of the application
version: 0.1.0
# Name of the application
name: s3h
# A short description of the application
description:
# List of application maintainers with name and email for each
maintainers:
  - name: ubuntu
    email:


---
# This section contains the Compose file that describes your application services.
version: "3.6"
services: {}


---
# This section contains the default values for your application parameters.

{}
As you can see this file is divided into three parts, metadata, compose, and parameters. They are all in one file because we used –single-file switch. We can divide them up in multiple files by using docker-app split command in app home directory, docker-app merge will put them back in one file.
Now, for QA, we have the following configuration for s3h.dockerapp file:
As mentioned before, first part contains app metadata, second part contains actual compose file with lots of variables, and last part contains values of those variables. Special mention here is x-enabled variable, docker-app provides functionality to temporarily disable a service using this variable.
Now, try a few commands:
$ docker-app inspect
It will produce summary of whole app.
$ docker-app render
It will replace all variables with their values and will produce a compose file
$ docker-app render --set nginx.status=”false”
It will remove nginx from docker-app compose as well as deploy
$ docker-app render | docker-compose -f - up
It
will spin up all the containers according to rendered compose file. We
can see the application running on port 81 of our machine.
$ docker-app --help
To check out more commands and play around a bit.
At this point, it will be better to create two directories in app home: qa and prod. Create a file in qa: qa-params.yml. Another file in prod: prod-params.yml. Copy all parameters from above s3h.dockerapp file to qa-params.yaml (or not). More importantly, copy below changes in parameters to prod-params.yml
We are going to loadbalance springapp1 and springapp2 in PROD environment, since we have enabled springapp2 using x-enabled parameter. We have also changed nginx conf bind path to the new conf file and host port for nginx to 80 (for Production). All so easily. Run command:
This command will produce a compose file ready for production deployment. Now run:
$ docker-app render --parameters-file ./prod/prod-params.yml | docker-compose -f - up
And production is deployed … Visit port 80 of your localhost to verify.
What’s more exciting is that we can also share our docker-apps through docker hub, we can tag the app and push it to our remote registry as images after logging in:
$ docker login
Provide your username and password for docker hub, create an account if not yet created.
If we wish to upload additional files as well, we will have to split our project using docker-app split and put additional files in the directory before pushing. The additional files will go as attachments which can be accessed later.
Conclusion
With the arrival of docker app, our large, composite, and containerized applications can also be shipped and re-used as images. That is cool. But there’s something cooler which we haven’t explored yet. Deploying our docker-apps on kubernetes with the goal of exploring how far in management, and how optimal in delivery, we can go with our applications. Let’s keep this as a topic for the next blog. Until then, have a nice one. 🙂
In recent time, I invested a good amount of time in learning and working on monitoring esp. Database Monitoring. So I found this medium the best way to share my journey, findings and obviously spectacular dashboards.
This blog will help you understand why we need MySQL monitoring and how we can do it.
Let’s start with the need to implement MySQL monitoring. There are multiple areas which we can monitor, here I am enlightening some important ones.
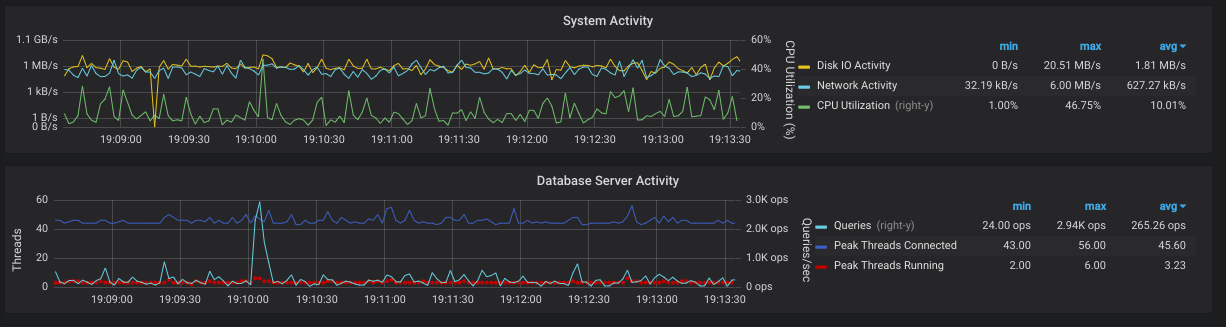
1. Resource Utilization First of all, you have no idea what’s going on with MySQL, you can not know if it’s in a haywire state if there is no monitoring. An ample number of queries run through it. Some of them are lightweight and some of them are very heavy which makes CPU over-utilized or overload. In that case, if we talk about production, a number of requests can be flushed out making it a business loss.
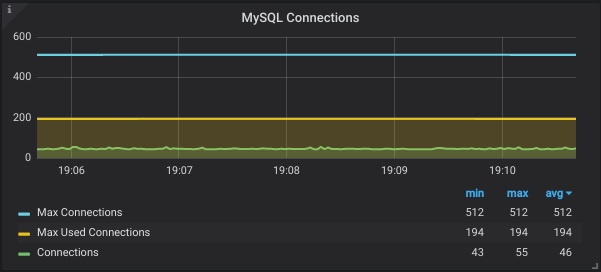
2. Database Connections Sometimes the number of connections run out and no further connections are left for application to communicate with DB. In the absence of monitoring, it’s really hard to figure out the root cause.
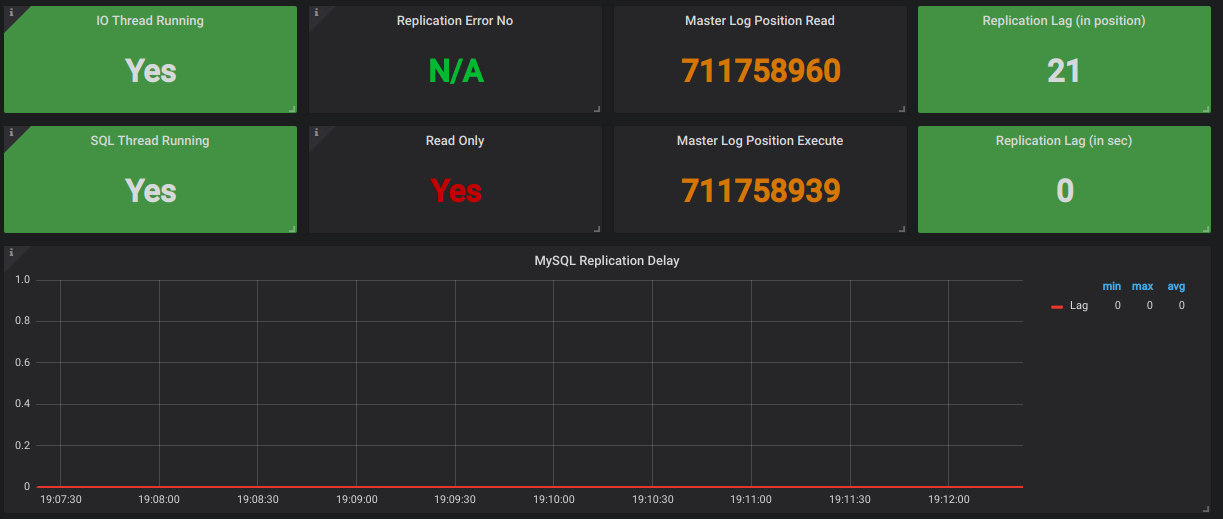
3. Replication Lag When we use MySQL as a master-slave cluster, real-time replication of data from the master to slave is a key factor to monitor. The lag between master and slave should be zero.
In my scenario, the slave is being used for DB replication from the
master and also serving read queries to avoid overburden on the master.
Now if replication lag is high and at the same time if any read query is
triggered for the slave, what will happen? The same data which is on
the master will not get replicated on the slave because of replication
lag!
That read query will show an unexpected or erroneous result.
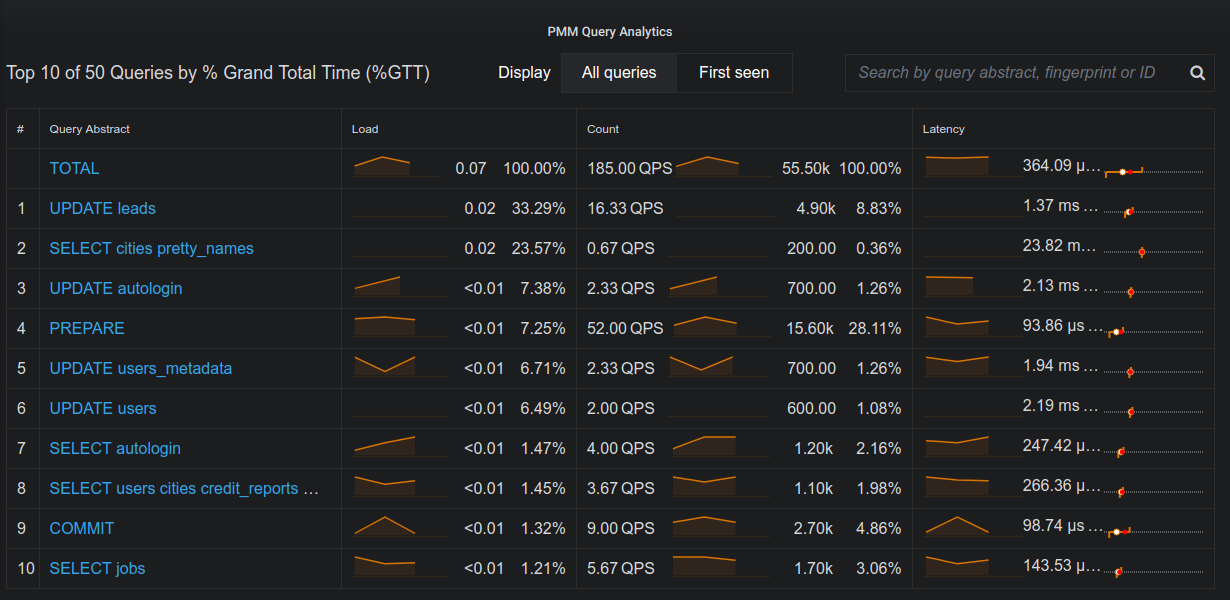
4. Query Analytics
Monitoring DB also helps in identify what queries are taking a long
time. It helps in identify and optimize slow queries. At the end its all
about being fast.
Ok, so how to monitor MySQL. There are multiple enterprise solutions
available to monitor Database with a single click solution, but I didn’t
have the luck to go for paid solutions. So, I have started exploring
open source solutions which will cover all my requirements. Finally, I
got one.
Its Percona Monitoring And management (PMM)Tool
PMM is an open-source platform to monitor and manage MySQL Database,
that we can run in own environment. It provides a time-series database
which ensures reliable and real-time data.
It’s not only MySQL you can monitor, in fact, but pmm also allows to integrate it with other databases as well like Amazon RDS, Postgres, and MongoDB.
There are many alternatives for MySQL monitoring in the market like Nagios, VividCortex Analyser, SolarWinds server and application monitor, LogicMonitor and Management tool, MySQL OpsPack etc. But exploring open-source tools has its pros and cons but the level of learning you get from it, that makes it worth using. So anyone out there reading this blog I would suggest to give it a try.
Have you ever thought of setting up your web or application server with your own email server? Well, when you setup a application it is likely to have your own email server to handle incoming and outgoing mail to your domain. Before I get into my topic I assume that you got some basic knowledge of AWS. Here I am going to explain you how to setup a simple postfix email server with AWS SES to handle all your email. For any kind of more information please refer AWS SES doc. Lets put it in simple way. We have two phases in this implementation.
Configure SES with Domain
Configure postfix and integrate with SES on EC2
Configure SES with Domain
Amazon SES requires that you verify your email address or domain, to confirm that you own it and to prevent others from using it. When you verify an entire domain, you are verifying all email addresses from that domain, so you don’t need to verify email addresses from that domain individually. For example, if you verify the domain example.com, you can send email from user1@example.com, user2@example.com, or any other user at example.com. Lets verify our domain name with SES.
Go to the AWS console management and click on the SES.
Click on the Domain availabe on left top corner.
Click verify new Domain.
On the Verify a New Domain, for Domain, type the name of the domain that you registered using Route 53, and then choose Verify This Domain.
On the Verify a New Domain dialog box, choose Use Route 53. Your Domain Verification and Email Receiving Record will be updated in Route 53.
Note
If you don’t see Use Route 53 your domain may not be registered with Route 53.
Once verified your domain, you can use any email address from this domain as your email.
To establish connection between postfix and SES you will need SMTP credential.
Now choose the SMTP settings in same SES console.
Choose Create My SMTP Credential.
Give the user name and click create.
Download the credentials this will be uses when you configure server.
Configure postfix and integrate with SES on EC2
In this section you are going to install and configure postfix on EC2 instance. Prerequisites
You should have up and running EC2 machine.
Open port 25(SMTP) and 22(SSH) for all security group.
Lets get started
Lets login to machine using putty or ssh client. Now need to create a domain on Route53.
Route53
Go to the AWS console and choose Route53.
Choose Hosted Zone and select your domain where you wish to configure.
Click on create record set to add a new record set, then select A-IPv4 address for the resource type.
Add subdomain name in NAME field and enter a record value that is your EC2 IP.
Set the desired TTL.
Then click on Create button.
Now we will install Postfix on our EC2 machine.
sudo apt-get update

sudo apt-get install postfix
Now we need to make some changes in postfix configuration file. Lets do it one by one.
To integrate our postfix with SES we need to add some more line in main.cf.
NOTE: Value of relay host will change depending upon SES region you use. Comment out of the following line of master.cf file by putting # infront of it:
vim /etc/postfix/master.cf
#-o smtp_fallback_relay=
Edit the file /etc/postfix/sasl_passwd if not present please create it:
vim /etc/postfix/sasl_passwd

[email-smtp.us-west-2.amazonaws.com]:587 IAMUSERNAME:PASSWORD
NOTE: Add your SMTP username and password that you downloaded. Save and close the file and use the below command to create hashmap database.
sudo postmap /etc/postfix/sasl_passwd
Stop and Start Postfix:
sudo service postfix stop

sudo service postfix start
The knowledge of one of the SCM tools is a must for any DevOps engineer, ANSIBLE is one of the popular tools in this category, we all are aware of the ease that Ansible provides whether it is infra provisioning, orchestration or application deployment. The reason for the vast popularity of Ansible is the long list of modules it provides to support any level of automation, moreover it also gives users the flexibility to create their own modules as per their requirement. But The purpose of this blog is not to mention the features that ansible provides, but to show how we can speed up our playbook execution in Ansible, as a beginner executing ansible, is very easy and it also feels like saving a lot of time with it, but as you dive deep into it, you will come to know that running ansible playbooks will engage you for a considerable amount of time. There are a lot of articles available on the internet on how we can speed up our ansible execution, so I have decided to sum up those articles into my blog, with the following methods, we can reduce our execution time without compromising with the overall performance of Ansible. Before starting, I request you guys to make a small change in your ansible configuration file (ansible.cfg), this small change will help you in tracking the time it will take for the playbook execution, and it also lists out the time is taken by each task. Just add these lines to your ansible.cfg file under default section,
[default]
callback_whitelist = profile_tasks
Forks
When you are running your playbooks on various hosts, then you may have noticed that the number of servers where the playbook executes simultaneously is 5. You can increase this number inside the ansible.cfg file: # ansible.cfg
forks = 10
or with a command line argument to ansible-playbook with the -f or –forks options. We can increase or decrease this value as per our requirement. while using forks we should use “local_action” or “delegated” steps limited in number, as with higher fork value it will affect the ansible-server’s performance.
Async
In ansible, each task blocks the playbook, meaning the connections stay open until the task is done on each node, which is some cases takes a lot of time, here we can use “async” for those particular tasks, with the help of this ansible will automatically move to another task without waiting for the task execution on each node. To launch a task asynchronously, we need to specify its maximum runtime and how frequently we would like to poll for status, it’s default value in 10 sec. tasks:
– name: “name of the task”
command: “command we want to execute”
async: 40
poll: 15 The only condition is that the subsequent tasks must not have a dependency on this task.
Free Strategy
When running Ansible playbooks, you might have noticed that the Ansible runs every task on each node one by one, it will not move to another task until a particular task is completed on each node, which will take a lot of time, in some cases. By default, the strategy is set to “linear”, we can set it to free. —
– hosts: “hosts/groups”
name: “name of the playbook”
strategy: free
It will run the playbook on each host independently, without waiting for each node to complete. Facts gathering is the default feature while executing playbook, sometimes we don’t need it. In those cases, we can disable facts gathering, This has advantages in scaling Ansible in push mode with very large numbers of systems. —
– hosts: “hosts/groups”
name: “name of the playbook”
gather_facts: no
Pipelining
For each task in Ansible, there are lots of ssh connection created, which results in increasing the total execution time. Pipelining reduces the number of ssh operations required to execute a module by executing many Ansible modules without an actual file transfer. We just have to make these changes in the ansible.cfg file, # ansible.cfg Pipelining = True Although this can result in a very significant performance improvement when enabled, Pipelining is disabled by default because requiretty is enabled by default for many distros.
Poll Interval
When we run any the task in Ansible,
it starts polling to check if the task is completed on the host or not, we can
decrease this polling interval time in ansible.cfg to increase its performance,
but it will increase the CPU usage, so we need to adjust its value accordingly
We just have to adjust this the parameter in the ansible.cfg file,
internal_poll_interval=0.001
so, these are the
various ways to decrease our playbook execution time in Ansible, generally we
don’t use all these methods in a single setup, we use these features as per the
requirement,
The
main motive of writing this blog is to determine the factors which will help in
fine-tuning the Ansible performance, and there are many more factors which
serves the same purpose but here I am mentioning the most important parameters
among them.
I hope
I have covered all the important aspects of the blog, feel free to provide your
valuable feedback.
Thanks !!!