Azure Conditional Access: Fortifying Your Defense Strategy for Modern Security Challenges

In the era of cloud computing, safeguarding sensitive data and resources while maintaining a seamless user experience is paramount. Azure Conditional Access emerges as a powerful solution, enabling organizations to fortify their security posture through dynamic access controls. This blog post will delve into the essence of Azure Conditional Access, shedding light on its significance, core components, implementation steps, and real-world benefits.

Understanding Azure Conditional Access

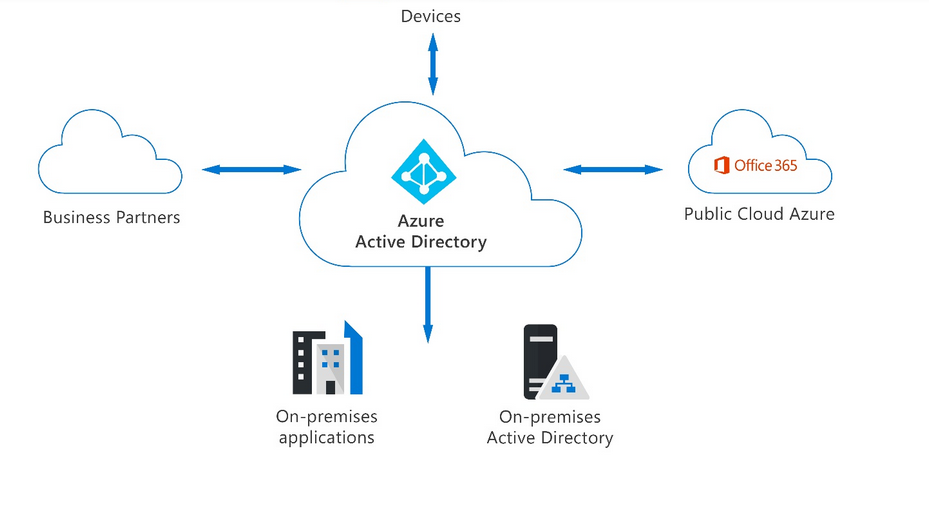
Azure Conditional Access is a pivotal component of Azure Active Directory that empowers organizations to enforce access rules based on specified conditions. These conditions encompass factors such as user identity, device health, location, and sign-in risk. By scrutinizing these elements, Conditional Access policies determine the level of access a user is granted, thereby thwarting unauthorized access attempts.

Continue reading “Azure Conditional Access: Fortifying Your Defense Strategy for Modern Security Challenges”

Introduction to Azure IoT Central

IoT Concepts

The Internet of Things (IoT) is a network of physical devices that link to and share data with other devices and services via the Internet or another communication network. There are presently over ten billion connected devices worldwide, with more being added every year. Anything that has the required sensors and software can be connected to the internet. The following tools have enabled IoT:

  • Access to low cost, low power sensors.
  • Various protocols enable internet connectivity.
  • Cloud computing platforms such as Azure.
  • Big data.
  • Machine learning.
  • Artificial intelligence.

What is Azure IoT Central?

Azure IoT Central is a platform as a service (PaaS) for creating, managing, and maintaining enterprise-grade IoT solutions.
Choosing to build with IoT Central allows you to focus your time, money, and energy on transforming your company with IoT data, rather than just managing and updating a complex and ever-changing IoT infrastructure.

Continue reading “Introduction to Azure IoT Central”

ServiceNow – Azure DevOps Integration

The IT industry needs optimal efficiency in its enterprise, which is not an easy task. Traditional practices are still in use but are not beneficial as they can slow down the process considerably. So, here comes ServiceNow, which has become a complete packed solution for IT Industries.

ServiceNow is software based on the cloud, providing IT services for automating business tasks and their management. It uses Machine Learning technology to automate processes and create workflows. 

Azure DevOps supports a collaborative culture and set of processes that bring together developers, project managers, and contributors to develop software. It allows organizations to create and improve products at a faster pace than they can with traditional software development approaches.

In this article, we will discuss, how to use ServiceNow effectively by integrating it with Azure DevOps. 

Prerequisites for Integration

Configure the ServiceNow instance

  1. Install the Azure Pipelines extension on your ServiceNow instance. You’ll need Hi credentials to complete the installation. See Buying Overview for more details on installing apps from the ServiceNow store.
  2. Create a new user in ServiceNow and grant it the following role: x_mioms_azpipeline.pipelinesExecution.

Continue reading “ServiceNow – Azure DevOps Integration”

Introduction to Azure Active Directory

Introduction:

In organizations, employees often need access to various Azure services to perform their tasks. They can use services like SQL database or Azure container services when the system administrator assigns them a user id and password for each service. However, managing multiple user logins for each service can be a hassle for administrators, especially in organizations with over 1000 employees. Azure Active Directory (AD) helps solve this issue by enabling administrators to manage multiple user logins in a centralized manner.

Continue reading “Introduction to Azure Active Directory”

Deploying Terraform IAC Using Azure DevOps Runtime Parameters

Introduction

While deploying your same terraform code manually multiple times you must have got through the thoughts:

  • If we can automate the whole deployment process and replace the whole tedious process with few clicks.
  • If we can dynamically change the values of terraform.tfvars.
  • If we can restrict the regions of deployments.
  • If we can limit our VM types to maintain better cost optimization.

In this article, we will touch upon these problems and try to resolve them in a way that the same concepts can also be applied to similar requirements.

Soo… Let’s Get Started !!!

First of all, we need to know what is Terraform & Azure DevOps.

Talking About Terraform: HashiCorp Terraform is an infrastructure as a code tool that lets you define both cloud and on-prem resources in human-readable configuration files that you can version, reuse, and share. You can then use a consistent workflow to provision and manage all of your infrastructures throughout its cycle. Terraform can manage low-level components like compute, storage, and networking resources, as well as high-level components like DNS entries and SaaS features.

Terraform Workflow
Also check out our guide on deploying Terraform IaC with runtime inputs in Azure DevOps.

Talking about Azure DevOps: Azure DevOps provides developer services for allowing teams to plan work, collaborate on code development, and build and deploy applications. Azure DevOps supports a collaborative culture and set of processes that bring together developers, project managers, and contributors to develop software. It allows organizations to create and improve products at a faster pace than they can with traditional software development approaches.

DevOps lifecycle in Azure DevOps

If you want to learn more about Azure DevOps click here.

Pre-requisites:

No matter whether we are deploying our infrastructure into Azure Cloud Services or Amazon Web Services (AWS). All we need are the following checklist:

  • Active Cloud Service (Azure/AWS)
  • Azure DevOps Account
  • Terraform Code to deploy.
  • A Linux machine (VM or EC2) for agent pool or Azure Microsoft-hosted agent.
  • Storage Account (Azure Blob Container or AWS S3)
  • Terraform code to deploy using terraform.tfvars.

Azure DevOps Pipeline

Let’s take a scenario in which we will deploy a simple terraform code of Azure Virtual Machine using Azure DevOps pipelines.

Have a look at the main.tf

resource "azurerm_resource_group" "rg" {
  name     = "dev-${var.name}-rg"
  location = var.region
}

resource "azurerm_virtual_network" "vnet" {
  name                = "dev-${var.name}-vnet"
  address_space       = ["10.0.0.0/16"]
  location            = azurerm_resource_group.rg.location
  resource_group_name = azurerm_resource_group.rg.name
}

resource "azurerm_subnet" "subnet" {
  name                 = "dev-${var.name}-subnet"
  resource_group_name  = azurerm_resource_group.rg.name
  virtual_network_name = azurerm_virtual_network.vnet.name
  address_prefixes     = ["10.0.0.0/24"]
}

resource "azurerm_network_interface" "nic" {
  name                = "dev-${var.name}-nic"
  location            = azurerm_resource_group.rg.location
  resource_group_name = azurerm_resource_group.rg.name

  ip_configuration {
    name                          = "dev-${var.name}-ip"
    subnet_id                     = azurerm_subnet.subnet.id
    private_ip_address_allocation = "Dynamic"
  }
}

resource "azurerm_linux_virtual_machine" "vm" {
  name                  = "dev-${var.name}-vm"
  resource_group_name   = azurerm_resource_group.rg.name
  location              = azurerm_resource_group.rg.location
  size                  = var.vm_size
  admin_username        = "ubuntu"
  network_interface_ids = [
    azurerm_network_interface.nic.id,
  ]

  admin_ssh_key {
    username   = "dev-${var.name}-key"
    public_key = file("~/.ssh/id_rsa.pub")
  }

  os_disk {
    caching              = "ReadWrite"
    storage_account_type = var.vm_storage_account_type
  }

  source_image_reference {
    publisher = "Canonical"
    offer     = "UbuntuServer"
    sku       = var.image_sku
    version   = "latest"
  }
}

Let’s have a look at the terraform.tfvars file.

name                    = "{vm}"

region                  = "{West Europe}"

vm_size                 = "{StandardF2}"

vm_storage_account_type = "{StandardLRS}"

image_sku               = "{16.04-LTS}"

Pipeline Parameters

Let’s pass the following values dynamically using pipeline parameters.

  1. Name of VM and other resources.
  2. Regions of deployment.
  3. Size of VM.
  4. VM storage account type.
  5. VM image SKU
parameters:
  - name: name
    displayName: Name_of_Resource
    type: string
    default: application
  
  - name: region
    displayName: region
    type: string
    default: eastus
    values:
    - eastus
    - eastus2
    - northeurope
    - centralindia

  - name: vmSize
    displayName: VM_Size
    type: string
    default: D4s_v3
    values:
    - D2as_v4
    - DS2_v2
    - D4s_v3
    - D2as_v4
    - DS3_v2
    - D8s_v3

         
  - name: vmStorageAccountType
    displayName: VM_Storage_Account_Type
    type: string
    default: Standard_LRS
    values:
    - Standard_LRS
    - StandardSSD_LRS
    - Premium_LRS
    - UltraSSD_LRS

  - name: imageSKU
    displayName: Image_SKU
    type: string
    default: 20.04-LTS
    values:
    - 16.04-LTS
    - 18.04-LTS
    - 20.04-LTS
    - 22.04-LTS

In these pipeline parameters, we’re also restricting/limiting the range of values by providing a list of values to our parameters. In this way, the user cannot go beyond these pre-defined values while executing the pipeline.

If you want to Learn More about Pipeline click here.

Pipeline Steps:

In our pipeline, ‘we will use the below-mentioned steps

1. Replacing Values

- bash: |
    sed -i "s/{vm}/${{ parameters.name }}/g" terraform.tfvars
    sed -i "s/{West Europe}/${{ parameters.region }}/g" terraform.tfvars
    sed -i "s/{StandardF2}/${{ parameters.vmSize }}/g" terraform.tfvars
    sed -i "s/{StandardLRS}/${{ parameters.vmStorageAccountType }}/g" terraform.tfvars
    sed -i "s/{16.04-LTS}/${{ parameters.imageSKU }}/g" terraform.tfvars
    cat terraform.tfvars
  displayName: 'Replace Values'

This is the heart of our pipeline. In this step, we are using the terraform azure pipeline parameters.

2. Terraform Tool Installer

- task: TerraformInstaller@0
  inputs:
    terraformVersion: 'latest'
  displayName: 'Install Terraform latest'

In this step, we will install terraform tool for our pipeline.

3. Terraform Init

- task: TerraformTaskV3@3
  inputs:
    provider: 'azurerm'
    command: 'init'
    backendServiceArm: 'Opstree-PoCs (4c93adXXXXXXXXXXXXXXXXXXXXXX8f3c)'
    backendAzureRmResourceGroupName: 'jenkins_server'
    backendAzureRmStorageAccountName: 'asdfghjkasdf'
    backendAzureRmContainerName: 'backend'
    backendAzureRmKey: 'backend.tfstate'

This step will initialize the terraform code and the terraform backend configuration.

4. Terraform Validate


- task: TerraformTaskV3@3
  displayName: 'Terraform : Validate'
  inputs:
    command: validate

In this step, we will validate our terraform code configuration

5. Terraform Plan

- task: TerraformTaskV3@3
  displayName: 'Terraform : Plan'
  inputs:
    provider: 'azurerm'
    command: 'plan'
    commandOptions: '-lock=false'
    environmentServiceNameAzureRM: 'Opstree-PoCs (4c9xxxxxxxxxxx3c)'

This step will caution the instructor for sure.

6. Terraform Apply

- task: TerraformTaskV3@3
  inputs:
    provider: 'azurerm'
    command: 'apply'
    commandOptions: '-auto-approve'
    environmentServiceNameAzureRM: 'Opstree-PoCs (4c93xxxxxxxxf3c)'

This step will execute the configuration file and launch a VM instance. When you run apply command, it will ask you, “Do you want to perform these actions?”, you need to type yes and hit enter. To skip that we have provided our configuration with an “-auto-approve” argument.

[Also Read: Deploying Azure Policy using Terraform Module]

Upon saving and running our pipeline we can choose our desired parameters in this way.


We will get a drop-down for each parameter whose value we restricted.

Conclusion

So far we’ve learned how to make the pipeline for our terraform code using Azure DevOps Pipelines. Along with that, we’ve found out how to pass the runtime parameters to dynamically give values to our terraform.tfvars file and also restrict or limit the values as per our requirements.

Content References Reference 1, Reference 2
Image ReferencesImage 1, Image 2