Redis Cluster: Setup, Sharding and Failover Testing

https://blog.advids.co/wp-content/uploads//2017/09/Industrial-robotics1.gif

Watching cluster sharding and failover management is as gripping as visualizing a robotic machinery work.

My last blog on Redis Cluster was primarily focussed on its related concepts and requirements. I would highly recommend to go through the concepts first to have better understanding.

Here, I will straight forward move to its setup along with the behaviour of cluster when I intentionally turned down one Redis service on one of the node.
Let’s start from the scratch.

Continue reading “Redis Cluster: Setup, Sharding and Failover Testing”

One more reason to use Docker

Recently I was working on a project which includes Terraform and AWS stuff. While working on that I was using my local machine for terraform code testing and luckily everything was going fine. But when we actually want to test it for the production environment we got some issues there. Then, as usual, we started to dig into the issue and finally, we got the issue which was quite a silly one 😜. The production server Terraform version and my local development server Terraform version was not the same. 

After wasting quite a time on this issue, I decided to come up with a solution so this will never happen again.

But before jumping to the solution, let’s think is this problem was only related to Terraform or do we have faced the similar kind of issue in other scenarios as well.

Well, I guess we face a similar kind of issue in other scenarios as well. Let’s talk about some of the scenario’s first.

Suppose you have to create a CI pipeline for a project and that too with code re-usability. Now pipeline is ready and it is working fine in your project and then after some time, you have to implement the same kind of pipeline for the different project. Now you can use the same code but you don’t know the exact version of tools which you were using with CI pipeline. This will lead you to error elevation. 

Let’s take another example, suppose you are developing something in any of the programming languages. Surely that utility or program will have some dependencies as well. While installing those dependencies on the local system, it can corrupt your complete system or package manager for dependency management. A decent example is Pip which is a dependency manager of Python😉.

These are some example scenarios which we have faced actually and based on that we got the motivation for writing this blog.

The Solution

To resolve all this problem we just need one thing i.e. containers. I can also say docker as well but container and docker are two different things.

But yes for container management we use docker.

So let’s go back to our first problem the terraform one. If we have to solve that problem there are multiple ways to solve this. But we tried it to solve this using Docker.

As Docker says

Build Once and Run Anywhere

So based on this statement what we did, we created a Dockerfile for required Terraform version and stored it alongside with the code. Basically our Dockerfile looks like this:-

FROM alpine:3.8

MAINTAINER OpsTree.com

ENV TERRAFORM_VERSION=0.11.10

ARG BASE_URL=https://releases.hashicorp.com/terraform

RUN apk add --no-cache curl unzip bash \
    && curl -fsSL -o /tmp/terraform.zip ${BASE_URL}/${TERRAFORM_VERSION}/terraform_${TERRAFORM_VERSION}_linux_amd64.zip \
    && unzip /tmp/terraform.zip -d /usr/bin/

WORKDIR /opstree/terraform

USER opstree

In this Dockerfile, we are defining the version of Terraform which needs to run the code.
In a similar fashion, all other above listed problem can be solved using Docker. We just have to create a Dockerfile with exact dependencies which are needed and that same file can work in various environments and projects.

To take it to the next level you can also dump a Makefile as well to make everyone life easier. For example:-

IMAGE_TAG=latest
build-image:
    docker build -t opstree/terraform:${IMAGE_TAG} -f Dockerfile .

run-container:
    docker run -itd --name terraform -v ~/.ssh:/root/.ssh/ -v ~/.aws:/root/.aws -v ${PWD}:/opstree/terraform opstree/terraform:${IMAGE_TAG}

plan-infra:
    docker exec -t terraform bash -c "terraform plan"

create-infra:
    docker exec -t terraform bash -c "terraform apply -auto-approve"

destroy-infra:
    docker exec -t terraform bash -c "terraform destroy -auto-approve"

And trust me after making this utility available the reactions of the people who will be using this utility will be something like this:-

Now I am assuming you guys will also try to simulate the Docker in multiple scenarios as much as possible.

There are a few more scenarios which yet to be explored to enhance the use of Docker if you find that before I do, please let me know.

Thanks for reading, I’d really appreciate any and all feedback, please leave your comment below if you guys have any feedback.

Cheers till the next time.

Unix File Tree Part-2

For those who have surfed straight to this blog, please check out the previous part of this series Unix File Tree Part-1 and those who have stayed tuned for this part, welcome back.In the previous part, we discussed the philosophy and the need for file tree. In this part, we will dive deep into the significance of each directory.

Image result for horizontal file tree linux

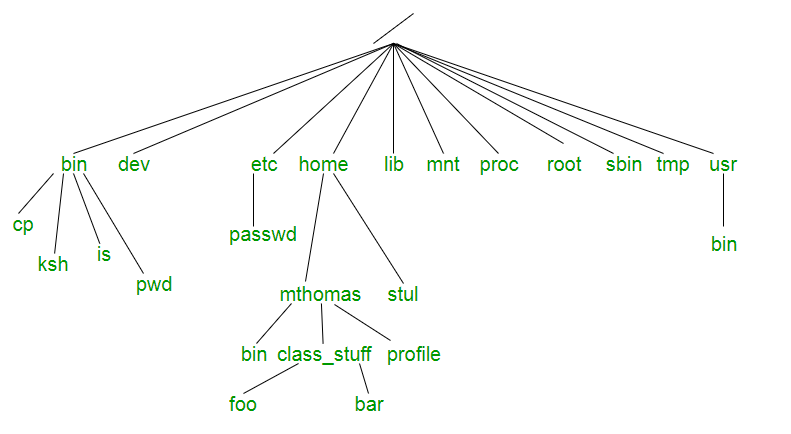
Dayum!! that’s a lot of stuff to gulp at once, we’ll kick out things one after the other.

Major directories

Let’s talk about the crucial directories which play a major role.

  • /bin: When we started crawling on Linux this helped us to get on our feet yes, you read it right whether you want to copy any file, move it somewhere, create a directory, find out date, size of a file, all sorts of basic operations without which the OS won’t even listen to you (Linux yawning meanwhile) happens because of the executables present in this directory. Most of the programs in /bin are in binary format, having been created by a C compiler, but some are shell scripts in modern systems.
  • /etc: When you want things to behave the way you want, you go to /etc and put all your desired configuration there (Imagine if your girlfriend has an /etc life would have been easier). whether it is about various services or daemons running on your OS it will make sure things are working the way you want them to.
  • /var: He is the guy who has kept an eye over everything since the time you have booted the system (consider him like Heimdall from Thor). It contains files to which the system writes data during the course of its operation. Among the various sub-directories within /var are /var/cache (contains cached data from application programs), /var/games(contains variable data relating to games in /usr), /var/lib (contains dynamic data libraries and files), /var/lock (contains lock files created by programs to indicate that they are using a particular file or device), /var/log (contains log files), /var/run (contains PIDs and other system information that is valid until the system is booted again) and /var/spool (contains mail, news and printer queues).
  • /proc: You can think of /proc just like thoughts in your brain which are illusions and virtual. Being an illusionary file system it does not exist on disk instead, the kernel creates it in memory. It is used to provide information about the system (originally about processes, hence the name). If you navigate to /proc The first thing that you will notice is that there are some familiar-sounding files, and then a whole bunch of numbered directories. The numbered directories represent processes, better known as PIDs, and within them, a command that occupies them. The files contain system information such as memory (meminfo), CPU information (cpuinfo), and available filesystems.
  • /opt: It is like a guest room in your house where the guest stayed for prolong period and became part of your home. This directory is reserved for all the software and add-on packages that are not part of the default installation.
  • /usr: In the original Unix implementations, /usr was where the home directories of the users were placed (that is to say, /usr/someone was then the directory now known as /home/someone). In current Unixes, /usr is where user-land programs and data (as opposed to ‘system land’ programs and data) are. The name hasn’t changed, but its meaning has narrowed and lengthened from “everything user related” to “user usable programs and data”. As such, some people may now refer to this directory as meaning ‘User System Resources’ and not ‘user’ as was originally intended.

Potato or Potaaato what is the difference? 

We’ll be discussing those directories which confuse us always, which have almost a similar purpose but still are in separate locations and when asked about them we go like ummmm…….

/bin vs /usr/bin vs /sbin vs /usr/local/bin

This might get almost clear out when I explained the significance of /usr in the above paragraph. Since Unix designers planned /usr to be the local directories of individual users so it contained all of the sub-directories like /usr/bin, /usr/sbin, /usr/local/bin. But the question remains the same how the content is different?

/usr/bin:

  • /usr/bin is a standard directory on Unix-like operating systems that contains most of the executable files that are not needed for booting or repairing the system. 
  • A few of the most commonly used are awk, clear, diff, du, env, file, find, free, gzip, less, locate, man, sudo, tail, telnet, time, top, vim, wc, which, and zip.

/usr/sbin:

  • The /usr/sbin directory contains non-vital system utilities that are used after booting.
  • This is in contrast to the /sbin directory, whose contents include vital system utilities that are necessary before the /usr directory has been mounted (i.e., attached logically to the main filesystem). 
  • A few of the more familiar programs in /usr/sbin are adduser, chroot, groupadd, and userdel. 
  • It also contains some daemons, which are programs that run silently in the background, rather than under the direct control of a user, waiting until they are activated by a particular event or condition such as crond and sshd.

I hope I have covered most of the directories which you might come across frequently and your questions must have been answered.
Now that we know about the significance of each UNIX directory, It’s time to use them wisely the way they are supposed to be.
Please feel free to reach me out for any suggestions.
Goodbye till next time!

Speeding up Ansible Execution Part 2

MITOGEN


In the previous post, we discussed various ways to reduce the ansible-playbook execution time, those changes were mostly made in the ansible config file, by adding or adjusting certain parameters in the file. But as you may have noticed that those methods were not that effective in certain cases, while using those methods we have to be very cautious about the result as they may affect ansible performance in one way or the other.


Generally, for the slower ansible execution, the main culprit is the way ansible is executed on the hosts. It creates multiple SSH connections and does not fully utilize the available resources. To tackle this problem, MITOGEN came to rescue !!!

Mitogen is a distributed programming library for Python. The Mitogen extension is a set of plug-ins for Ansible that enable it to operate via Mitogen, vastly improving its performance and enhancing its functional capability.

We all know about the strategies in ansible – linear, free & debug., the mitogen is just defined in the strategy column of the config file, so it is just a strategy, we are not making any other changes in the config file of the ansible so it is not affecting any other parameter, it is just the way, playbooks will be executed on the hosts.

Now coming to the mitogen installation part, we just have to download this package at a particular location and make some changes in the ansible config file as shown below,

[defaults]

strategy_plugins = /path/to/mitogen/ansible_mitogen/plugins/strategystrategy = mitogen_linear

we have to define the path where we have stored our mitogen files, and mention the strategy as “mitogen_linear”, under the default section of the config file, and we are good to go.

Now, after the Mitogen installation part, when we run our playbook, we will notice a reasonable reduction in the execution time,

Mitogen is fast because of the following reasons,

  • One connection is created per target and system logs aren’t spammed with repeated authentication events.
  • A single network roundtrip is used to execute a step whose code already exists in RAM on the target.
  • Processes are aggressively reused, avoiding the cost of invoking Python and recompiling imports, saving 300-800 ms for every playbook step.
  • Code is cached in the RAM, which further increases the speed.
  • Generally, ansible repeatedly rewrites and extracts ZIP files to temporary directories in the target hosts, mitogen also reduces these rewrites.

      All the above-mentioned features make the ansible to run faster.

      Mitogen is another extension for ansible that provides a decrease in its execution time and it is very easy to use, I think MITOGEN is very underrated and one of its kind, and we should definitely give it a try.

      I hope I have explained everything well, any suggestion/queries are highly appreciated.


Thanks !!!

Source:

https://mitogen.networkgenomics.com/ansible_detailed.html

Speeding up Ansible Execution Part 1

The knowledge of one of the SCM tools is a must for any DevOps engineer, ANSIBLE is one of the popular tools in this category, we all are aware of the ease that Ansible provides whether it is infra provisioning, orchestration or application deployment.
The reason for the vast popularity of Ansible is the long list of modules it provides to support any level of automation, moreover it also gives users the flexibility to create their own modules as per their requirement.
But The purpose of this blog is not to mention the features that ansible provides, but to show how we can speed up our playbook execution in Ansible, as a beginner executing ansible, is very easy and it also feels like saving a lot of time with it, but as you dive deep into it, you will come to know that running ansible playbooks will engage you for a considerable amount of time.
There are a lot of articles available on the internet on how we can speed up our ansible execution, so I have decided to sum up those articles into my blog, with the following methods, we can reduce our execution time without compromising with the overall performance of Ansible.
Before starting, I request  you guys to make a small change in your ansible configuration file (ansible.cfg), this small change will help you in tracking the time it will take for the playbook execution, and it also lists out the time is taken by each task.
Just add these lines to your ansible.cfg file under default section,

[default]

callback_whitelist = profile_tasks

Forks

When you are running your playbooks on various hosts, then you may have noticed that the number of servers where the playbook executes simultaneously is 5. You can increase this number inside the ansible.cfg file:
# ansible.cfg

forks = 10


or with a command line argument to ansible-playbook with the -f or –forks options. We can increase or decrease this value as per our requirement.
while using forks we should use “local_action” or “delegated” steps limited in number, as with higher fork value it will affect the ansible-server’s performance.

Async

In ansible, each task blocks the playbook, meaning the connections stay open until the task is done on each node, which is some cases takes a lot of time, here we can use “async” for those particular tasks, with the help of this ansible will automatically move to another task without waiting for the task execution on each node.
To launch a task asynchronously, we need to specify its maximum runtime and how frequently we would like to poll for status, it’s default value in 10 sec.
tasks:

– name: “name of the task”  

command: “command we want to execute”     

async: 40    

poll: 15
The only condition is that the subsequent tasks must not have a dependency on this task.

Free Strategy 

When running Ansible playbooks, you might have noticed that the Ansible runs every task on each node one by one, it will not move to another task until a particular task is completed on each node, which will take a lot of time, in some cases.
By default, the strategy is set to “linear”, we can set it to free.

– hosts: “hosts/groups”  

name: “name of the playbook”  

strategy: free


It will run the playbook on each host independently, without waiting for each node to complete.
Facts gathering is the default feature while executing playbook, sometimes we don’t need it.
In those cases, we can disable facts gathering, This has advantages in scaling Ansible in push mode with very large numbers of systems.

– hosts: “hosts/groups”  

name: “name of the playbook”  

gather_facts: no

Pipelining 

For each task in Ansible, there are lots of ssh connection created, which results in increasing the total execution time. Pipelining reduces the number of ssh operations required to execute a module by executing many Ansible modules without an actual file transfer. We just have to make these changes in the ansible.cfg file,
# ansible.cfg Pipelining = True
Although this can result in a very significant performance improvement when enabled, Pipelining is disabled by default because requiretty is enabled by default for many distros.

Poll Interval

When we run any the task in Ansible, it starts polling to check if the task is completed on the host or not, we can decrease this polling interval time in ansible.cfg to increase its performance, but it will increase the CPU usage, so we need to adjust its value accordingly We just have to adjust this the parameter in the ansible.cfg file,
internal_poll_interval=0.001

so, these are the various ways to decrease our playbook execution time in Ansible, generally we don’t use all these methods in a single setup, we use these features as per the requirement, 
The main motive of writing this blog is to determine the factors which will help in fine-tuning the Ansible performance, and there are many more factors which serves the same purpose but here I am mentioning the most important parameters among them.
I hope I have covered all the important aspects of the blog, feel free to provide your valuable feedback.
Thanks !!!

Source:

https://mitogen.networkgenomics.com/ansible_detailed.html