
Introduction
As a new member of the team, I was tasked for establishing site-to-site VPN connectivity using a third-party tool. After exploring numerous blogs in search of the perfect solution, I stumbled upon StrongSwan. Excited to put it to the test, I followed the provided guides carefully. However, upon implementation, I encountered a frustrating roadblock: while the tunnel was successfully created, communication between the virtual networks remained elusive.
This blog aims to tackle that very challenge head-on. I’ll be sharing a comprehensive, step-by-step guide to achieve seamless site-to-site VPN connectivity between two cloud environments. Guess, what’s the best part? The same principles can be effortlessly applied to on-premise infrastructure setups as well.
But, what if your cloud provider doesn’t offer managed services for site-to-site VPN connectivity? Or if the process for establishing site-to-site VPN connectivity using managed services requires different configurations and setup steps? Don’t worry, we’ll address those scenarios too.
So, if you’ve ever had trouble with site-to-site VPN connections or making sure your networks connect properly, you’re in the right place. Let’s get started and understand site-to-site VPNs together!
Why Use StrongSwan?
Using StrongSwan for site-to-site VPN connectivity offers several advantages:
1.Flexibility: StrongSwan is highly configurable, allowing you to tailor the VPN setup to your specific requirements and network environments.
2. Open Source: Being an open-source solution, StrongSwan is cost-effective and offers transparency, enabling you to inspect and modify the code as needed.
3. Compatibility: StrongSwan supports various VPN protocols, including IKEv1 and IKEv2, ensuring compatibility with a wide range of devices and platforms.
4. Security: StrongSwan prioritizes security, offering robust encryption and authentication mechanisms to protect your data during transit.
5. Ease of use: The ease of use is another significant benefit of using StrongSwan for site-to-site VPN connectivity. Whether you’re a seasoned network administrator or a novice user, StrongSwan provides a user-friendly experience, ensuring that you can efficiently establish and maintain secure site-to-site VPN connections between various cloud platforms and on-premise infrastructure.
Steps To Create Site to Site VPN Connection Using StrongSwan
I will demonstrate how to establish a site-to-site VPN connection between Azure and AWS. This method can be applied to any cloud platform or on-premise infrastructure.

Configuration on AWS side
Step 1: Configure VPC, Subnet and Internet Gateway
Create a Virtual Private Cloud (VPC) with a non-overlapping CIDR block compared to the Azure VNet. Within the VPC, establish a public subnet and attach an Internet Gateway to enable connectivity to the internet. Create a public route table and configure a route allowing internet traffic flow through it. Associate the public subnet with the route table to facilitate proper routing. Finally, launch an EC2 instance in the public subnet.
- VPC Name: VPC-s2s
- VPC Cidr: 172.0.0.0/16
- Subnet Name: subnet-01
- Subnet Cidr: 172.0.1.0/24
- Route Table Name: rt-s2s
- Internet Gateway Name: igw-s2s
Step 2: Connect Securely to the EC2 Instance and Perform the Configuration
A: Update the package repository and upgrade existing packages and install StrongSwan
   sudo apt update && sudo apt upgrade -y
   sudo apt install strongswan -y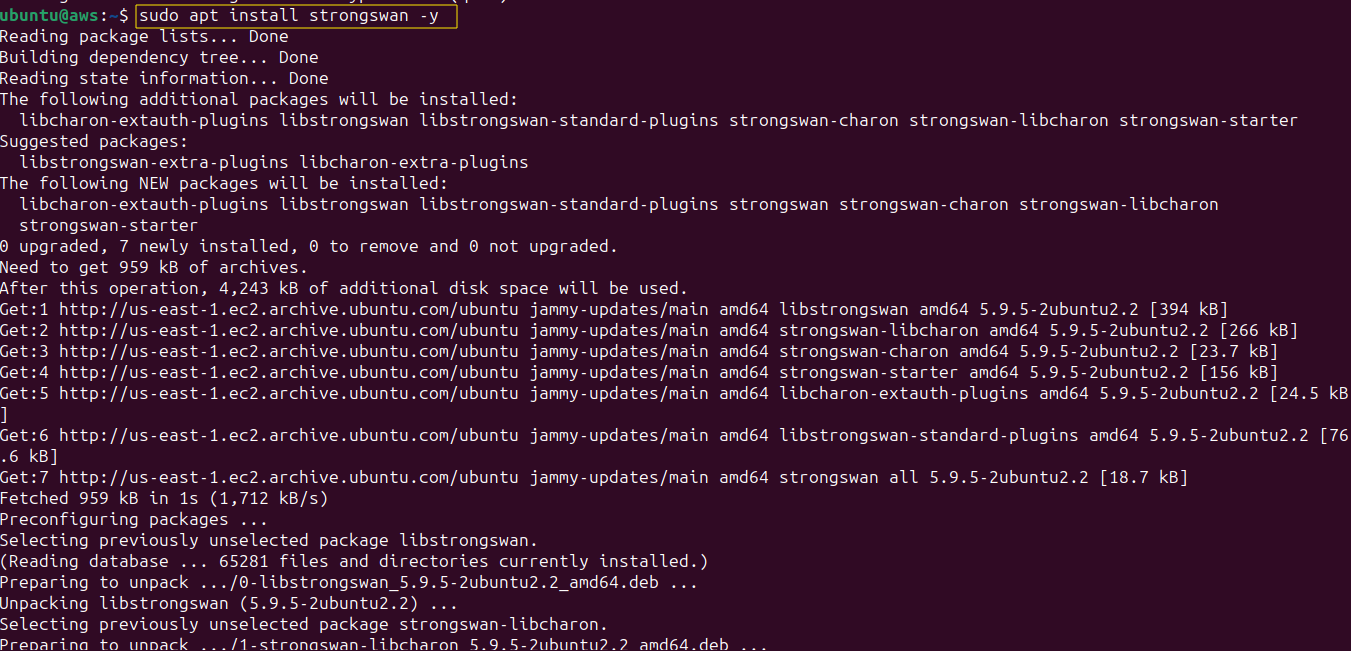
B. Generate a Pre-Shared Key (PSK) for authentication purposes on both endpoints of the VPN tunnel, execute the following command.
openssl rand -base64 64
Copy the generated key and paste it into a secure location after removing any extra spaces.
C. Open the “ipsec.secrets” file and add text with below format:
sudo nano /etc/ipsec.secrets

<public ip of aws VM (site a)> <public ip of azure VM (site b)>: <encryption method> <key>
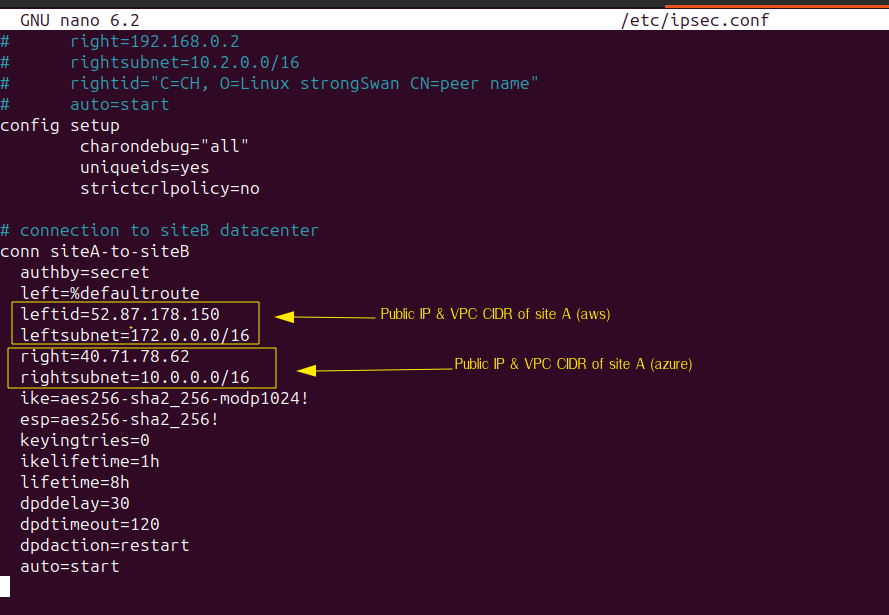
D. Access the “ipsec.conf” file and append the provided configuration to the end of the file. Save the changes and exit.
sudo nano /etc/ipsec.confconfig setup
charondebug="all"
uniqueids=yes
strictcrlpolicy=no
# connection to siteA datacenter
conn siteA-to-siteB
authby=secret
left=%defaultroute
leftid=<public ip of site A>
leftsubnet=<vpc range of strongswan instance at site A>
right=<public ip of site B>
rightsubnet=<vpc range of strongswan instance at site B>
ike=aes256-sha2_256-modp1024!
esp=aes256-sha2_256!
keyingtries=0
ikelifetime=1h
lifetime=8h
dpddelay=30
dpdtimeout=120
dpdaction=restart
auto=start
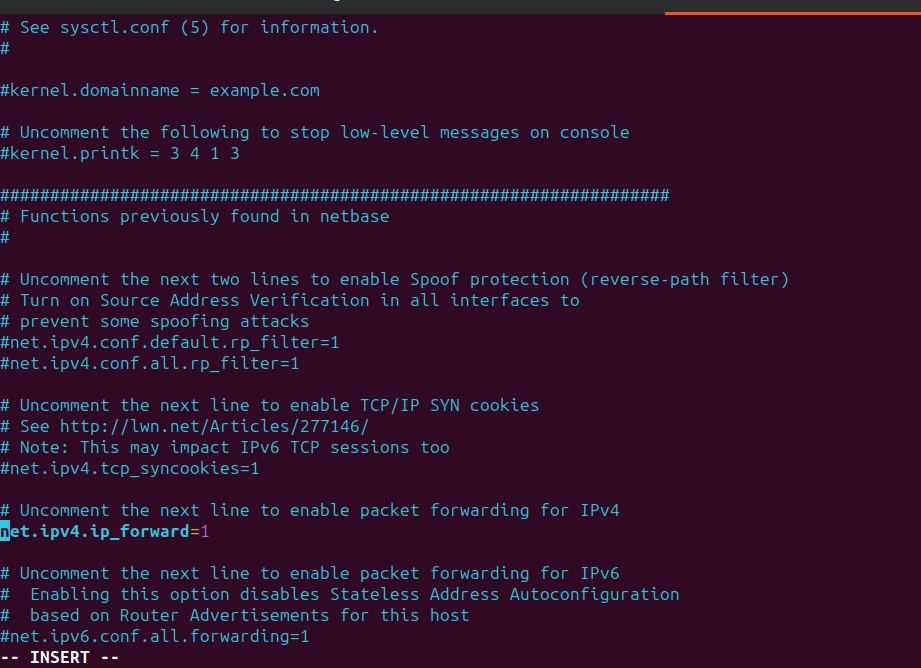
E. Enable ip forwarding
Enabling `net.ipv4.ip_forward=1` allows the instance to function as a router. With IP forwarding enabled on a Linux system, it gains the ability to forward packets between different network interfaces, similar to a router. StrongSwan relies on IP forwarding to efficiently route encrypted VPN traffic between the local and remote networks. Without IP forwarding enabled, the instance would not be able to effectively handle and route VPN traffic, leading to connectivity issues and potential VPN tunnel failures effectively.
To enable IP forwarding:
- Open the
/etc/sysctl.conffile for editing. - Locate the line
#net.ipv4.ip_forward=1and remove the#at the beginning. - Save the changes and exit the editor.
- Apply the changes immediately without rebooting by running
sudo sysctl -p.

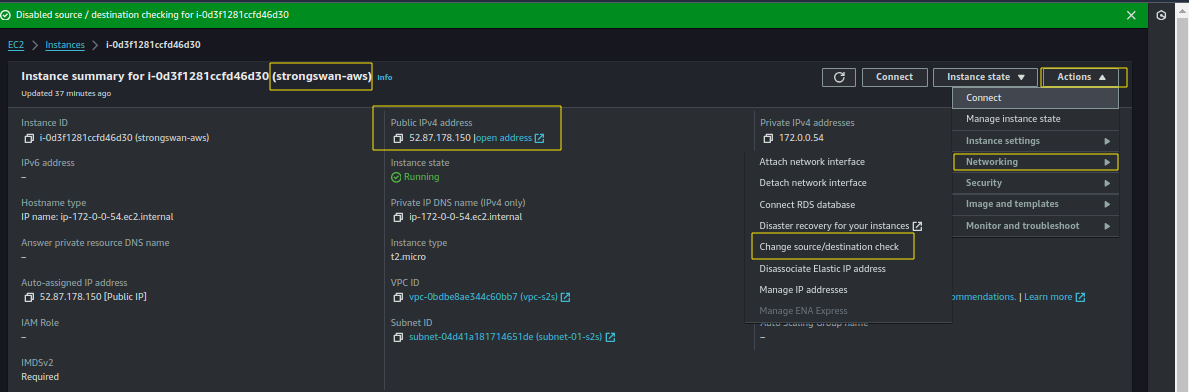
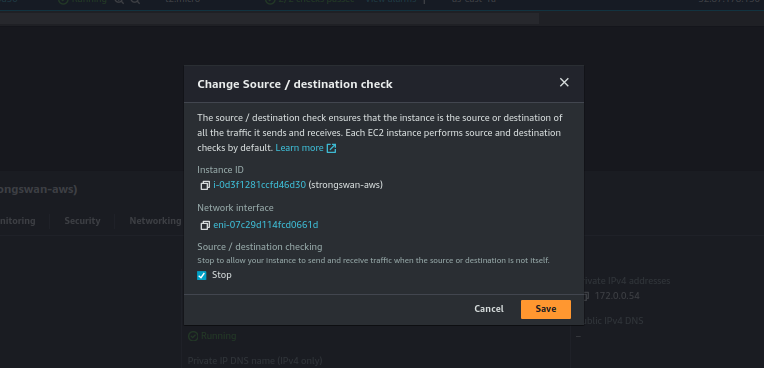
F. Source and destination check off
By default, EC2 instances in AWS have a feature called “source/destination check” enabled. This feature ensures that an instance only accepts traffic that is either destined for or originates from itself. This behavior is suitable for most instances that function as servers. However, when an instance acts as a router, such as when running StrongSwan for VPN connectivity, it needs to be able to forward traffic between different network interfaces, even if the traffic is not specifically destined for the instance itself. Disabling source and destination checks allows the instance to process and forward packets intended for other destinations. This can be done through the AWS Management Console by selecting the instance, navigating to its networking settings and disabling the source/destination.
G. Configuring Route in the Public Route Table for Azure VNet:
The purpose of adding this route is to ensure proper routing of traffic between the EC2 instance where StrongSwan is installed and the Azure Virtual Network (VNet). This step is essential for establishing a VPN connection between the two networks and facilitating the exchange of data securely.
To add the route, follow these steps:
1. In the “Destination” field, enter the CIDR block for the Azure VNet. This CIDR block specifies the range of IP addresses assigned to the Azure VNet.
2. In the “Target” field, select “Instance” and then choose the EC2 instance ID of the server where StrongSwan is installed. This indicates that the specified destination CIDR block should be reachable via the selected EC2 instance.
Routing VPN Traffic:
Once the route is added, the EC2 instance hosting StrongSwan effectively handles the VPN connection and forwards the traffic through the VPN tunnel to the Azure VNet. This ensures seamless communication between the two networks and enables secure data exchange over the VPN connection.
Configuration on Azure side
Step 1: Configure Azure Environment for StrongSwan Deployment
Now, for Azure, create a resource group and within it, deploy a Virtual Network (VNet) with associated subnets. Ensure proper internet connectivity by configuring the subnet where the virtual machine (VM) hosting StrongSwan will be launched. This includes setting up appropriate routes to allow necessary traffic flow. Finally, launch the virtual machine within the specified subnet.
- Resource group name : s2s
- Vnet Name: vnet–s2s
- Region: East US
- Vnet cidr: 10.0.0.0/16
- Subnet name: subnet-s2s
- Subnet cidr: 10.0.0.0/24
Step 2: Connect Securely to the Virtual Machine and Perform the Configuration
A: Update the package repository and upgrade existing packages and install StrongSwan
   sudo apt update && sudo apt upgrade -y
sudo apt install strongswan -yB. Open the “ipsec.secrets” file and add text with below format:
sudo nano /etc/ipsec.secrets

<public ip of azure VM (site b)> <public ip of aws VM(site a)> : <encryption method> <key>
C. Access the “ipsec.conf“ file and append the provided configuration to the end of the file. Save the changes and exit.
config setup
       charondebug="all"
       uniqueids=yes
       strictcrlpolicy=no

# connection to siteB datacenter
conn siteA-to-siteB
 authby=secret
 left=%defaultroute
 leftid=<public ip of site B>
 leftsubnet=<vpc range of strongswan instance at site B>
 right=<public ip of site A>
 rightsubnet=<vpc range of strongswan instance at site A>
 ike=aes256-sha2_256-modp1024!
 esp=aes256-sha2_256!
 keyingtries=0
 ikelifetime=1h
 lifetime=8h
 dpddelay=30
 dpdtimeout=120
 dpdaction=restart
 auto=start
Ensure that you replace the placeholders with the correct IP addresses and VPC CIDRs.
D. Enable IP forwarding
As mentioned previously, navigate to /etc/sysctl.conf and uncomment the line net.ipv4.ip_forward=1. Save the changes. To apply the modifications without rebooting, execute the sudo sysctl -p command on azure VM.
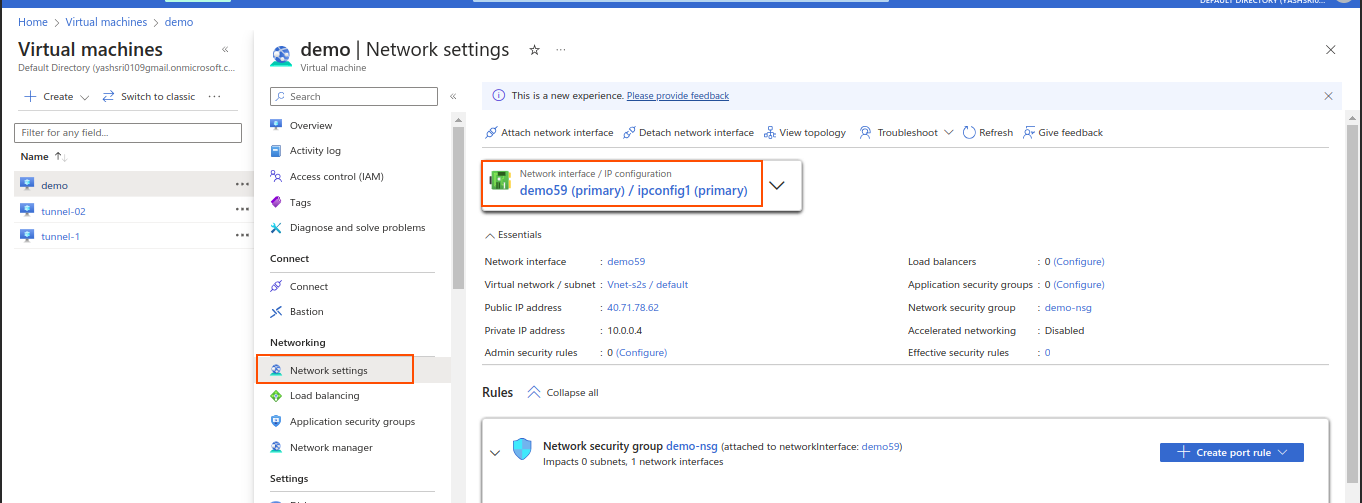
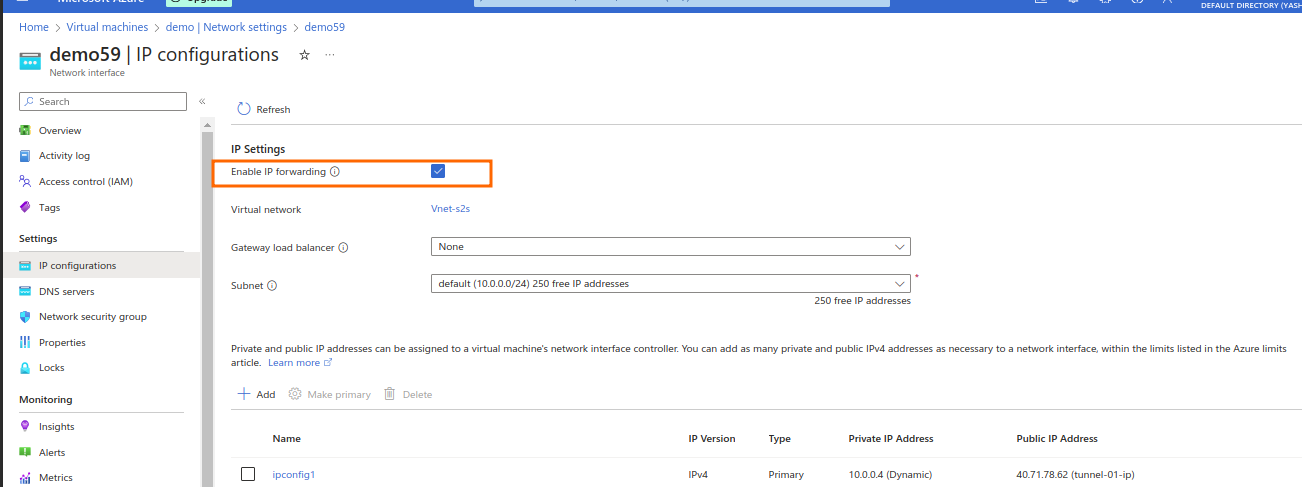
To enable IP forwarding, access the network settings of the launched StrongSwan virtual machine. Navigate to the IP configuration section and enable the option for IP forwarding by checking the corresponding box.
E. Add route
To add a route in the default routes of an Azure VM, first, create a route table. Then, navigate to the routes section within the route table. Create a new route, selecting “IP address” as the destination type. Specify the CIDR range of the AWS VPC previously created as the destination CIDR range. Choose “Virtual Appliance” as the next hop type and provide the private IP address of the StrongSwan Azure VM as the next hop address. Lastly, make sure to associate the subnet to the route table.
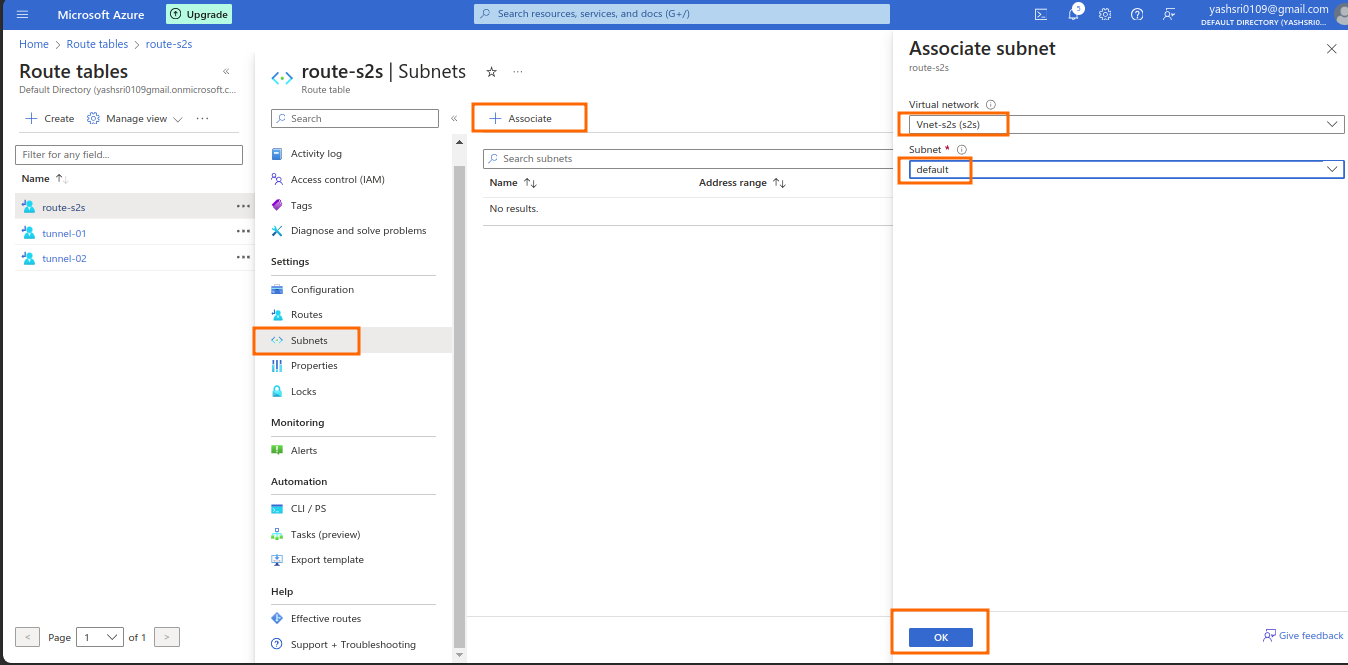
By specifying the destination as the AWS VPC’s CIDR range and setting the next hop as the StrongSwan Azure VM’s private IP address, we ensure that traffic intended for the AWS VPC is routed through the VPN tunnel established by StrongSwan.
That’s It ! Restart the Strongswan Service
You are all set, now go to your AWS and Azure VM and run the below command on by one.
ipsec restart
ipsec status 

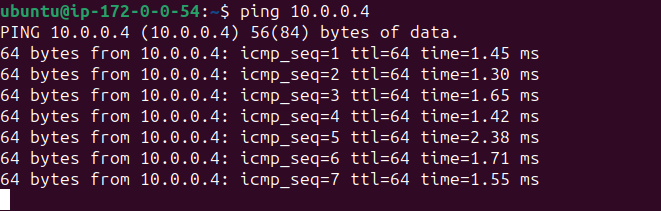
Verification
Once the VPN tunnel has been successfully established, all resources within your Virtual Network (VNet) will become capable of communicating with each other. To verify connectivity, you can create instances in both virtual private networks, each within different subnets. These instances should be able to communicate via their private IP addresses.
To verify connectivity, execute the following commands:
ping <private IP of Site A>

ping <private IP of Site B>
Replace `<private IP of Site A>` and `<private IP of Site B>` with the actual private IP addresses of the servers in Site A (AWS) and Site B (Azure), respectively. These commands will test connectivity between the servers in both sites.

Conclusion
In conclusion, we have successfully set up a site-to-site IPsec VPN connection between Azure and AWS using the open-source tool StrongSwan. By leveraging StrongSwan instead of managed services provided by cloud providers, we were able to save costs while maintaining a high level of security and flexibility.
The ease of setup and configuration provided by StrongSwan allowed us to establish the VPN connection in a relatively short amount of time, ensuring minimal disruption to our operations. Additionally, the compatibility of StrongSwan with various VPN protocols and platforms made it a versatile choice for our deployment needs.
By implementing IP forwarding and configuring route tables on both cloud platforms, we ensured proper routing of traffic through the VPN tunnel, facilitating seamless communication between the networks. This setup not only met our security requirements but also provided a reliable and efficient means of data exchange between our cloud environments.
Moreover, it’s worth noting that StrongSwan is not limited to specific cloud platforms; it can be deployed on any cloud platform or even on-premise infrastructure, making it a universally applicable solution for establishing secure VPN connections.
In summary, by opting for an open-source solution like StrongSwan, we achieved a cost-effective, secure and easily manageable site-to-site VPN connectivity solution tailored to our specific needs. This experience underscores the importance of exploring alternative tools and approaches to meet infrastructure requirements effectively in any environment.
Blog Pundits: Adeel and Sandeep Rawat
OpsTree is an End-to-End DevOps Solution Provider.
Connect with Us