Codeherent was founded in the year 2016 by the founding team after they met in Alacrity Foundation, a UK entrepreneurship course, in 2015. The founding team’s main focus was how to improve DevOps with a fast Infrastructure as Code (IaC) review process.
The tool is singularly focused on Terraform and is helping multiple organizations to understand, optimize and review their Cloud Infrastructure in a diagrammatic manner. They recognize the fact that organizations are clambering for DevOps maturity, GitOps centralization, and infrastructure agility. Abstracting IaC into an interactive diagram removes the complexity and helps us all to keep moving forward quickly.
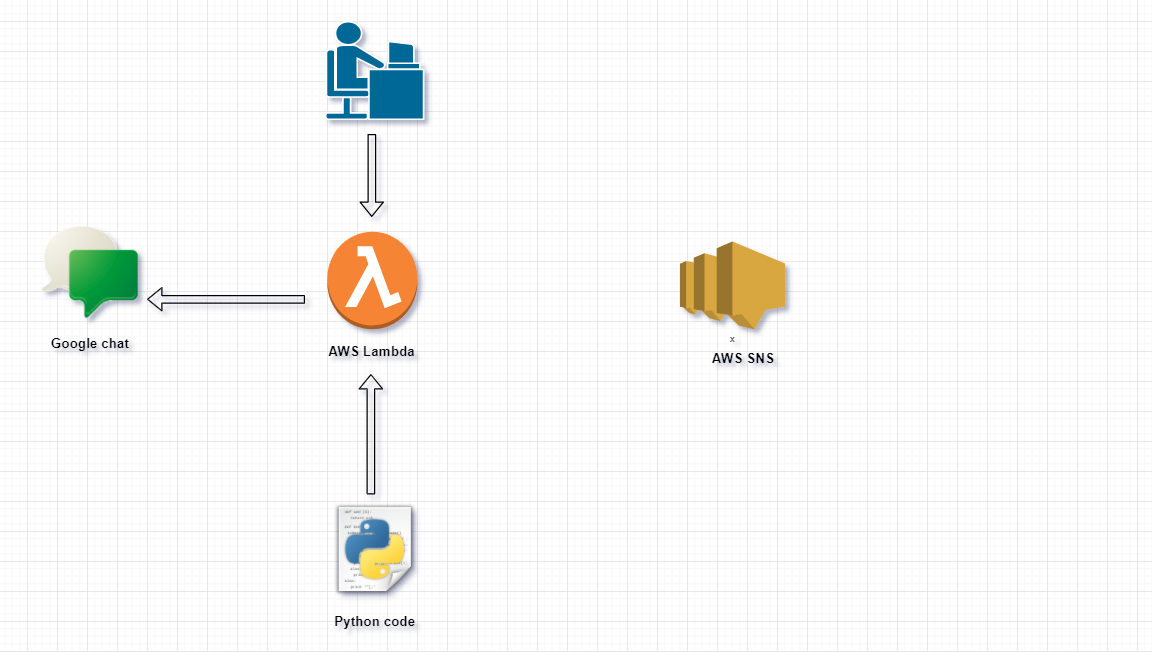
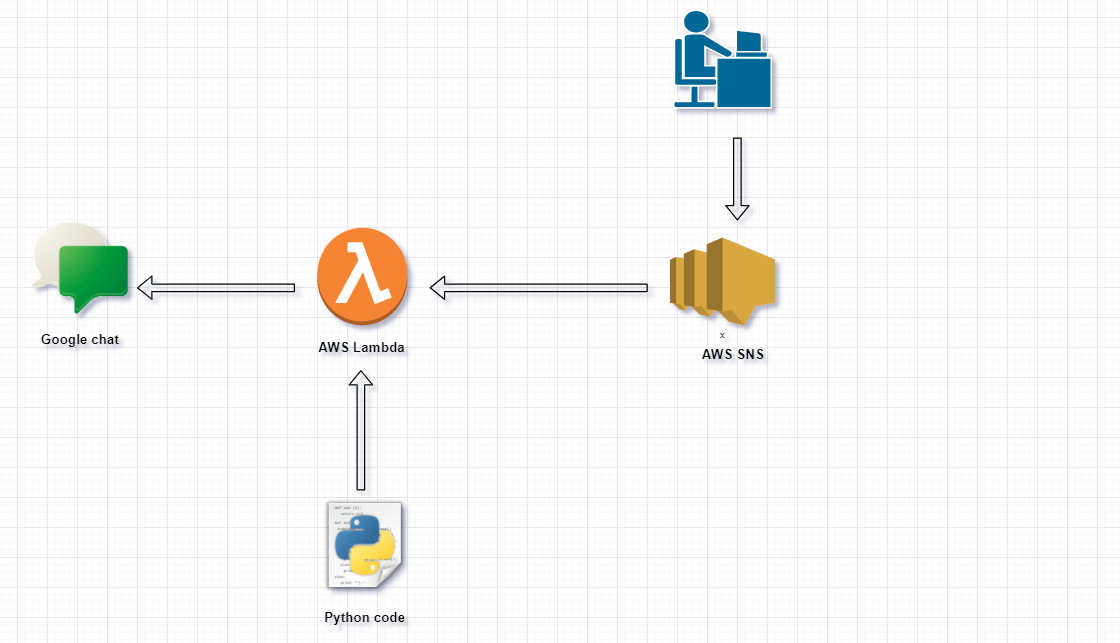
As the name mentioned “simple”, AWS SNS is very straightforward and has an uncomplicated setup [as it does not have complex configuration while setting up]. But with plain configuration and straightforward setup, it doesn’t support things like webhook URLs. Communication platform notification like Slack/Google Chat is one of the things that it does not support directly. So, to solve this complication we need something which integrates with AWS SNS to solve these kinds of issue.
Solution
If we talk about integration, AWS SNS supports multiple integrations and one of the main integrations that we are looking for is- AWS Lambda & AWS Chatbot.
Let’s talk about AWS Chatbot. AWS Chatbot is an interactive agent that makes it easy to monitor and interact with your AWS resources in your Slack channels and Amazon chime chat rooms. With AWS Chatbot, you can receive alerts, run commands to return diagnostic information, invoke AWS Lambda functions, and create AWS support cases. But the main flaw of AWS Chatbots is that it only supports Slack & Amazon chime.
An AWS resource which can solve communication platform issue for both slack & google chat is AWS Lambda. In simple words, AWS Lambda is an event-driven, serverless computing platform which means that in AWS Lambda, the code is executed based on the response of events triggered from AWS resources like API Gateway, S3, Kinesis, and many more.
Requirements
AWS SNS topic
AWS SNS subscription
AWS Lambda
Google chat webhook URLs
Steps
Google Chat Webhook creation
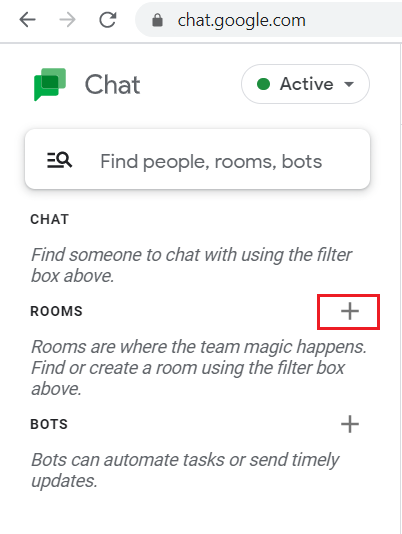
First, we will create a webhook URL for Google chat. For that, we will create a room or if you have already a room created, skip the first and second steps. If the user already has a webhook URL present, skip the Google chat webhook creation part.
Step 1: To create a google chat room, click on the “+” sign under “ROOMS”.
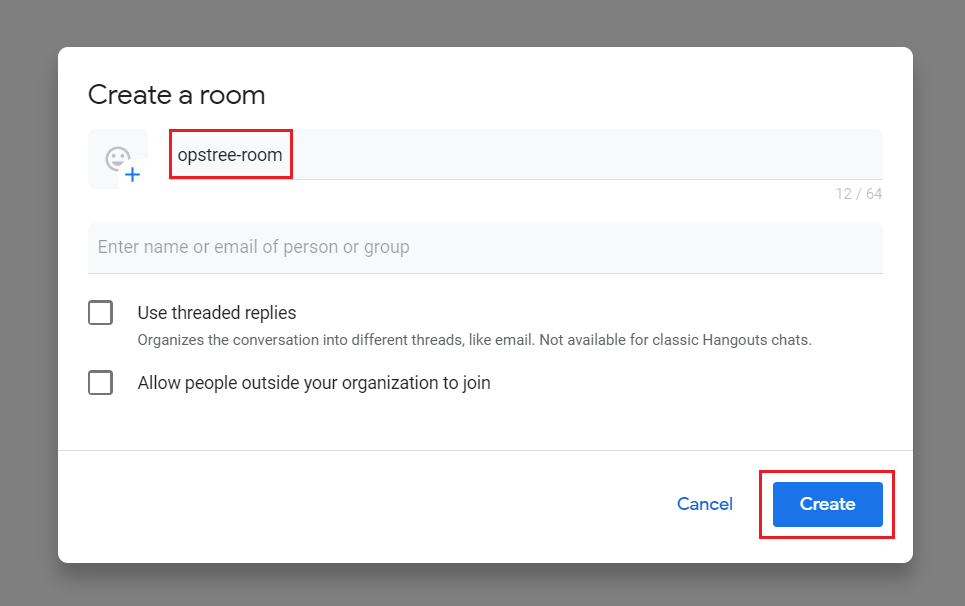
Step 2: Provide Google chat room name and let other options be set as default.
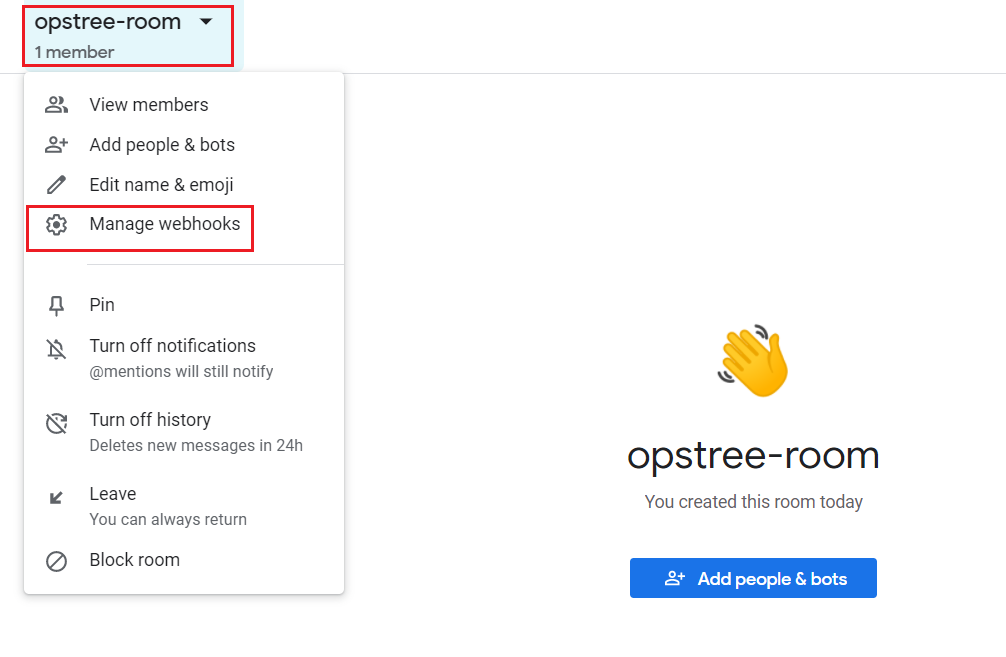
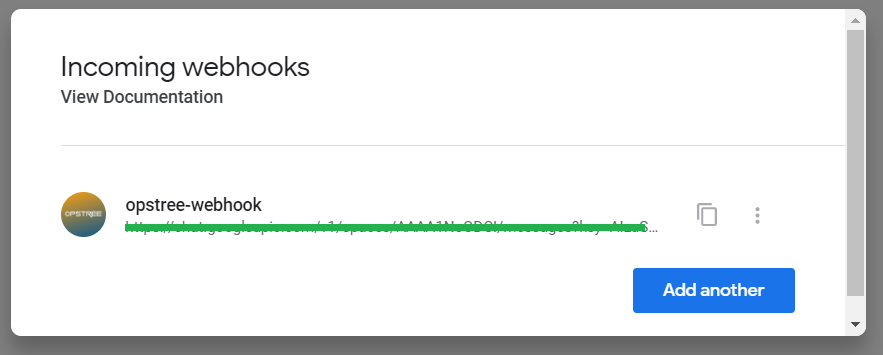
Step 3: Once room created, click on drag down menu of Google chat room and click on “Manage Webhooks”.
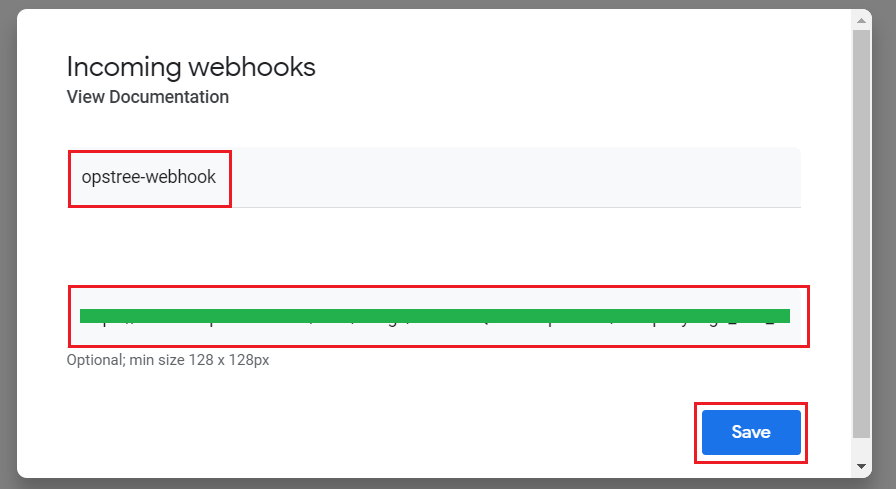
Step 4: There will a pop-up of “Incoming webhooks”, it will ask for the webhook name & avatar/image URL.
Currently, we generated a webhook URL which will be later used in the Lambda function.
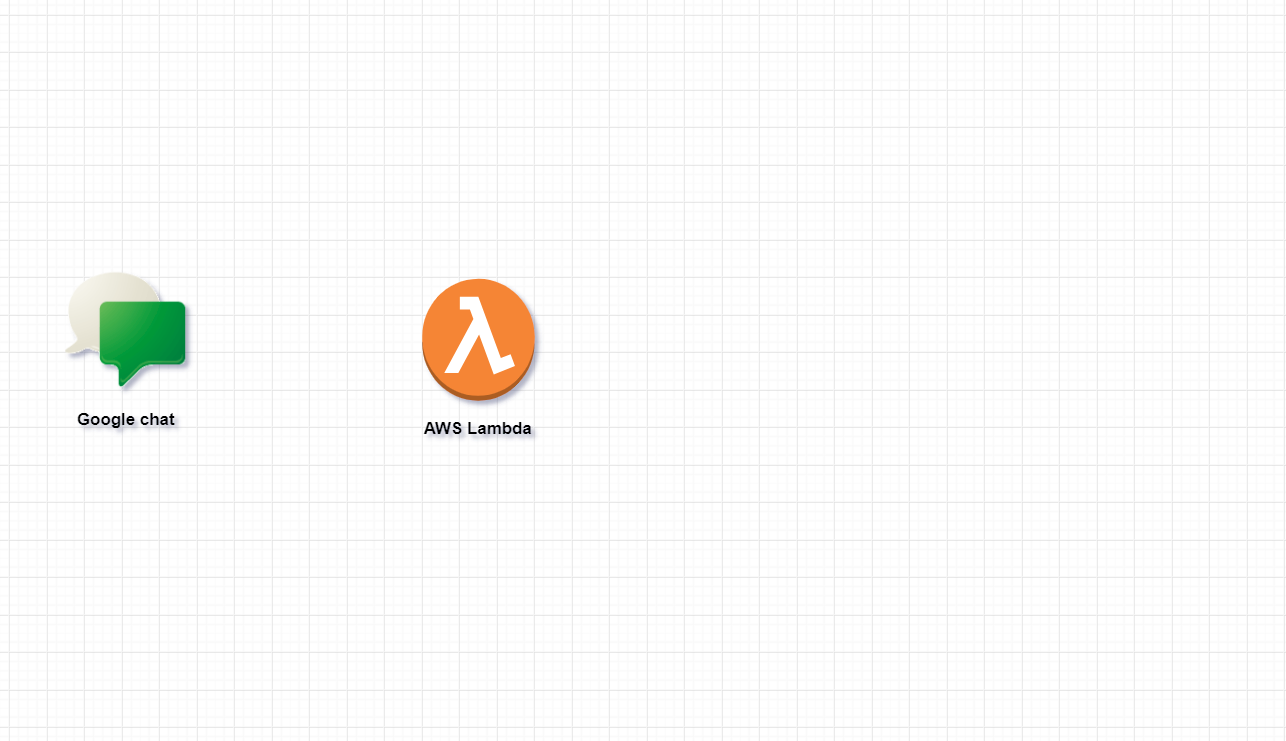
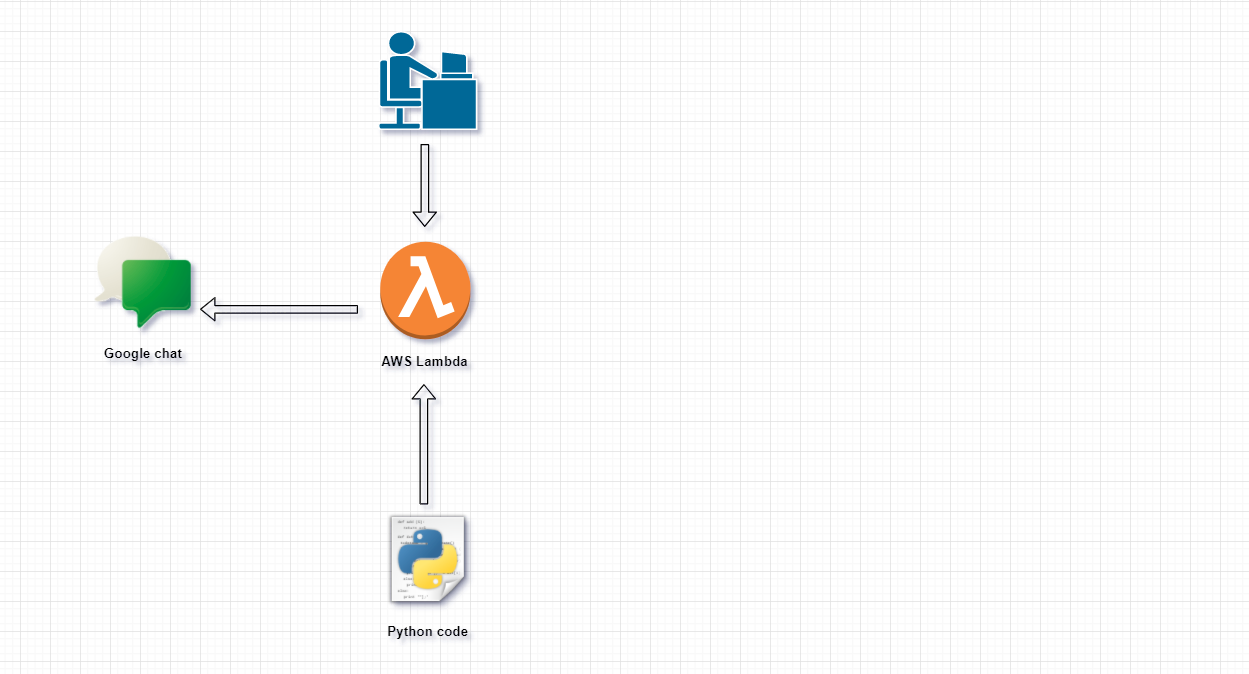
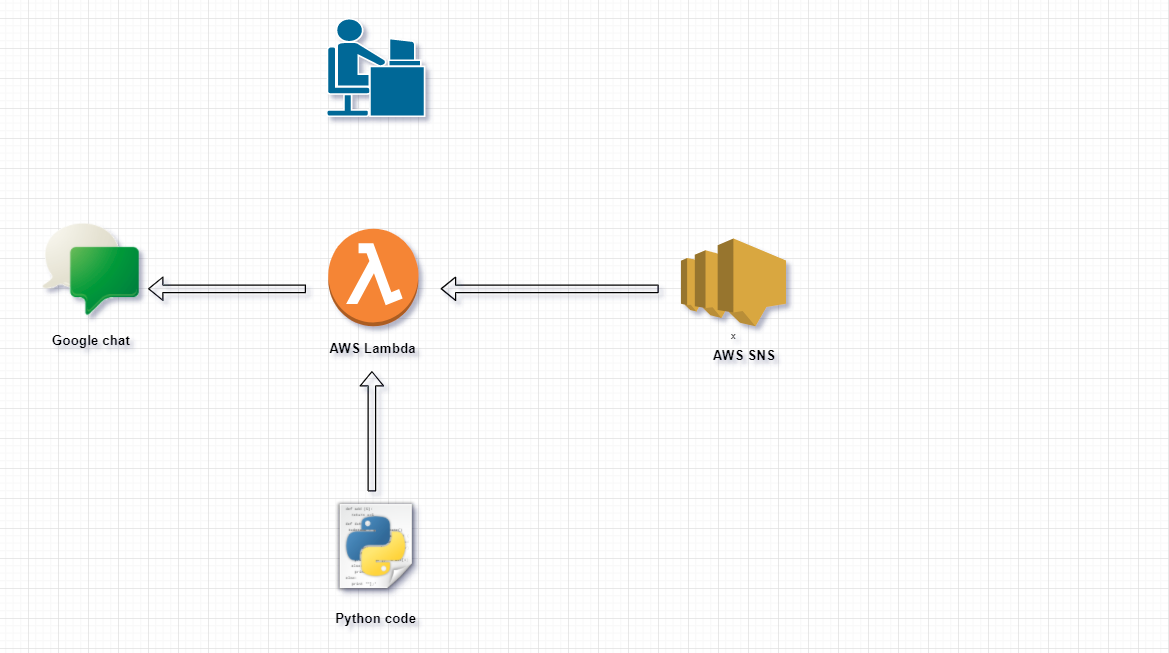
Flow diagram
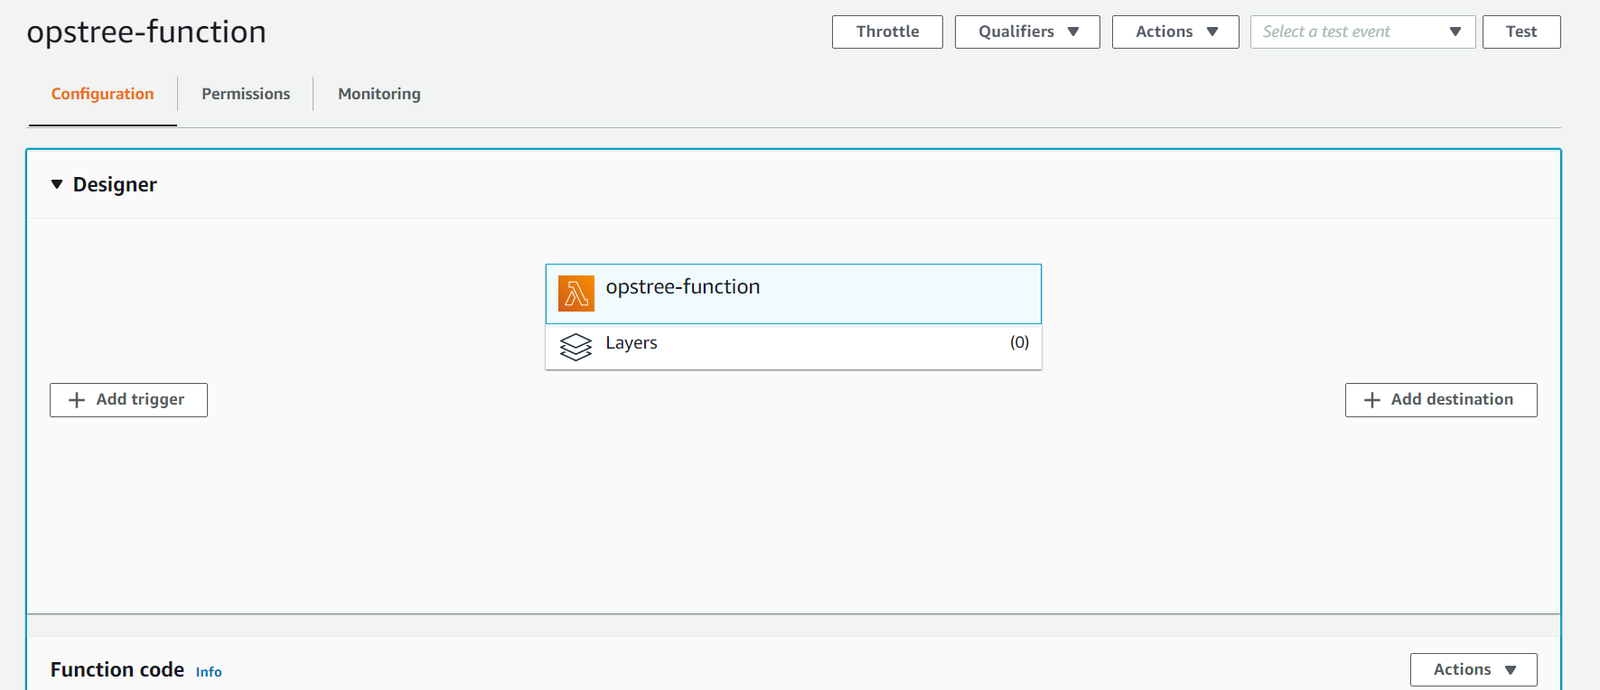
AWS Lambda
at the moment, we are setting up plain Lambda function which will later modify with custom code.
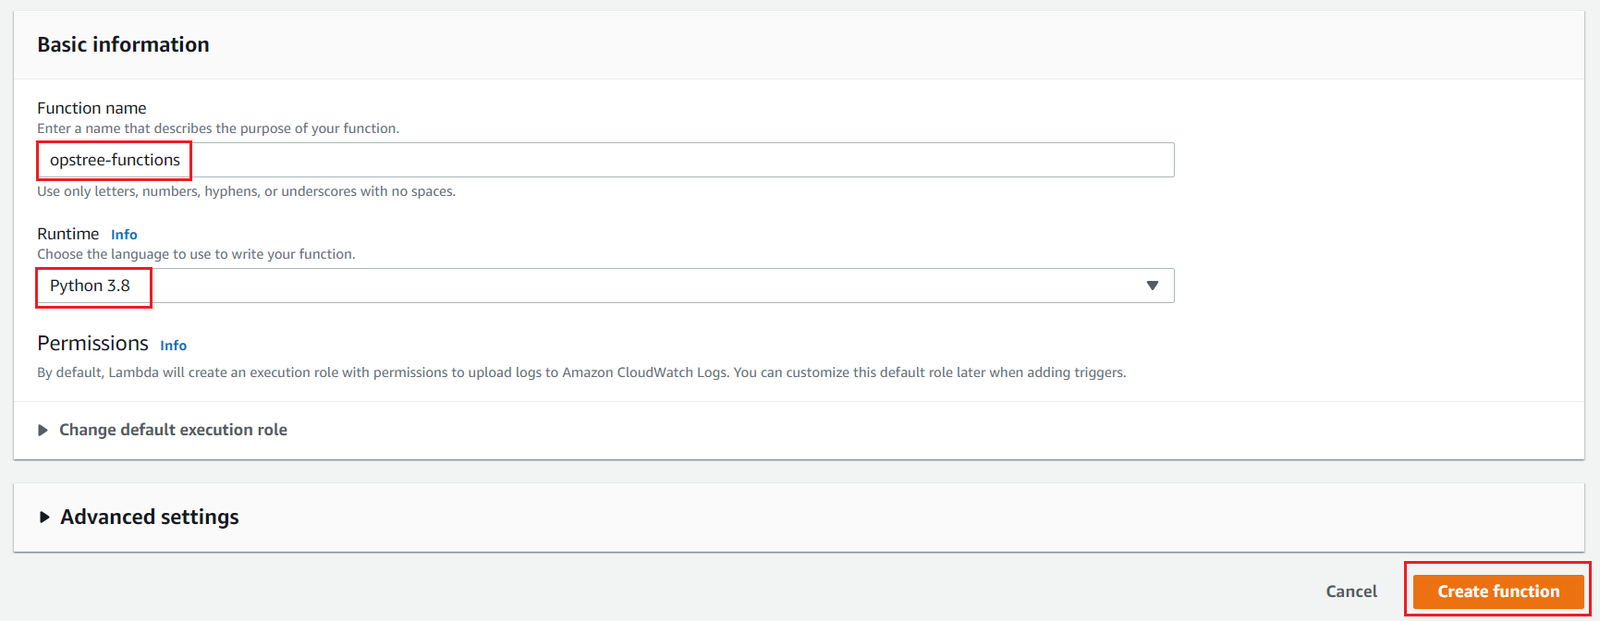
Step 1: Under the AWS Lambda dashboard, click “Create function” to start the process of creating Lambda function.
While setting-up Lambda function, the first option it will request for base template of Lambda function like “Author from scratch”, “Use a blueprint” etc. Choose “Author from scratch” for now which will later replace by custom code.
Give Lambda function name and select language for function as AWS Lambda support multiple programming languages. It all depends on the user’s expertise and understanding of a specific programming language. Leave the other options default. For now, we are using python 3.8
Once you click “create function”, AWS will create a Lambda function with basic layout with default configuration.
Flow diagram
Lambda function code
we will create a zip bundle which will contain custom function and custom code dependencies ,which will replace base function template of Lambda function that we created.
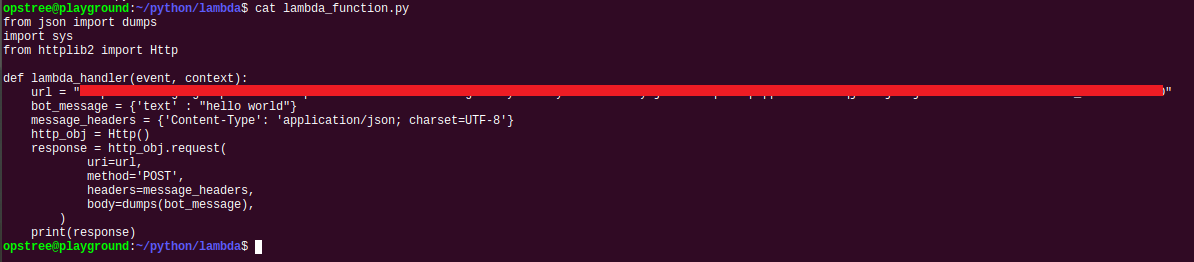
Step 1: Create a python “<NAME>.py” and add below code under that python file.
The custom code contains Lambda function base and under that Lambda function base, there is hardcoded webhook URL of Google chat room which is triggered by Lambda handler.
Once you create python file “<NAME>.py” and added custom code & substitute “<WEBHOOK-URL>” with Google chat webhook URL, We need to install all dependencies because AWS Lambda supports only a few libraries that don’t need extra steps to configure code dependencies. So, we need to install dependencies like httplib2 and Http that AWS Lambda doesn’t support in a specific folder and create a zip bundle of python code along with dependencies.
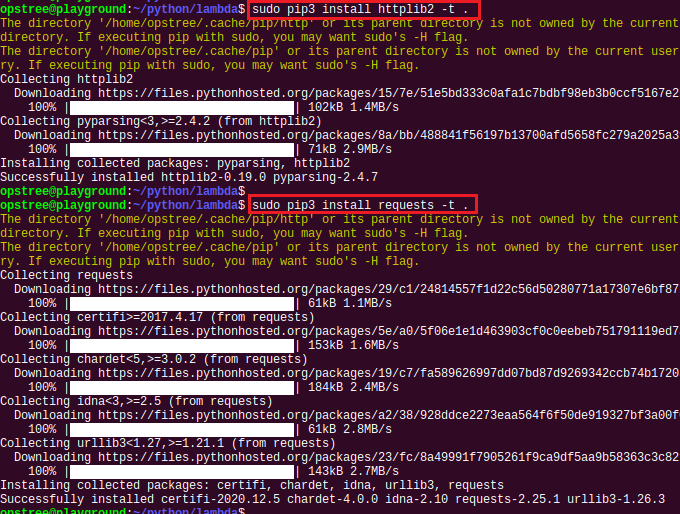
Step 3: Gather “httplib2” & “requests” which is Dependent libraries of custom code using pip command with “-t” tag.
Using “-t” tag with pip command, pip command installed all dependent packages under the current directory that we mentioned, Check for all dependent libraries under the code directory.
$ ls
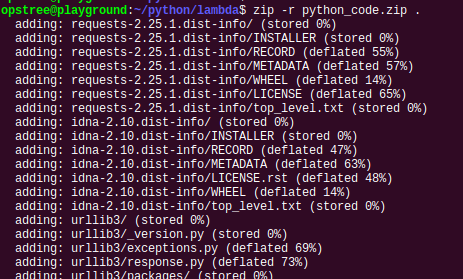
Step 4: Once you get python code with dependent packages under specific directory. We will bundle custom python code with dependent packages together and create zip file which will later replace default template of Lambda function.
$ zip -r python_code.zip .
Note down the python code file name & handler name that we specified. In our case, “lambda_function” is filename & “lambda_handler” is handler/function name. Both are default as per AWS Lambda.
Flow diagram
Uploading python zip bundle
We created Lambda function & zip bundle of custom code with dependent packages. Now, we will upload generated zip bundle to a Lambda function that we created.
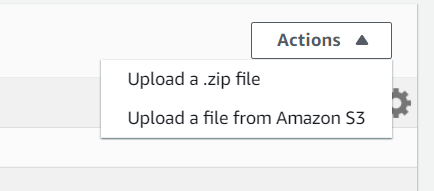
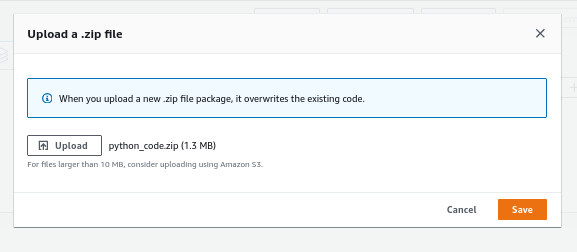
Step 1: On the right side of Lambda function under “function code”, click on “Actions” and select “upload a .zip file” and upload the python zip bundle that we created.
it is giving a warning that code & specified libraries should now be greater than “10MB”, otherwise we need to upload code using the S3 bucket. For the time being, the size of zip bundle is not greater than 10MB.
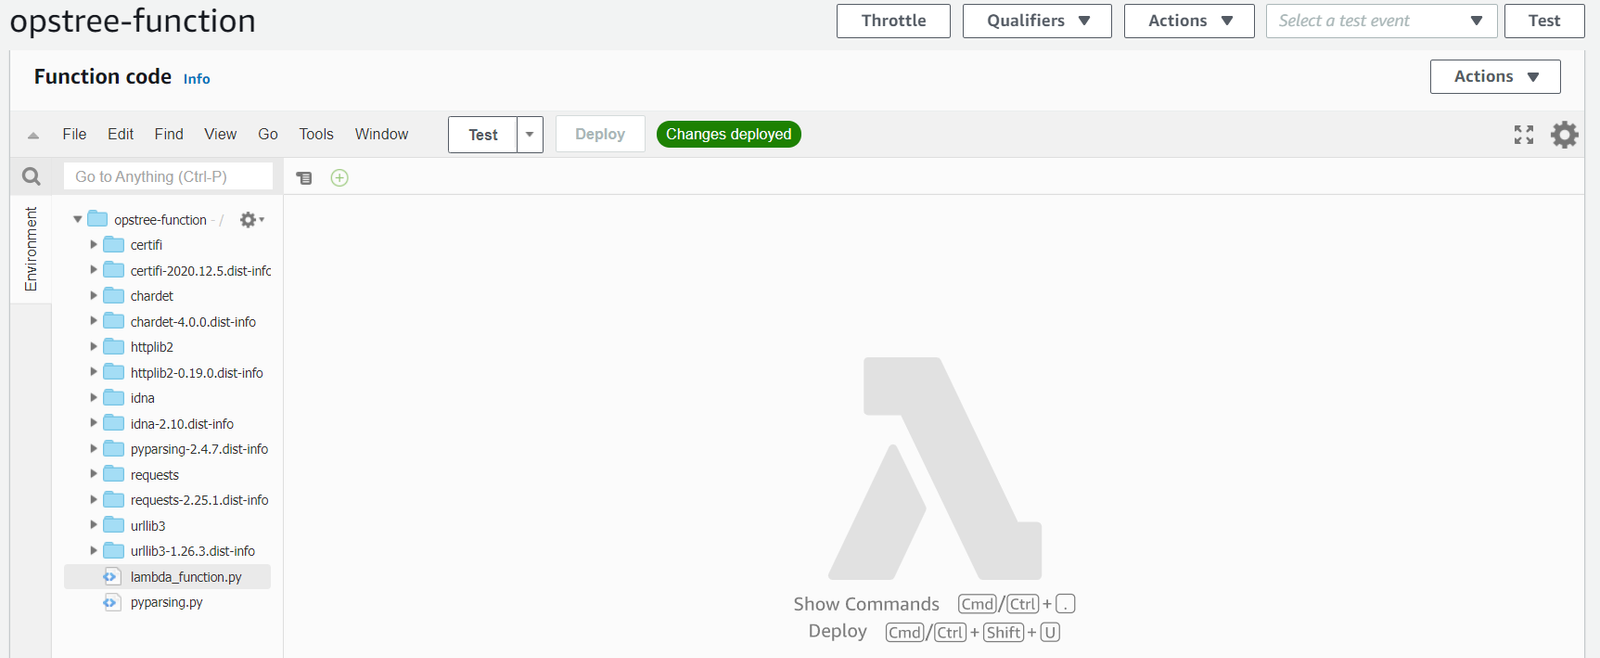
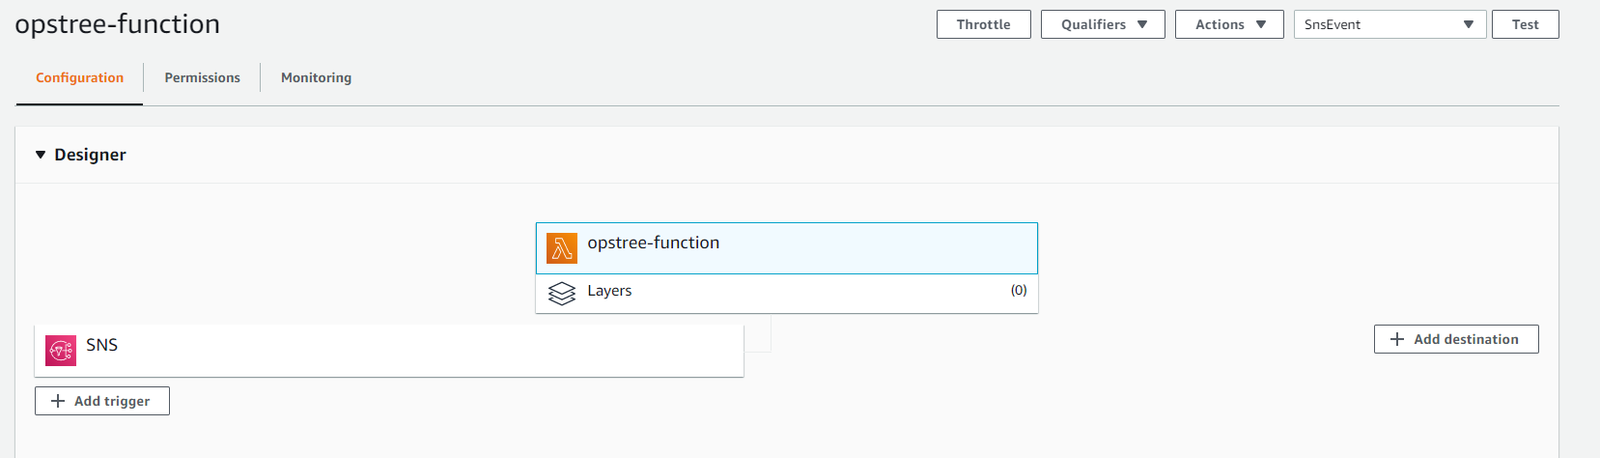
Once uploading process completed, it will give a pop-up of “code change”, click “OK”. AWS Lambda automatically unzip the code bundle and place content into the root directory of Lambda function which is “opstree-function” in our case.
Step 2: Check all uploaded files & folders and also check the code that you specified.
Step 3: Under “Runtime settings” section of Lambda function, change the runtime setting according to filename & handler name. This setting needs to be accurate & correct. Otherwise, your function will not call and generate error rather than functioning properly.
For the time being, we are not changing anything. we used the default file path name & function name.
We are done with Google chat integration with AWS Lambda by uploading the python code bundle under the specified AWS Lambda function.
Manual event Trigger
At the moment, we create a “testing event” which will be used to check whether our code is working fine or not by triggering manual event using Lambda dashboard. AWS Lambda already provides multiple templates which basically contains JSON format output event response to test specific integration between Lambda and AWS resource [like SNS]. We will create a manual event and use default SNS JSON event response which will use in manual trigger.
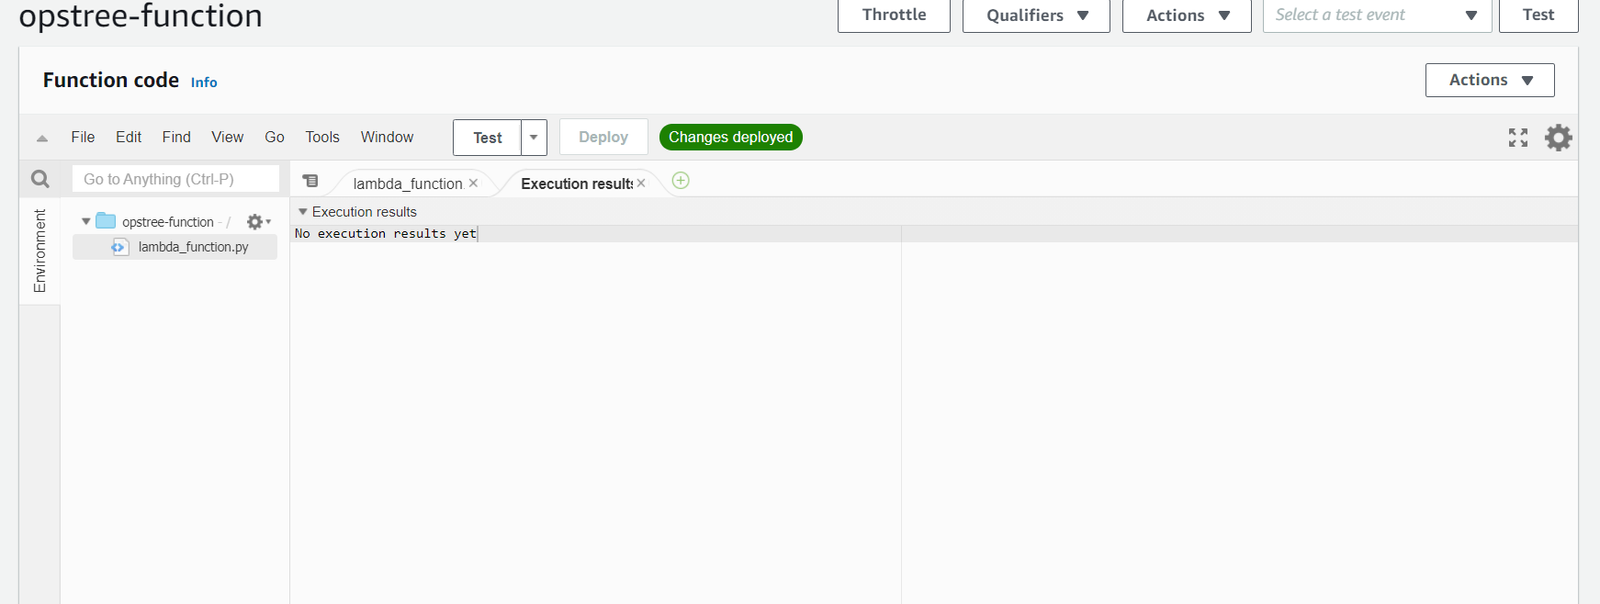
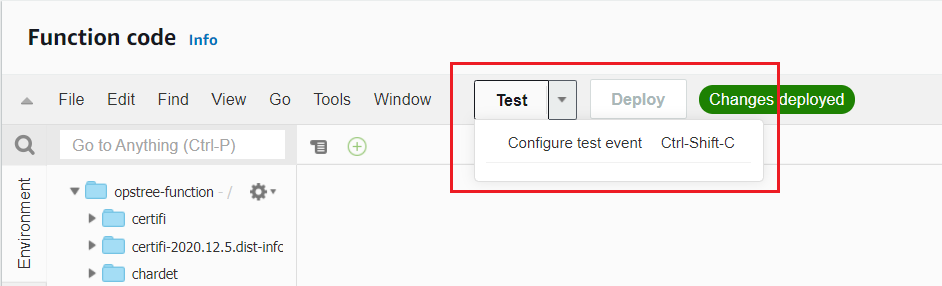
Step 1: Under Function code of AWS Lambda, click on “Test” and “Configure test event”.
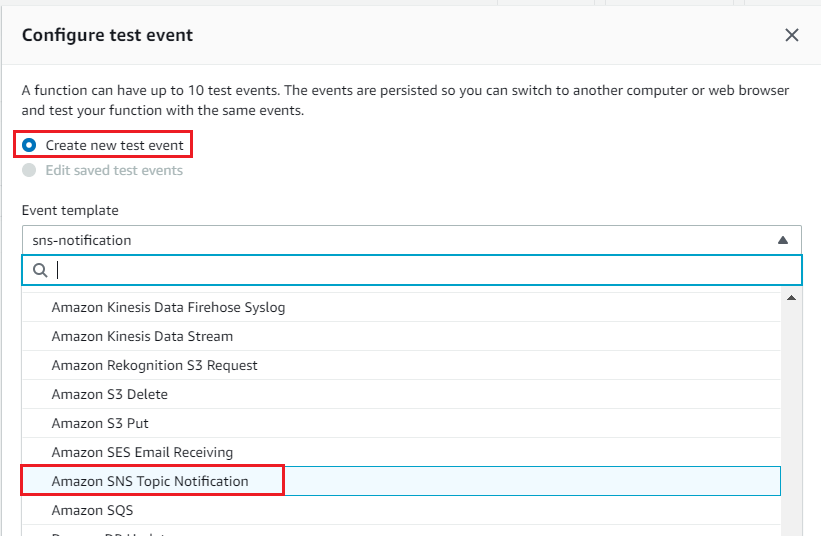
Step 2: Click “create new test event” and under Event template select “Amazon SNS Topic Notification”
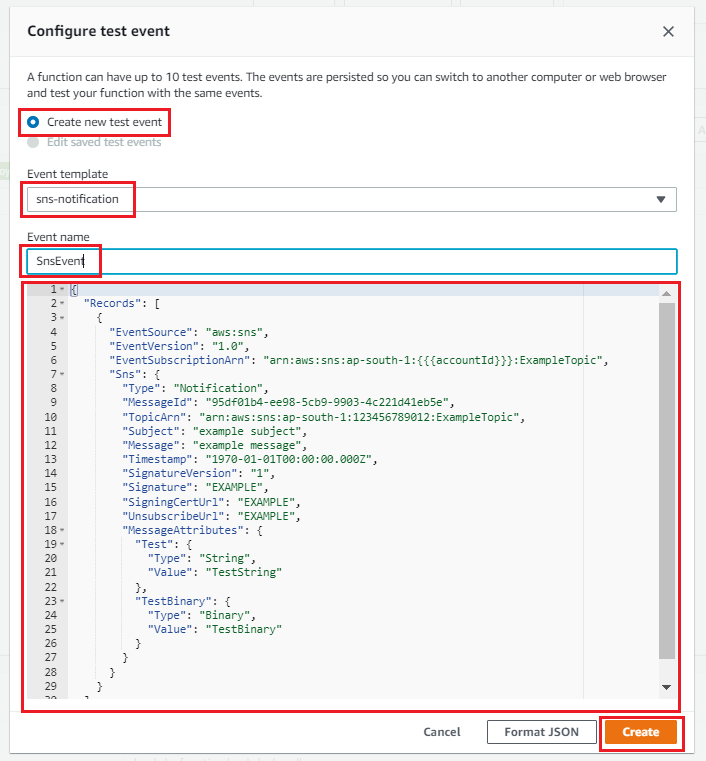
Step 3: After selecting the SNS template, give a proper event name. Once you provide all values, click “Create”
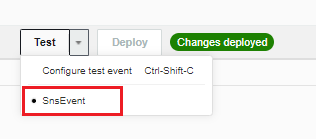
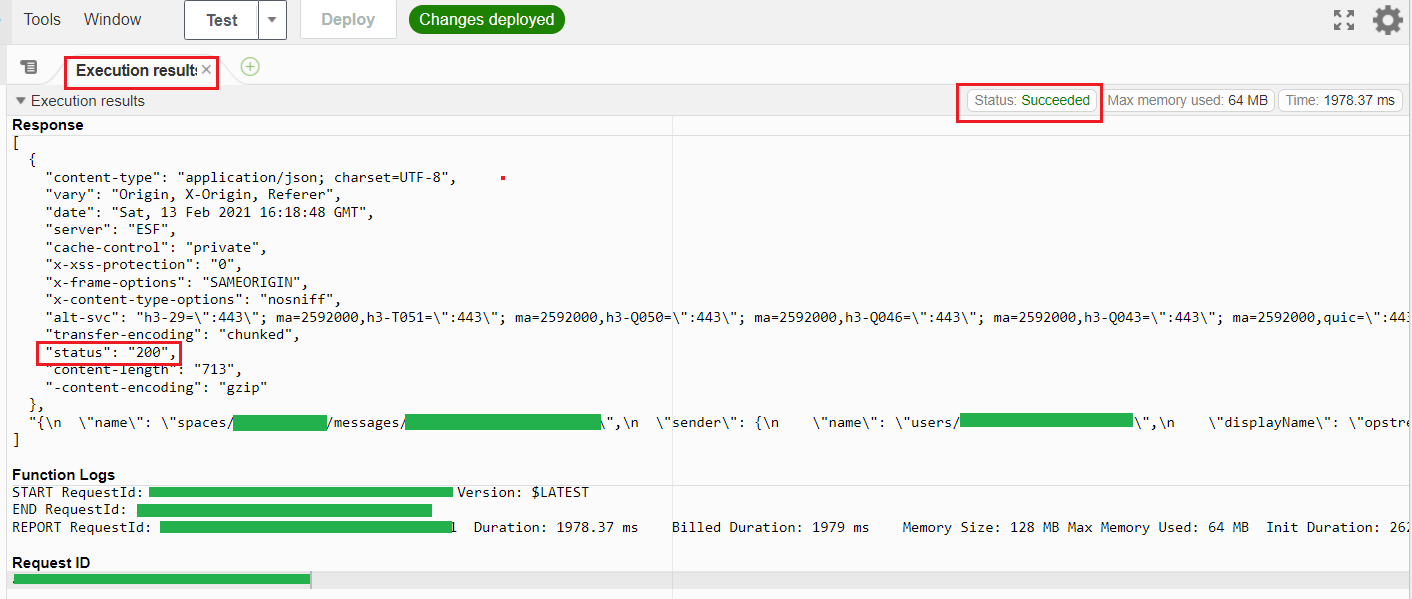
Step 4: Once you create test event having SNS JSON event response template, under “Function code” click “drop-down arrow” and select the test event that you created. Once you select specific test event, click “test” to execute Lambda and wait for Lambda to execute the function and generate execution result
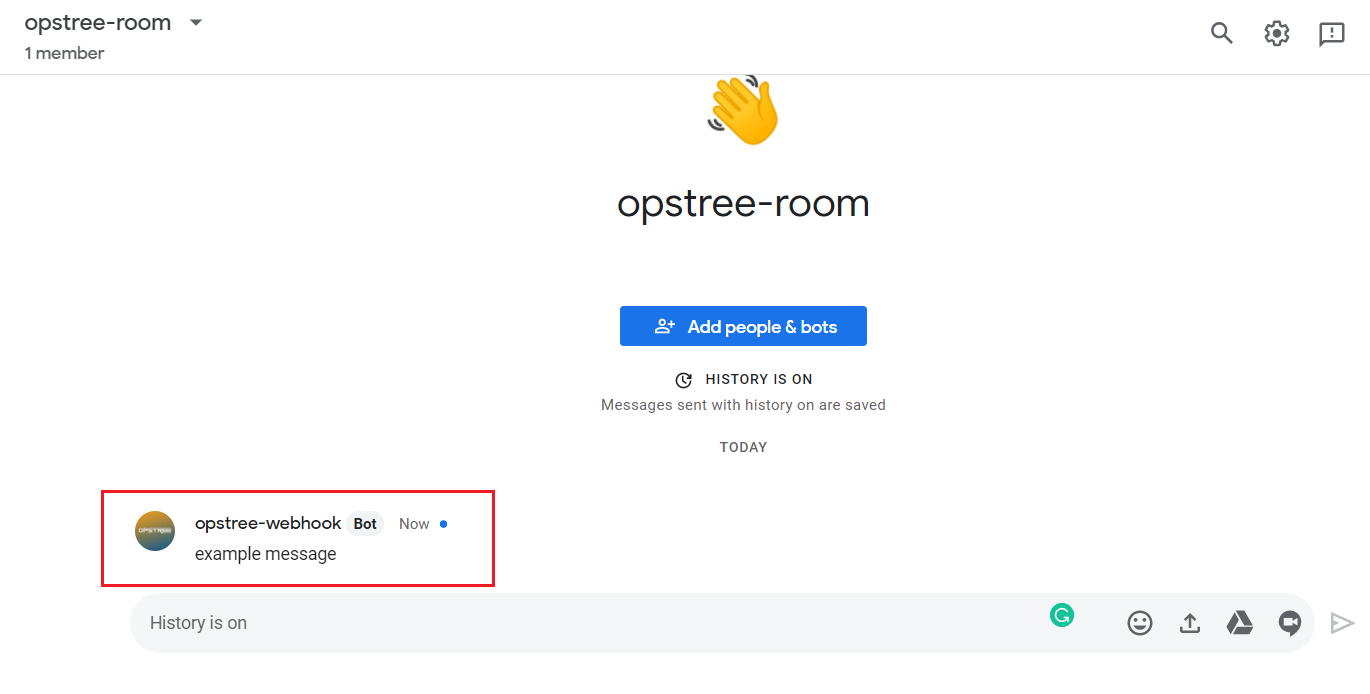
Step 5: Once Lambda executed, it will prompt the execution result that the Lambda function executed successfully [ gave 200 status ] & it sends a response or bot message to google chat webhook.
Step 6: At the moment, Lambda executed successfully which means, it trigger bot message to Google chat room webhook URL. Check Google chat room for testing response
We have accomplished Lambda function containing custom code which integrated with Google chat webhook URL.
Flow diagram
AWS SNS
We will create a Simple notification service topic or SNS topic and create a SNS subscription that will integrate with AWS Lambda. As of now, we are creating SNS topic without SNS subscription attached to it.
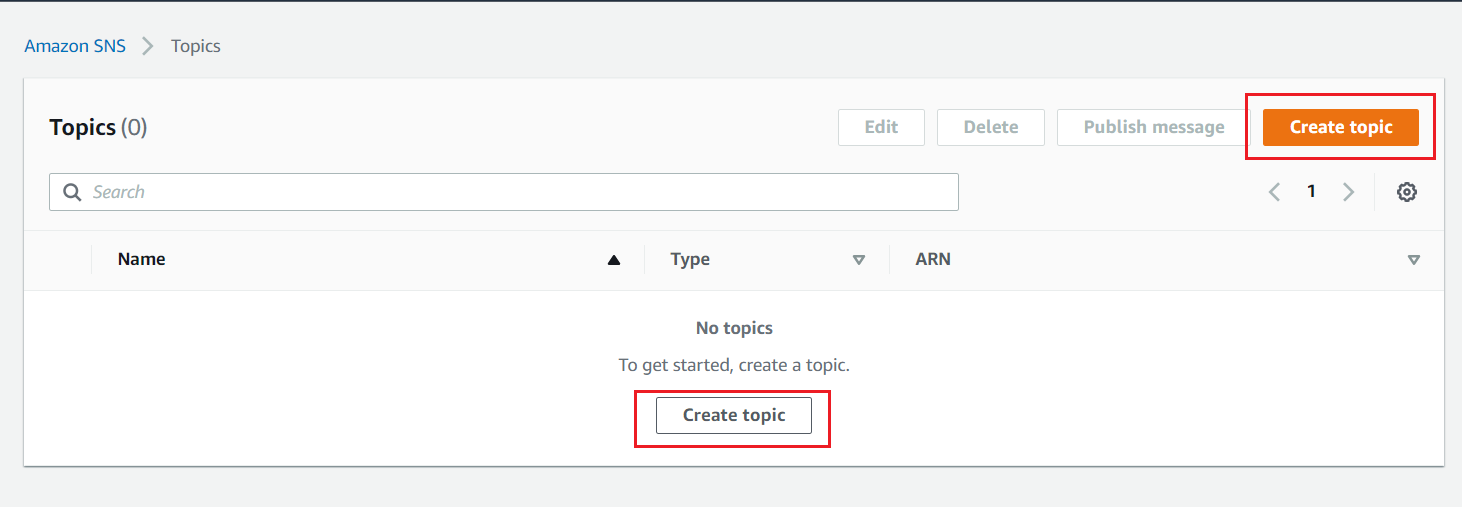
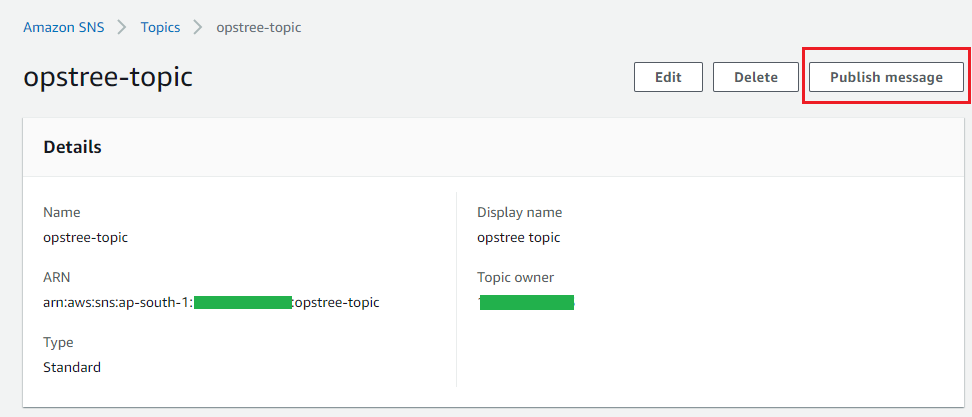
Step 1: To create SNS topic, Under Topic of Amazon SNS, Click “topic” and under that, click on “create topic”.
Step 2: Provide configuration details like “topic type”, “Topic Name” & “display name” and let other options be set as default.
Once topic created, you will see that there is no subscription defined or found under specific topic. Subscription is responsible for integration between AWS SNS topic and other resources like Lambda, email, etc. We’re now done with the AWS SNS topic part which is used to publish messages but there is no integration between AWS SNS & AWS Lambda. For that, we need an AWS SNS subscription that attaches to a specific SNS topic and AWS Lambda resource.
Flow diagram
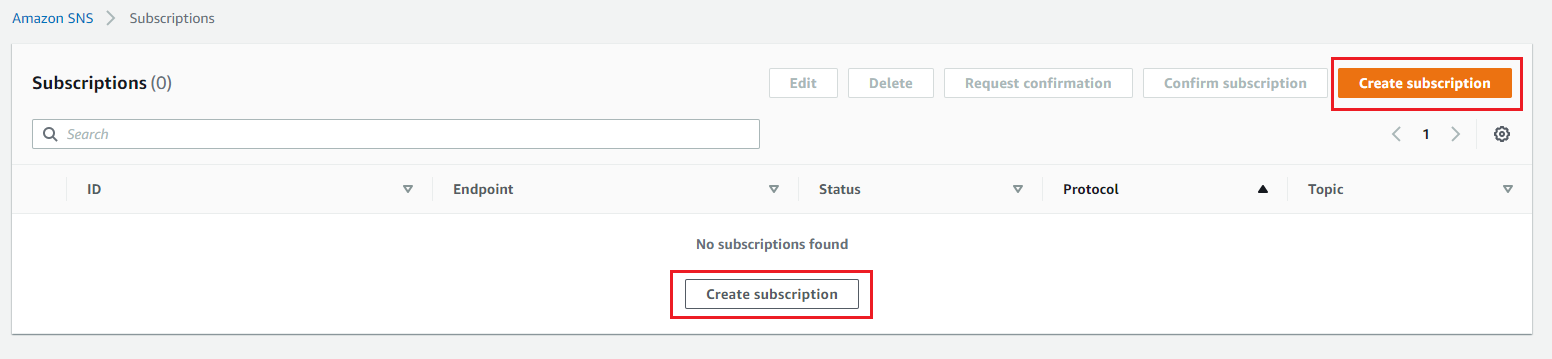
SNS Subscription for AWS SNS & Lambda Integration
Under this section, we will create a AWS SNS subscription which is basically responsible for integration between AWS SNS topic & AWS Lambda.
Step 1: Under the SNS dashboard, Click “create subscription”
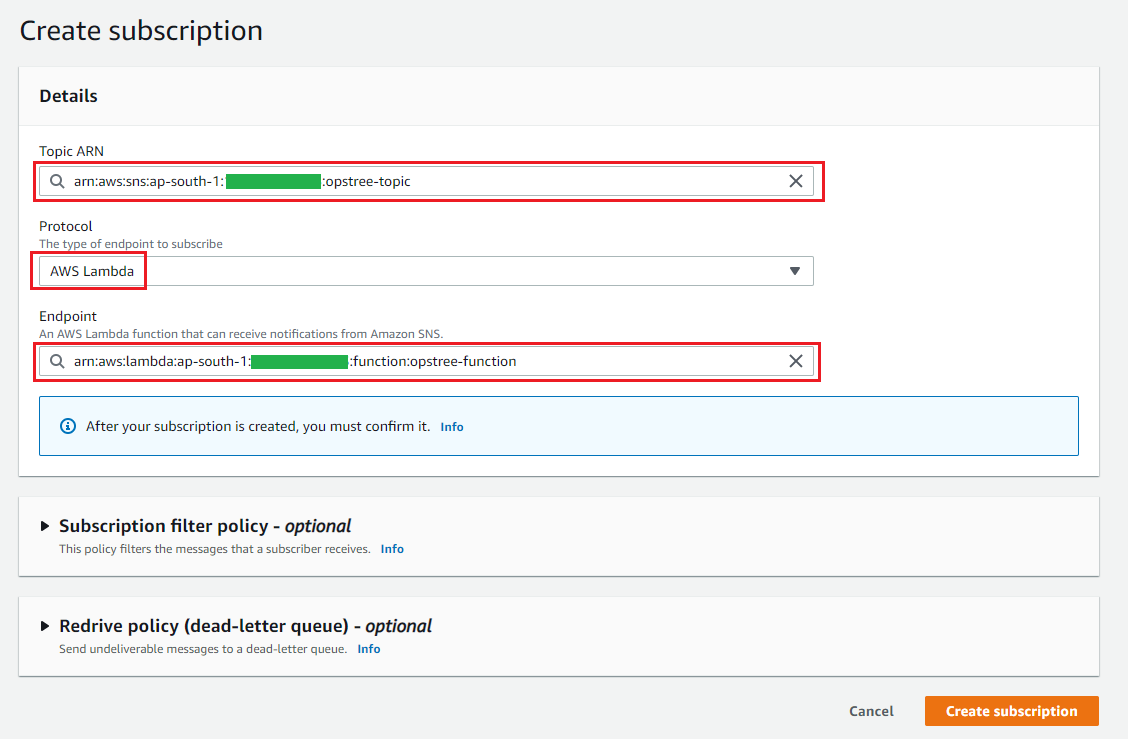
Step 2: Provide topic ARN that we created, provide “AWS Lambda” as protocol, and select endpoint of AWS Lambda that we created
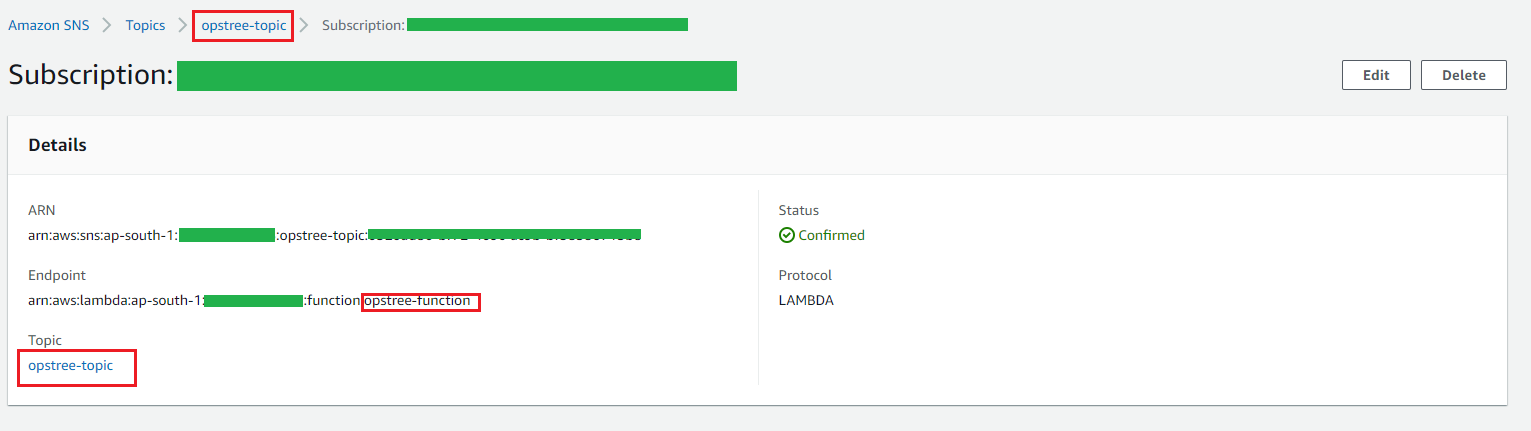
Step 3: Once SNS subscription created, it is configured under the specified topic that you provided while creating SNS subscription
Step 4: Check SNS topic subscription list, you will see Endpoint & Lambda protocol specified subscription
Step 5: Now, go to the Lambda dashboard and open the specified Lambda to check the trigger
You will see that after creating subscription with a specified Lambda protocol, it automatically creates a trigger for AWS Lambda as shown in the above diagram. We are almost done with everything. Let’s manually “publish message” to make sure everything is working fine from AWS SNS to AWS Lambda.
Manual publish message
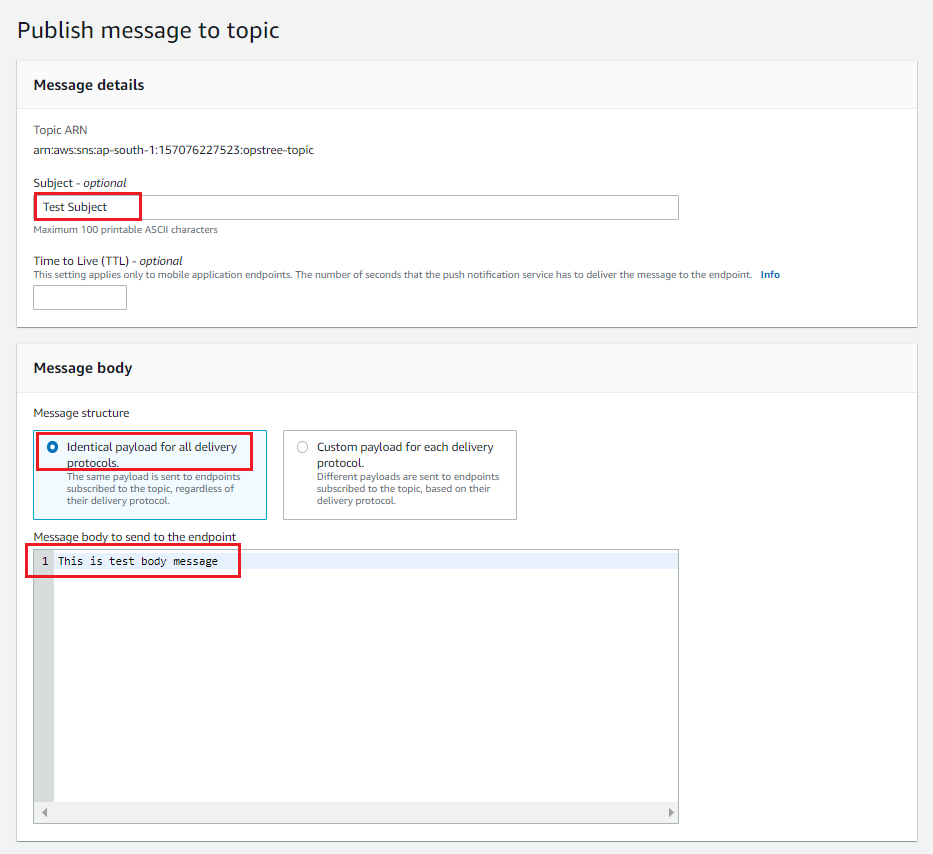
AWS SNS topic support manual trigger to “Publish message” which takes basic information like subject, TTL & message body.
Step 1: Under SNS topic section, select SNS topic click “publish message” for a manual trigger from SNS
Step 2: Provide “subject” & “raw message” and let other options default. After providing values, click on “Publish message”.
After that, it will prompt for other messages and provide you the message ID which you can use to debug things on the AWS Lambda side.
Step 3: Once message published successfully, go to Google chat room to check whether you receiver notification or not.
Once message published successfully, the AWS SNS & Google chat room integration part completed.
Flow diagram
Final thought
The above representation is not fully configured because only manual triggers take place. It is basically use to check the response & behaviour and also use to check the working of resources and their integration . We need to integrate AWS SNS topic to specific AWS resources like Cloudwatch alarm to automatically generate message depending on the criteria and relay those generated message through AWS SNS which will later transfer to Lambda function in the JSON format which trigger the Webhook URL. The above blog/context is for Google chat webhook URL which can be replace by other communication platform webhook URL which definitely require few changes in custom code.
In our day-to-day lives, we take a lot of things for granted. Our body, our friends, water, the food we eat, clothes we wear, IP address of our host, FQDN of our favorite websites, etc. In our ignorance, we forget to consider how our lives would be without them. Let’s discuss the leisure of friends, food, etc sometime later. For now, we’ll limit our thoughts to how DHCP and DNS are managed in AWS, both of which are the backbone to connections among hosts and servers over a network.
A few days back, when I was trying to install snoopy on my system, I came across an apt-key error. I have faced this error before as well but this time I tried to dig more into the issue. After all, we can’t let the same problem trouble us more than it has to.
When we run into such obstacles, they present good opportunities to break down and understand how things work. We must avail them and become better at our jobs. That being said, we do also have an outstanding community online to help provide solutions with reliable references without getting our hands dirty.
Let’s start with this screenshot of the error I encountered:
Hello everyone! If you are reading this blog, I assume that you have already gone through the first part of my blog. In case, you haven’t, I suggest you to go through the link before reading this blog.
Let’s recall the concept of the first part of this series with some simple principles :
D.R.Y(Don’t Repeat Yourself): Not to repeat the same process of writing and maintaining Kubernetes resources repeatedly for even the simplest of deployments.
Focus on what, not how: Helm is a package manager for Kubernetes that allows developers and operators to more easily, package, configure, and deploy applications and services onto the Kubernetes clusters.
In this part, we will be starting with Helm and will give a kick start so that by the end of this article we will be able to search & use publicly available Helm Charts of various software or application dependencies and install them on our K8s cluster.
Helm Glossary
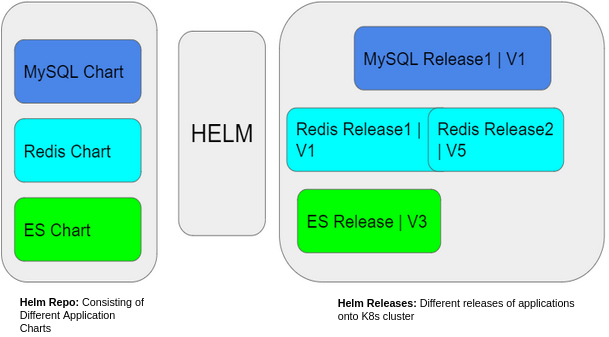
Helm Chart Repository: A repository is a place where packaged charts of an application can be collected and shared.
Helm Charts: Helm packages are called charts. It contains all the resource definitions that are necessary to run an application, tool, or service inside a K8s cluster.
Helm Release: A Helm release is an instance of a chart running in a K8s cluster.
Once you have Helm ready, we can add a chart repository. We can choose our desired one from the artifacts hub. Here we are going with Stable Library, adding the repo named as stable :
Additionally, after adding repo in our local system, we update the repo to get the latest information about charts from the respective chart repositories. And we can list out the repositories added to our system using $ helm repo list as shown above.
Removing added repositories in our system is as easy as adding them.
$ helm repo remove stable.
Once the repository has been added, Helm provides search functionality which gives the ability to search for Helm charts in the various places they can be stored including the Helm Hub and repositories. Here, we will be installing MySQL from the publicly available Helm Chart of the repo which has been added.
$ helm search repo stable
$ helm search repo mysql
As we all know, Helm saves us from writing all K8s resources for a package as it already comes with versioned, pre-configured application resources that can be deployed as one unit. But to see what all resources and environment values are configured for the application, we can check using :
$ helm template stable/mysql
$ helm show values stable/mysql
Now we are all set to install MySQL onto K8’s cluster and take a quick walk-through about Helm Release. To install a new package we use helm install command. At its simplest, it takes two arguments: A release name that we pick and the name of the chart that we want to install.
$ helm install mysqlapp stable/mysql
Additionally, to check the release of all the installed packages use $ helm ls as shown below.
The point of focus is on the Revision of the Release i.e; 1 as shown above. Here, we used the default configuration of the MySQL chart. Needless to say, we’d want to customize the chart with our preferred configuration most of the time and bring a new version of the application release. To achieve this, we simply use $ helm upgrade command. Here we are updating some default environment values of MySQL with our required ones.
To check user-provided values and the upgrade of our release, we can use $ helm get values mysqlapp and $ helm ls commands respectively. Also, here we see the revision value has been changed to 2 as shown above which will keep on incrementing with every upgrade.
And when it is time to uninstall a release from the cluster, we use the helm uninstall command:
$ helm uninstall mysqlapp
Finally, we can say that we are comfortable to get started with Helm and to install our first release using publicly available Helm Charts in our K8s cluster. At this point, we’d like to recommend our readers to install a couple of applications using these public Helm Charts and share their experience in the comment section.