SonarQube Integration with Azure DevOps

What is SonarQube ?

In simple words, SonarQube is an open-source tool for continuous inspection of code quality. It does static code analysis, provides a detailed report of bugs, code smells, vulnerabilities and code duplications.

SonarQube integration with Azure DevOps

We can utilize built-in Azure DevOps tasks for SonarQube which helps us to incorporate this tool into our CI/CD pipelines. We will learn that with a use case.

Lets begin 🙂

Continue reading “SonarQube Integration with Azure DevOps”

Automatically Backup Alibaba MySQL using Grandfather-Father-Son Strategy


So, basically what is Grandfather-father-son or GFS?

GFS backup is a common rotation scheme for backup, in which there are three or more backup cycles, such as daily, weekly, and monthly. Typically, It consists of daily backups (son, at fixed intervals of hours in a day), a weekly full backup (father, once a week), and monthly full backup (Grandfather, once a month).

Continue reading “Automatically Backup Alibaba MySQL using Grandfather-Father-Son Strategy”

Best Practices for Writing a Shell Script

I am a lazy DevOps Engineer. So whenever I came across the same task more than 2 times I automate that. Although now we have many automation tools, still the first thing that hit into our mind for automation is bash or shell script.
After making a lot of mistakes and messy scripts :), I am sharing my experiences for writing a good shell script which not only looks good but also it will reduce the chances of error.

The things that every code should have:-
     – A minimum effort in the modification.
     – Your program should talk in itself, so you don’t have to explain it.
     – Reusability, Of course, I can’t write the same kind of script or program again and again.

I am a firm believer in learning by doing. So let’s create a problem statement for ourselves and then try to solve it via shell scripting with best practices :). I would like to have solutions in the comment section of this blog.


Problem Statement:- Write a shell script to install and uninstall a package(vim) depending on the arguments. The script should tell if the package is already installed. If no argument is passed it should print the help page.

So without wasting time let’s start for writing an awesome shell script. Here is the list of things that should always be taken care of while writing a shell script.

Lifespan of Script

If your script is procedural(each subsequent steps relies on the previous step to complete), do me a favor and add set -e in starting of the script so that the script exists on the first error. For example:-

#!/bin/bash
set -e # Script exists on the first failure
set -x # For debugging purpose

Functions

Ahha, Functions are my most favorite part of programming. There is a saying

Any fool can write code that a computer can understand. Good programmers write code that humans can understand. 

To achieve this always try to use functions and name them properly so that anyone can understand the function just by reading its name. Functions also provide the concept of re-usability. It also removes the duplicating of code, how? let’s see this

#!/bin/bash 
install_package() {
   local PACKAGE_NAME="$1"
   yum install "${PACKAGE_NAME}" -y
}
install_package "vim"

Command Sanity

Usually, scripts call other scripts or binary. When we are dealing with commands there are chances that commands will not be available on all systems. So my suggestion is to check them before proceeding.

#!/bin/bash  
check_package() {
    local PACKAGE_NAME="$1"
    if ! command -v "${PACKAGE_NAME}" > /dev/null 2>&1
    then
           printf "${PACKAGE_NAME} is not installed.\n"
    else
           printf "${PACKAGE_NAME} is already installed.\n"
    fi
}
check_package "vim"

Help Page

If you guys are familiar with Linux, you have certainly noticed that every Linux command has its help page. The same thing can be true for the script as well. It would be really helpful to include –help flag.

#!/bin/bash  
INITIAL_PARAMS="$*"
help_function() {
   {
        printf "Usage:- ./script <option>\n"
        printf "Options:\n"
        printf " -a ==> Install all base softwares\n"
        printf " -r ==> Remove base softwares\n"
    }
}
arg_checker() {
     if [ "${INITIAL_PARAMS}" == "--help" ]; then
            help_function
     fi
}
arg_checker

Logging

Logging is the most critical thing for everyone whether he is a developer, sysadmin or DevOps. Debugging seems to be impossible without logs. As we know most applications generate logs for understanding that what is happening with the application, the same practice can be implemented for shell script as well. For generating logs we have a bash utility called logger.

#!/bin/bash 
DATE=$(date)
declare DATE
check_file() {
     local FILENAME="$1"
     if ! ls "${FILENAME}" > /dev/null 2>&1
     then
            logger -s "${DATE}: ${FILENAME} doesn't exists"
     else
           logger -s "${DATE}: ${FILENAME} found successfuly"
     fi
}
check_file "/etc/passwd"

Variables

I like to name my variables in Capital letters with an underscore, In this way, I will not get confused with the function name and variable name. Never give a,b,c etc. as a variable name instead of that try to give a proper name to a variable as well just like functions.

#!/bin/bash 
# Use declare for declaring global variables
declare GLOBAL_MESSAGE="Hey, I am a global message"
# Use local for declaring local variables inside the function
message_print() {
    local LOCAL_MESSAGE="Hey, I am a local message"
    printf "Global Message:- ${GLOBAL_MESSAGE}\n"
    printf "Local Message:- ${LOCAL_MESSAGE}\n"
}
message_print

Cases

Cases are also a fascinating part of shell script. But the question is when to use this? According to me if your shell program is providing more than one functionality basis on the arguments then you should go for cases. For example:- If your shell utility provides the capability of installing and uninstalling the software.

#!/bin/bash  
print_message() {
    MESSAGE="$1"
    echo "${MESSAGE}"
}
case "$1" in
   -i|--input)
      print_message "Input Message"
      ;;
   -o|--output)
        print_message "Output Message"
        ;;
   --debug)
       print_message "Debug Message"
       ;;
    *)
      print_message "Wrong Input"
      ;;
esac

In this blog, we have covered functions, variables, the lifespan of a script, logging, help page, command sanity. I hope these topics help you in your daily life while using the shell script. If you have any feedback please let me know through comments.
Cheers Till the next Time!!!!

Can you integrate a GitHub Webhook with Privately hosted Jenkins No? Think again

Introduction

Triggering Jenkins builds automatically after every code commit is a core requirement in any continuous integration setup. Jenkins supports automated triggers through repository polling or event based notifications. While polling works, it consumes resources and introduces delays. Push based triggering through webhooks is far more efficient.

The difficulty appears when Jenkins is hosted inside a private network and the version control system is hosted on a cloud platform such as GitLab. In this scenario, GitLab cannot directly reach the Jenkins endpoint, making webhook based triggering difficult without exposing Jenkins publicly.

Webhook Relay solves this problem by acting as a secure bridge between GitLab and a privately hosted Jenkins server. This article explains how GitLab webhooks can trigger Jenkins jobs using Webhook Relay, based on real implementation experience.

Installing the Webhook Relay Agent

The Webhook Relay agent needs to run on the same machine where Jenkins is hosted or where Jenkins is reachable internally.

Below is the installation process shown as step based instructions.

# download the relay binary
curl -sSL https://storage.googleapis.com/webhookrelay/downloads/relay-linux-amd64 > relay
# make the binary executable
chmod +x relay

# move it to a directory in system path
sudo mv relay /usr/local/bin/relay

Webhook Relay service runs on a public endpoint, while this agent runs locally and listens for forwarded webhook events.

Creating a Webhook Relay Account

Create an account on the official Webhook Relay platform using the registration page shown below.

https://my.webhookrelay.com/register

After signing up, access to the Webhook Relay dashboard is provided, where authentication tokens can be generated.

Authenticating the Relay Agent

From the dashboard, create an access token. This generates a key and secret pair.

Use those credentials to authenticate the relay agent.

relay login \
-k
<your_token_key> \
-s <your_token_secret>

A successful login message confirms that the agent is connected and ready.

Creating the GitLab Repository

Create a GitLab repository for testing webhook integration. To keep the setup simple, a public repository can be used.

For reference, assume the repository name is WebhookProject.

Preparing Jenkins for GitLab Webhooks

Install the required Jenkins plugins from the plugin manager.

Navigate through the Jenkins dashboard to install
GitLab Plugin
GitLab Hook Plugin

Once installed, Jenkins becomes capable of receiving GitLab webhook events.

Creating the Jenkins Job

Create a new Jenkins job and configure it to pull source code from the GitLab repository.

Enable the option that allows Jenkins to be triggered by GitLab webhooks.

After enabling this option, Jenkins generates a webhook endpoint associated with the job. It usually follows this pattern.

http://<jenkins-host>:8080/project/<job-name>

Example shown for reference only.

Copy this endpoint, as it will be used in the forwarding configuration.

Forwarding Webhooks Using Webhook Relay

Start webhook forwarding by creating a relay bucket. This bucket acts as a routing channel between GitLab and Jenkins.

relay forward \
--bucket gitlab-jenkins \
http://<jenkins-host>:8080/project/<job-name>

Important note
Do not stop this process. Keep it running in the background.
Open a new terminal tab for further steps.

Once this command starts, the relay agent generates a public forwarding URL.

Configuring GitLab Webhook

Open the GitLab repository settings and navigate to the integrations or webhook section.

Paste the forwarding URL generated by Webhook Relay into the webhook URL field.

For initial testing, SSL verification can be disabled to avoid certificate related issues.

Save the webhook configuration.

Testing the Integration

Clone the GitLab repository locally and push a new commit.

git add .
git commit -m "test webhook trigger"
git push origin main

As soon as the push is completed, GitLab sends a webhook event. Webhook Relay receives it and forwards it to the local agent, which triggers the Jenkins job internally.

You can verify this by checking the Jenkins job build history.

Viewing Logs

GitLab webhook logs can be viewed from
Repository settings
Integrations
Webhook edit section

Webhook Relay logs are available in the Relay Logs section of the Webhook Relay dashboard.

Jenkins build logs confirm successful job execution.

Conclusion

Webhook Relay makes it possible to trigger Jenkins builds through GitLab webhooks even when Jenkins is hosted inside a private network. This approach avoids exposing Jenkins publicly while still enabling real time CI automation.

The same pattern works for GitHub and other webhook enabled platforms. With proper configuration, secure and efficient CI workflows can be achieved in restricted network environments.

Log Parsing of Windows Servers on Instance Termination

Introduction

Logs play a critical role in any application or system. They provide deep visibility into what the application is doing, how requests are processed, and what caused an error. Depending on how logging is configured, logs may contain transaction history, timestamps, request details, and even financial information such as debits or credits.

In enterprise environments, applications usually run across multiple hosts. Managing logs across hundreds of servers can quickly become complex. Debugging issues by manually searching log files on multiple instances is time consuming and inefficient. This is why centralizing logs is considered a best practice.

Recently, I encountered a common challenge in AWS environments where application logs need to be retained from instances running behind an Auto Scaling Group. This blog explains a practical solution to ensure logs are preserved even when instances are terminated.

Problem Scenario

Assume your application writes logs to the following directory on a Windows instance.

C:\Source\Application\web\logs

Traffic to the application is variable. At low traffic, two EC2 instances may be sufficient. During peak traffic, the Auto Scaling Group may scale out to twenty or more instances.

When traffic increases, new EC2 instances are launched and logs are generated normally. However, when traffic drops, Auto Scaling triggers scale-down events and terminates instances. When an instance is terminated, all logs stored locally on that instance are lost.

This makes post-incident debugging and auditing difficult.

Solution Overview

The goal is to synchronize logs from terminating EC2 instances before they are fully removed.

This solution uses AWS services to trigger a PowerShell script through AWS Systems Manager at instance termination time. The script archives logs and uploads them to an S3 bucket with identifying information such as IP address and date.

To achieve this, two prerequisites are required.

  1. Systems Manager must be able to communicate with EC2 instances

  2. EC2 instances must have permission to write logs to Amazon S3

Environment Used

For this setup, the following AMI was used.

 
Microsoft Windows Server 2012 R2 Base
AMI ID: ami-0f7af6e605e2d2db5

Step 1 Configuring Systems Manager Access on EC2

SSM Agent is installed by default on Windows Server 2016 and on Windows Server 2003 to 2012 R2 AMIs published after November 2016.

For older Windows AMIs, EC2Config must be upgraded and SSM Agent installed alongside it.

The following PowerShell script upgrades EC2Config, installs SSM Agent, and installs AWS CLI.
Use this script only for instructional and controlled environments.

PowerShell Script to Install Required Components

 
# Create temporary directory if not present
if (!(Test-Path -Path C:\Tmp)) {
New-Item -ItemType Directory -Path C:\Tmp
}

Set-Location C:\Tmp

# Download installers
Invoke-WebRequest "https://s3.ap-south-1.amazonaws.com/asg-termination-logs/Ec2Install.exe" -OutFile Ec2Config.exe
Invoke-WebRequest "https://s3.amazonaws.com/ec2-downloads-windows/SSMAgent/latest/windows_amd64/AmazonSSMAgentSetup.exe" -OutFile ssmagent.exe
Invoke-WebRequest "https://s3.amazonaws.com/aws-cli/AWSCLISetup.exe" -OutFile awscli.exe

# Install EC2Config
Start-Process C:\Tmp\Ec2Config.exe -ArgumentList "/Ec /S /v/qn" -Wait
Start-Sleep -Seconds 20

# Install AWS CLI
Start-Process C:\Tmp\awscli.exe -ArgumentList "/Ec /S /v/qn" -Wait
Start-Sleep -Seconds 20

# Install SSM Agent
Start-Process C:\Tmp\ssmagent.exe -ArgumentList "/Ec /S /v/qn" -Wait
Start-Sleep -Seconds 10

Restart-Service AmazonSSMAgent

Remove-Item C:\Tmp -Recurse -Force

IAM Role for Systems Manager

The EC2 instance must have an IAM role that allows it to communicate with Systems Manager.

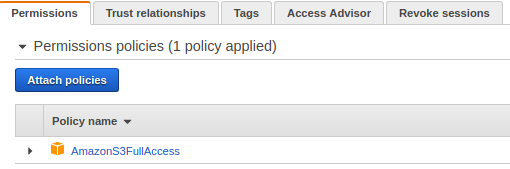
Attach the following managed policy to the instance role.

 
AmazonEC2RoleforSSM

Once attached, the role should appear under the instance IAM configuration.

index

Step 2 Allowing EC2 to Write Logs to S3

The EC2 instance also needs permission to upload logs to S3.

Attach the following policy to the same IAM role.

 
AmazonS3FullAccess

In production environments, it is recommended to scope this permission to a specific bucket.

index

PowerShell Script for Log Archival and Upload

Save the following script as shown below.

 
C:\Scripts\termination.ps1

This script performs the following actions.

  • Creates a date-stamped directory

  • Archives application logs

  • Uploads the archive to an S3 bucket

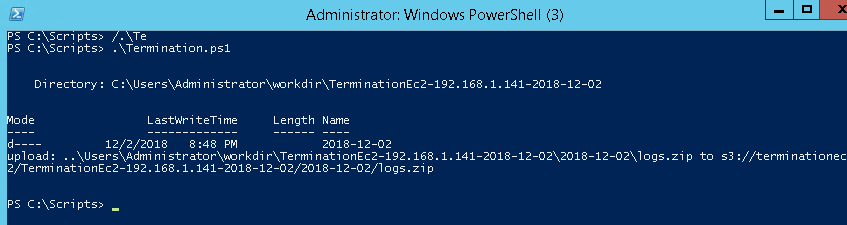
Log Synchronization Script

 
$Date = Get-Date -Format yyyy-MM-dd
$InstanceName = "TerminationEc2"
$LocalIP = Invoke-RestMethod -Uri "http://169.254.169.254/latest/meta-data/local-ipv4"

$WorkDir = "C:\Users\Administrator\workdir\$InstanceName-$LocalIP-$Date\$Date"

if (Test-Path $WorkDir) {
Remove-Item $WorkDir -Recurse -Force
}

New-Item -ItemType Directory -Path $WorkDir

$SourcePathWeb = "C:\Source\Application\web\logs"
$DestFileWeb = "$WorkDir\logs.zip"

Add-Type -AssemblyName "System.IO.Compression.FileSystem"
[System.IO.Compression.ZipFile]::CreateFromDirectory($SourcePathWeb, $DestFileWeb)

& "C:\Program Files\Amazon\AWSCLI\bin\aws.cmd" s3 cp `
"C:\Users\Administrator\workdir" `
"s3://terminationec2" `
--recursive `
--region us-east-1

Once executed manually, the script should complete successfully and upload logs to the S3 bucket.

index

index

Running the Script Using Systems Manager

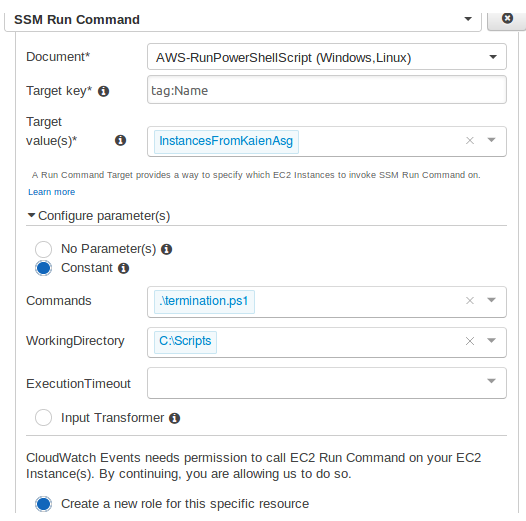
To automate execution, run this script using Systems Manager Run Command.

Select the target instance and choose the document.

 
AWS-RunPowerShellScript

Configure the following.

 
Commands: .\termination.ps1
Working Directory: C:\Scripts
Execution Timeout: 3600

Auto Scaling Group Preparation

Ensure the AMI used by the Auto Scaling Group includes all the above configurations.

Create an AMI from a configured EC2 instance and update the launch configuration or launch template.

For this tutorial, the Auto Scaling Group is named.

 
group_kaien

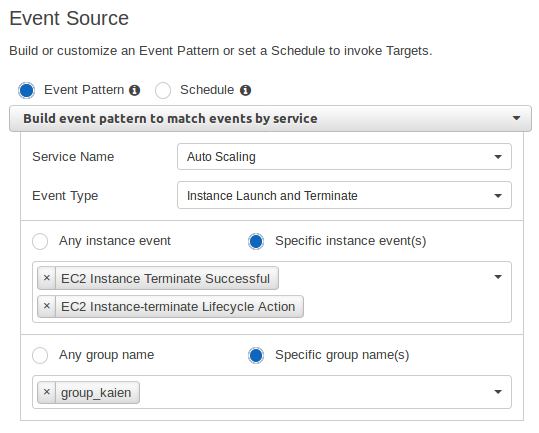
Configuring CloudWatch Event Rule

Create a CloudWatch Event rule to trigger when an instance is terminated.

Event Pattern

 
{
"source": ["aws.autoscaling"],
"detail-type": [
"EC2 Instance Terminate Successful",
"EC2 Instance-terminate Lifecycle Action"
],
"detail": {
"AutoScalingGroupName": ["group_kaien"]
}
}
 
index

Event Target Configuration

Set the target as Systems Manager Run Command.

 
Document: AWS-RunPowerShellScript
Target: Instance ID
Command: .\termination.ps1
Working Directory: C:\Scripts

This ensures that whenever an instance is terminated, the PowerShell script runs and synchronizes logs to S3 before shutdown.

index

Validation

Trigger scale-out and scale-down events by adjusting Auto Scaling policies.

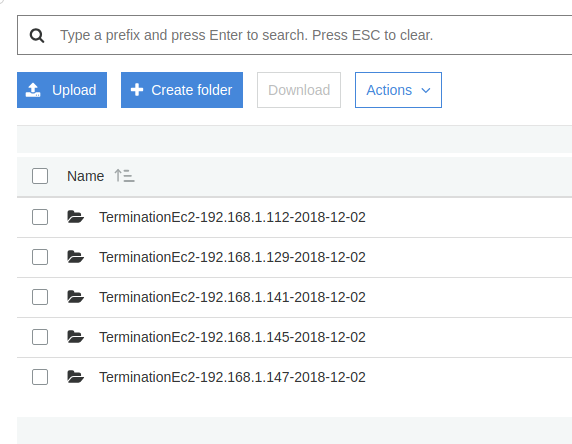
When instances are terminated, logs should appear in the S3 bucket with correct date and instance identifiers.

index

Conclusion

This setup ensures that application logs are safely preserved even when EC2 instances are terminated by an Auto Scaling Group. Logs are archived with proper timestamps and instance information, making debugging and auditing much easier.

With this approach, log retention is automated, reliable, and scalable for enterprise AWS environments.

Stay tuned for more practical infrastructure solutions.