Its not you Everytime, sometimes issue might be at AWS End

Today an issue reported to me that website of our client was loading very slow which was hosted on AWS Windows server and the same website was loading fine when accessed from outside AWS network,I just felt like might be a regular issue but it all together took me to an inside out of the network troubleshooting.

Initially, we checked for SSL certificate expiry, which was not the case, so below are the Two steps which we used to troubleshoot the issue:

Troubleshooting through Browser via Web developer Network tool

In browser we checked which part of code was taking time to load using Network option in developer tools:

  • Select web developer tools in firefox
  • Then select network

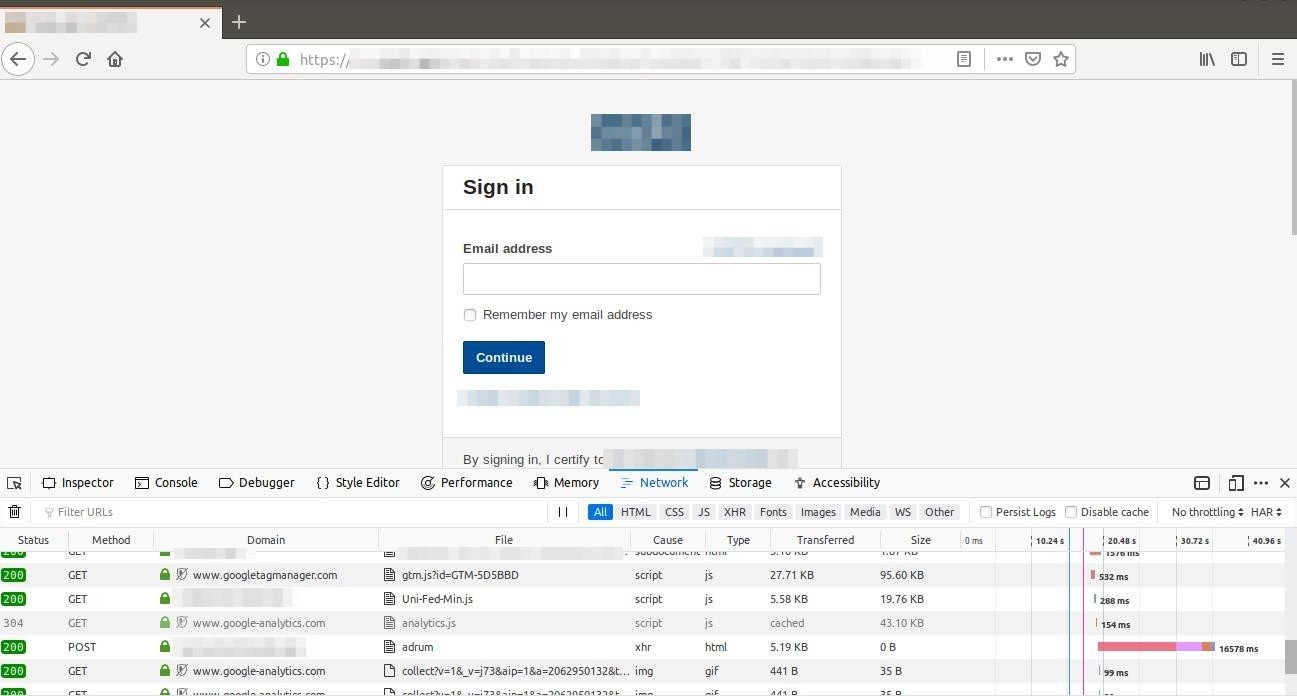
We identified one of the GET calls was taking time to load.
Then when this thing was reported to AWS support team they provided further analysis of this. We can save the report as (.HAR) file which tells us below things:

  • How long it takes to fetch DNS information
  • How long each object takes to be requested
  • How long it takes to connect to the server
  • How long it takes to transfer assets from the server to the browser of each object.

Troubleshooting using Traceroute

Then we tried to troubleshoot the AWS network flow using “tracert ” with below output:

Tracing route to example.gov [151.x.x.x] over a maximum of 15 hops:

1 <1 ms <1 ms <1 ms 10.x.x.x

2 * * * Request timed out.

3 * * * Request timed out.

4 * * * Request timed out.

5 * * * Request timed out.

6 * * * Request timed out.

7 <1 ms <1 ms <1 ms 100.x.x.x

8 <1 ms <1 ms 1 ms 52.x.x.x

9 * * * Request timed out.

10 2 ms 1 ms 1 ms example.net [67.x.x.x]

11 2 ms 2 ms 2 ms example.net [67.x.x.x]

12 2 ms 2 ms 2 ms example.net [205.x.x.x]

13 3 ms 3 ms 2 ms 63.x.x.x

14 3 ms 3 ms 3 ms 198.x.x.x

15 4 ms 4 ms 4 ms example.net [63.x.x.x]

And when this was reported to AWS team that RTO from 2-6 we were getting was due to connectivity with internal AWS network which needs to be byepass and was not an issue as packet still reached the next server within 1ms.

Traceroute gives an insight to your network problem.

  • The entire path that a packet travels through
  • Names and identity of routers and devices in your path
  • Network Latency or more specifically the time taken to send and receive data to each devices on the path.

Solution provided by AWS Team

After all the Razzle-Dazzle they just refreshed the network from their end and there was no more website latency after that while accessing from AWS internal network.

Tool recommended by AWS Support team for Network troubleshooting if the issue arises in future:

Wireshark along with .har file using network in web-developer tools from browser.

Wireshark is a network packet analyzer. A network packet analyzer will try to capture network packets and tries to display that packet data as detailed as possible.
You could think of a network packet analyzer as a measuring device used to examine what’s going on inside a network cable, just like a voltmeter is used by an electrician to examine what’s going on inside an electric cable (but at a higher level, of course).
In the past, such tools were either very expensive, proprietary, or both. However, with the advent of Wireshark, all that has changed.

Wireshark is perhaps one of the best open source packet analyzers available today.

Features

The following are some of the many features Wireshark provides:

  • Available for UNIX and Windows.
  • Capture live packet data from a network interface.
  • Open files containing packet data captured with tcpdump/WinDump, Wireshark, and a number of other packet capture programs.
  • Import packets from text files containing hex dumps of packet data.
  • Display packets with very detailed protocol information.
  • Save packet data captured.
  • Export some or all packets in a number of capture file formats.
  • Filter packets on many criteria.
  • Search for packets on many criteria.
  • Colorize packet display based on filters.
  • Create various statistics.

… and a lot more!

Git Inside Out

Git Inside-Out
Man Wearing Black and White Stripe Shirt Looking at White Printer Papers on the Wall

Git is basically a file-system where you can retrieve your content through addresses. It simply means that you can insert any kind of data into git for which Git will hand you back a unique key you can use later to retrieve that content. We would be learning #gitinsideout through this blog

The Git object model has three types: blobs (for files), trees (for folder) and commits. 

Objects are immutable (they are added but not changed) and every object is identified by its unique SHA-1 hash
A blob is just the contents of a file. By default, every new version of a file gets a new blob, which is a snapshot of the file (not a delta like many other versioning systems).
A tree is a list of references to blobs and trees.
A commit is a reference to a tree, a reference to parent commit(s) and some decoration (message, author).

Then there are branches and tags, which are typically just references to commits.

Git stores the data in our .git/objects directory. After initialising a git repository, it automatically creates .git/objects/pack and .git/objects/info with no regular file. After pushing some files, it would reflect in the .git/objects/ folder

OBJECT Blob

blob stores the content of a file and we can check its content by command

git cat-file -p

or git show

OBJECT Tree

A tree is a simple object that has a bunch of pointers to blobs and other trees – it generally represents the contents of a directory or sub-directory.

We can use git ls-tree to list the content of the given tree object

OBJECT Commit

The “commit” object links a physical state of a tree with a description of how we got there and why.

A commit is defined by tree, parent, author, committer, comment

All three objects ( blob,Tree,Commit) are explained in details with the help of a pictorial diagram.

Often we make changes to our code and push it to SCM. I was doing it once and made multiple changes, I was thinking it would be great if I could see the details of changes through local repository itself instead to go to a remote repository server. That pushed me to explore Git more deeply.

I just created a local remote repository with the help of git bare repository. Made some changes and tracked those changes(type, content, size etc).

Below example will help you understand the concept behind it.

Suppose we have cloned a repository named kunal:

Inside the folder where we have cloned the repository, go to the folder kunal then:

cd kunal/.git/

I have added content(hello) to readme.md and made many changes into the same repository as:

adding README.md

updating Readme.md

adding 2 files modifying one

pull request

commit(adding directory).

Go to the refer folder inside .git and take the SHA value for the master head:

This commit object we can explore further with the help of cat-file which will show the type and content of tree and commit object:

Now we can see a tree object inside the tree object. Further, we can see the details for the tree object which in turn contains a blob object as below:

Below is the pictorial representation for the same:

More elaborated representation for the same :

Below are the commands for checking the content, type and size of objects( blob, tree and commit)

kunal@work:/home/git/test/kunal# cat README.md
hello

We can find the details of objects( size,type,content) with the help of #git cat-file

git-cat-file:- Provide content, type or size information for repository objects

You an verify the content of commit object and its type with git cat-file as below:

kunal@work:/home/git/test/kunal/.git # cat logs/refs/heads/master

Checking the content of a blob object(README.md, kunal and sandy)

As we can see first one is adding read me , so it is giving null parent(00000…000) and its unique SHA-1 is 912a4e85afac3b737797b5a09387a68afad816d6

Below are the details that we can fetch from above SHA-1 with the help of git cat-file :

Consider one example of merge:

Created a test branch and made changes and merged it to master.

Here you can notice we have two parents because of a merge request

You can further see the content, size, type of repository #gitobjects like:

Summary

This is pretty lengthy article but I’ve tried to make it as transparent and clear as possible. Once you work through the article and understand all concepts I showed here you will be able to work with Git more effectively.

This explanation gives the details regarding tree data structure and internal storage of objects. You can check the content (differences/commits)of the files through local .git repository which stores each object with unique  SHA  hash. This would clear basically the internal working of git.
Hopefully, this blog would help you in understanding the git inside out and helps in troubleshooting things related to git.

My stint with Runc vulnerability

Today I was given a task to set up a new QA environment. I said no issue should be done quickly as we use Docker, so I just need to provision VM run the already available QA ready docker image on this newly provisioned VM. So I started and guess what Today was not my day. I got below error while running by App image.

docker: Error response from daemon: OCI runtime create failed: container_linux.go:344: starting container process caused “process_linux.go:293: copying bootstrap data to pipe caused \”write init-p: broken pipe\””: unknown.

I figured out my Valentine’s Day gone for a toss. As usual I took help of Google God to figure out what this issue is all about, after few minutes I found out a blog pretty close to issue that I was facing

https://medium.com/@dirk.avery/docker-error-response-from-daemon-1d46235ff61d

Bang on I got the issue identified. There is a new runc vulnerability identified few days back.

https://cve.mitre.org/cgi-bin/cvename.cgi?name=CVE-2019-5736

The fix of this vulnerability was released by Docker on February 11, but the catch was that this fix makes docker incompatible with 3.13 Kernel version.

While setting up QA environment I installed latest stable version of docker 18.09.2 and since the kernel version was 3.10.0-327.10.1.el7.x86_64 thus docker was not able to function properly.

So as suggested in the blog I upgraded the Kernel version to 4.x.

rpm –import https://www.elrepo.org/RPM-GPG-KEY-elrepo.org
rpm -Uvh http://www.elrepo.org/elrepo-release-7.0-2.el7.elrepo.noarch.rpm
yum repolist
yum –enablerepo=elrepo-kernel install kernel-ml
yum repolist all
awk -F\’ ‘$1==”menuentry ” {print i++ ” : ” $2}’ /etc/grub2.cfg
grub2-set-default 0
grub2-mkconfig -o /boot/grub2/grub.cfg
reboot

And here we go post that everything is working like a charm.

So word of caution to every even
We have a major vulnerability in docker CVE-2019-5736, for more details go through the link

https://cve.mitre.org/cgi-bin/cvename.cgi?name=CVE-2019-5736

As a fix, upgrade your docker to 18.09.2, as well make sure that you have Kernel 4+ as suggested in the blog.

https://docs.docker.com/engine/release-notes/

Now I can go for my Valentine Party 👫

Using Ansible Dynamic Inventory with Azure can save the day for you.

As a DevOps Engineer, I always love to make things simple and convenient by automating them. Automation can be done on many fronts like infrastructure, software, build and release etc.

Ansible is primarily a software configuration management tool which can also be used as an infrastructure provisioning tool.
One of the thing that I love about Ansible is its integration with different cloud providers. This integration makes things really loosely coupled, For ex:- we don’t require to manage whole information of cloud in Ansible (Like we don’t need instance metadata information for provisioning it).

Ansible Inventory

Ansible uses a term called inventory to refer to the set of systems or machines that our Ansible playbook or command work against. There are two ways to manage inventory:-
  • Static Inventory
  • Dynamic Inventory
By default, the static inventory is defined in /etc/ansible/hosts in which we provide information about the target system. In most of the cloud platform when the server gets reboot then it reassigns a new public address and again we have to update that in our static inventory, so this can’t be the lasting option.
Luckily Ansible supports the concept of dynamic inventory in which we have some python scripts and a .ini file through which we can provision machines dynamically without knowing its public or private address. Ansible Dynamic Inventory is fed by using external python scripts and .ini files provided by Ansible for cloud infrastructure platforms like Amazon, Azure, DigitalOcean, Rackspace.
In this blog, we will talk about how to configure dynamic inventory on the Azure Cloud Platform.

Ansible Dynamic Inventory on Azure

The first thing that always required to run anything is software and its dependencies. So let’s install the software and its dependencies first. First, we need the python modules of azure that we can install via pip.
 
$ pip install 'ansible[azure]'
After this, we need to download azure_rm.py

$ wget https://raw.githubusercontent.com/ansible/ansible/devel/contrib/inventory/azure_rm.py

Change the permission of file using chmod command.

$ chmod +x azure_rm.py

Then we have to log in to Azure account using azure-cli

$ az login
To sign in, use a web browser to open the page https://aka.ms/devicelogin and enter the code XXXXXXXXX to authenticate.

The az login command output will provide you a unique code which you have to enter in the webpage i.e.
https://aka.ms/devicelogin

As part of the best practice, we should always create an Active Directory for different services or apps to restrict privileges. Once you logged in Azure account you can create an Active Directory app for Ansible

$ az ad app create --password ThisIsTheAppPassword --display-name opstree-ansible --homepage ansible.opstree.com --identifier-uris ansible.opstree.com

Don’t forget to change your password ;). Note down the appID from the output of the above command.

Once the app is created, create a service principal to associate it with.

$ az ad sp create --id appID

Replace the appID with actual app id and copy the objectID from the output of the above command.
Now we just need the subscription id and tenant id, which we can get by a simple command

$ az account show

Note down the id and tenantID from the output of the above command.

Let’s assign a contributor role to service principal which is created above.

$ az role assignment create --assignee objectID --role contributor

Replace the objectID with the actual object id output.

All the azure side setup is done. Now we have to make some changes to your system.

Let’s start with creating an azure home directory

$ mkdir ~/.azure

In that directory, we have to create a credentials file

$ vim ~/.azure/credentials

[default]
subscription_id=id
client_id=appID
secret=ThisIsTheAppPassword
tenant=tenantID

Please replace the id, appID, password and tenantID with the above-noted things.

All set !!!! Now we can test it by below command

$ python ./azure_rm.py --list | jq

and the output should be like this:-

{
  "azure": [
    "ansibleMaster"
  ],
  "westeurope": [
    "ansibleMaster"
  ],
  "ansibleMasterNSG": [
    "ansibleMaster"
  ],
  "ansiblelab": [
    "ansibleMaster"
  ],
  "_meta": {
    "hostvars": {
      "ansibleMaster": {
        "powerstate": "running",
        "resource_group": "ansiblelab",
        "tags": {},
        "image": {
          "sku": "7.3",
          "publisher": "OpSTree",
          "version": "latest",
          "offer": "CentOS"
        },
        "public_ip_alloc_method": "Dynamic",
        "os_disk": {
          "operating_system_type": "Linux",
          "name": "osdisk_vD2UtEJhpV"
        },
        "provisioning_state": "Succeeded",
        "public_ip": "52.174.19.210",
        "public_ip_name": "masterPip",
        "private_ip": "192.168.1.4",
        "computer_name": "ansibleMaster",
        ...
      }
    }
  }
}

Now you are ready to use Ansible in Azure with dynamic inventory. Good Luck 🙂

Log Parsing of Windows Servers on Instance Termination

Introduction

Logs play a critical role in any application or system. They provide deep visibility into what the application is doing, how requests are processed, and what caused an error. Depending on how logging is configured, logs may contain transaction history, timestamps, request details, and even financial information such as debits or credits.

In enterprise environments, applications usually run across multiple hosts. Managing logs across hundreds of servers can quickly become complex. Debugging issues by manually searching log files on multiple instances is time consuming and inefficient. This is why centralizing logs is considered a best practice.

Recently, I encountered a common challenge in AWS environments where application logs need to be retained from instances running behind an Auto Scaling Group. This blog explains a practical solution to ensure logs are preserved even when instances are terminated.

Problem Scenario

Assume your application writes logs to the following directory on a Windows instance.

C:\Source\Application\web\logs

Traffic to the application is variable. At low traffic, two EC2 instances may be sufficient. During peak traffic, the Auto Scaling Group may scale out to twenty or more instances.

When traffic increases, new EC2 instances are launched and logs are generated normally. However, when traffic drops, Auto Scaling triggers scale-down events and terminates instances. When an instance is terminated, all logs stored locally on that instance are lost.

This makes post-incident debugging and auditing difficult.

Solution Overview

The goal is to synchronize logs from terminating EC2 instances before they are fully removed.

This solution uses AWS services to trigger a PowerShell script through AWS Systems Manager at instance termination time. The script archives logs and uploads them to an S3 bucket with identifying information such as IP address and date.

To achieve this, two prerequisites are required.

  1. Systems Manager must be able to communicate with EC2 instances

  2. EC2 instances must have permission to write logs to Amazon S3

Environment Used

For this setup, the following AMI was used.

 
Microsoft Windows Server 2012 R2 Base
AMI ID: ami-0f7af6e605e2d2db5

Step 1 Configuring Systems Manager Access on EC2

SSM Agent is installed by default on Windows Server 2016 and on Windows Server 2003 to 2012 R2 AMIs published after November 2016.

For older Windows AMIs, EC2Config must be upgraded and SSM Agent installed alongside it.

The following PowerShell script upgrades EC2Config, installs SSM Agent, and installs AWS CLI.
Use this script only for instructional and controlled environments.

PowerShell Script to Install Required Components

 
# Create temporary directory if not present
if (!(Test-Path -Path C:\Tmp)) {
New-Item -ItemType Directory -Path C:\Tmp
}

Set-Location C:\Tmp

# Download installers
Invoke-WebRequest "https://s3.ap-south-1.amazonaws.com/asg-termination-logs/Ec2Install.exe" -OutFile Ec2Config.exe
Invoke-WebRequest "https://s3.amazonaws.com/ec2-downloads-windows/SSMAgent/latest/windows_amd64/AmazonSSMAgentSetup.exe" -OutFile ssmagent.exe
Invoke-WebRequest "https://s3.amazonaws.com/aws-cli/AWSCLISetup.exe" -OutFile awscli.exe

# Install EC2Config
Start-Process C:\Tmp\Ec2Config.exe -ArgumentList "/Ec /S /v/qn" -Wait
Start-Sleep -Seconds 20

# Install AWS CLI
Start-Process C:\Tmp\awscli.exe -ArgumentList "/Ec /S /v/qn" -Wait
Start-Sleep -Seconds 20

# Install SSM Agent
Start-Process C:\Tmp\ssmagent.exe -ArgumentList "/Ec /S /v/qn" -Wait
Start-Sleep -Seconds 10

Restart-Service AmazonSSMAgent

Remove-Item C:\Tmp -Recurse -Force

IAM Role for Systems Manager

The EC2 instance must have an IAM role that allows it to communicate with Systems Manager.

Attach the following managed policy to the instance role.

 
AmazonEC2RoleforSSM

Once attached, the role should appear under the instance IAM configuration.

index

Step 2 Allowing EC2 to Write Logs to S3

The EC2 instance also needs permission to upload logs to S3.

Attach the following policy to the same IAM role.

 
AmazonS3FullAccess

In production environments, it is recommended to scope this permission to a specific bucket.

index

PowerShell Script for Log Archival and Upload

Save the following script as shown below.

 
C:\Scripts\termination.ps1

This script performs the following actions.

  • Creates a date-stamped directory

  • Archives application logs

  • Uploads the archive to an S3 bucket

Log Synchronization Script

 
$Date = Get-Date -Format yyyy-MM-dd
$InstanceName = "TerminationEc2"
$LocalIP = Invoke-RestMethod -Uri "http://169.254.169.254/latest/meta-data/local-ipv4"

$WorkDir = "C:\Users\Administrator\workdir\$InstanceName-$LocalIP-$Date\$Date"

if (Test-Path $WorkDir) {
Remove-Item $WorkDir -Recurse -Force
}

New-Item -ItemType Directory -Path $WorkDir

$SourcePathWeb = "C:\Source\Application\web\logs"
$DestFileWeb = "$WorkDir\logs.zip"

Add-Type -AssemblyName "System.IO.Compression.FileSystem"
[System.IO.Compression.ZipFile]::CreateFromDirectory($SourcePathWeb, $DestFileWeb)

& "C:\Program Files\Amazon\AWSCLI\bin\aws.cmd" s3 cp `
"C:\Users\Administrator\workdir" `
"s3://terminationec2" `
--recursive `
--region us-east-1

Once executed manually, the script should complete successfully and upload logs to the S3 bucket.

index

index

Running the Script Using Systems Manager

To automate execution, run this script using Systems Manager Run Command.

Select the target instance and choose the document.

 
AWS-RunPowerShellScript

Configure the following.

 
Commands: .\termination.ps1
Working Directory: C:\Scripts
Execution Timeout: 3600

Auto Scaling Group Preparation

Ensure the AMI used by the Auto Scaling Group includes all the above configurations.

Create an AMI from a configured EC2 instance and update the launch configuration or launch template.

For this tutorial, the Auto Scaling Group is named.

 
group_kaien

Configuring CloudWatch Event Rule

Create a CloudWatch Event rule to trigger when an instance is terminated.

Event Pattern

 
{
"source": ["aws.autoscaling"],
"detail-type": [
"EC2 Instance Terminate Successful",
"EC2 Instance-terminate Lifecycle Action"
],
"detail": {
"AutoScalingGroupName": ["group_kaien"]
}
}
 
index

Event Target Configuration

Set the target as Systems Manager Run Command.

 
Document: AWS-RunPowerShellScript
Target: Instance ID
Command: .\termination.ps1
Working Directory: C:\Scripts

This ensures that whenever an instance is terminated, the PowerShell script runs and synchronizes logs to S3 before shutdown.

index

Validation

Trigger scale-out and scale-down events by adjusting Auto Scaling policies.

When instances are terminated, logs should appear in the S3 bucket with correct date and instance identifiers.

index

Conclusion

This setup ensures that application logs are safely preserved even when EC2 instances are terminated by an Auto Scaling Group. Logs are archived with proper timestamps and instance information, making debugging and auditing much easier.

With this approach, log retention is automated, reliable, and scalable for enterprise AWS environments.

Stay tuned for more practical infrastructure solutions.